
How to install steam games to another drive. How to transfer Steam games without reinstalling them

There will come a time when you run out of space on your hard drive thanks to Steam games. Then you will need to either delete unnecessary ones, or simply transfer them to another HDD. Here's just how to do it if they are linked to the created library? There are ways, including those offered by the service itself.
As you know, after you have downloaded Steam, it creates a library where all toys are loaded. This is quite convenient from the point of view of systematization. However, it is then difficult for users to transfer the game to Steam to another disk: they have to delete it and re-download it. After all, if you just move the folder with the program to another location, the service will generate an error on startup. Let's look at three methods to avoid this error.
Powered by Steam
The service has recently added an option that allows you to automatically transfer games to another directory or to another HDD. It is not performed automatically, but nevertheless it is almost always trouble-free. You must first create another library, and then, through the properties of the game, transfer it to a new section.
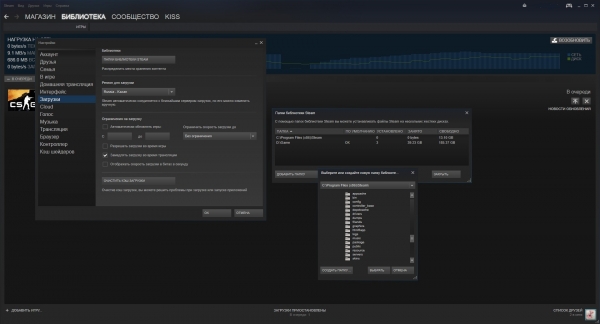
- Click on the Steam button located in the upper left corner.
- In the drop-down menu, select "Settings".

- In the settings window, we find the "Downloads" section.
- Below the Libraries item is the Steam Library Folders link. Click on it.

- In the list that opens, you can see a list of all directories and see how much space they take up. Click on the "Add folder" button.

"Add Folder" to Steam
- We select the hard disk and its section, which will contain the new library.

- Exit the settings and go to the list of installed games.
- Right-click on the toy you want to send to another location and select "Properties".
- Open the "Local files" tab.
- Click on the Move install folder button. She, by the way, was not previously in the service.

"Move install folder" on Steam
- In the window with the choice of the library, select a new location for our game.
- Click Move folder.

"Move folder" on Steam
- The transfer process starts. If the game is large, and the HDD or SSD is connected via USB, this may take some time.

- At the end, we will be told where we transferred the game and how many files were transferred.
Most importantly, do not turn off your computer while copying files. Otherwise, the transfer of games may get lost, and its data may be damaged.
The method appeared not so long ago, so some users may have difficulties with it. Plus, perhaps you haven't updated Steam for a long time and for some reason don't want to do it. Then there are two more alternative methods for you, one of which will be a little faster.
Steam Tool Library Manager
This is a special utility that automates the process of creating a library and transferring selected programs to it. Quite convenient, while taking up very little space and doing everything relatively quickly. If you need to transfer many toys at once, then it is better to use the Tool Library Manager.

That's all, as you can see, here it happens even faster. Games then, as a rule, are launched without any complaints.
Steam gaming service offers a convenient way to move games between HDD (SDD) without the risk of data corruption or loss
Previously, transferring a game to Steam from one disc to another required the use of third-party software. For example, the Steam Tool Library Manager, which, using links in the NTFS file system, moved games while maintaining full functionality.
Steam today offers a built-in feature for this. It is as easy as choosing a new installation location. By default, applications are installed in the C: Program FilesSteam (x86) SteamAppsCommon folder. However, you can choose another path.
First you need to create a new Steam folder on the disk where you plan to move the games. The service does not recommend using an external hard drive as it can cause performance issues.
Create a Steam Library Folder
First of all, to make changes to the Steam Library folder, you need to pause any downloads.
After that, click on "Steam" in the upper right corner of the screen, find "Settings" - "Downloads" - "Steam library folders".
In the window that opens, click "Add Library" and go to the choice of the disk on which the new library will be created. Click "New folder" and give it a name. Recommended name for SteamGames to make it easier to find.
Having decided on the name, click OK - "Select". This will select the folder you just created.
The location you selected should appear in the "Libraries Folders" folder list. If everything is visible, click "Close" and exit the settings.
Moving games to a new library
We have a second Steam library on a different disk where we can move games without worrying about losing game data.
We find the game that we want to transfer in our library. Click on it with the right mouse button and find "Properties" - "Local files -" Change installation folder ". Then a pop-up window will open where you need to select a new Steam library and click "Move folder", after which it will start the move process. When the indicator reaches the end, the Steam game will be transferred to another disc.

That's all. The process can be repeated as many times as necessary. Also, now when installing games, you can specify the location where you want to download games in the future.
Manual movement
You can also manually migrate your Steam library completely. To do this, close the service. Cut the SteamApps folder from its original location and move it to a new location. After launching Steam, log into your account and check the integrity of the game files. But do not forget to make a backup, if something goes wrong, all data may be lost. That is why we recommend using the built-in game movement function - safe and reliable.
Hey! Today there will be an unusual post useful for those who often reinstall the OS. How to transfer Steam games without reinstalling them.
What does it mean?
A friend has come to you, he does not have Dota 2 installed. You can copy the folder with Steam games for him from your computer and you're done!
You don't need to download anything again.
I will explain below how to do this. So, first you have to install Steam. By the way, if you install it where it was before (if it is not the C: / drive)
When you start it, you do not need to specify the installation of programs, it will pick them up by itself
Initially, if you just want to reinstall Windows and keep the programs, you need to copy the steamapps folder to another drive. For example, to drive D: / 
If you have all Steam games on the C: drive / you need to go to Program Files / Steam / 
Fine! After that, you need to launch Steam and start installing the games that you want to transfer. It is very important to change the default installation disk 
After you start downloading games, icons will appear on the desktop.
Super! Now log out of Steam completely 
The last step is to copy and replace the steamapps folder. 
Now we take the old steamapps folder (where the games were stored) and replace it with a complete replacement of the files
Or you can delete it from the Steam folder altogether. And then reload (the old copy of the steamapps folder - where the games were installed)
Ready! A complete example is shown in the video at the beginning.
So I copied my Dota 2 from Windows 8 to Windows Xp and from Windows Xp to Windows 10. No errors, everything was like clockwork. Therefore, I decided to write an article, it will come in handy for someone!
Remember, the owner of Steam used to work at Microsoft 😉
He took into account all the little things 😉
As long as you update your computer's hardware, you don't have to uninstall your existing Steam and reinstall all games from scratch. You can transfer your games to another computer using a few simple and not-so-great methods.
Please make sure you have a Steam username and password before starting this method. If you have any problems with your password, then we recommend that you check the connection of your Steam account with any of your email. Moreover, we also do not recommend that you install Steam on an external hard drive, as this can cause many problems in the future.
Step # 1 Creating a backup of game files
Before transferring Steam to your new computer, you need to back up every game in your library. If something goes wrong during the installation, then you can always simply recover.
However, keep in mind that many of the games use third-party apps and installers to work. If you have games of this kind, then the backup will definitely not work on them. This is especially true for MMO games, as they often only work with some kind of additional programs or launchers.
A Steam backup will not include your custom maps, saves, or config files. If you want to keep everything described, then go to the directory C: \ Program Files \ Steam \ SteamApps \ common \<имя игры> and copy the contents of the following folders:
- / cfg /- configuration files
- / downloads /- possible location of files related to multiplayer game
- / maps /- custom maps that are used for multiplayer mode
- / materials /- this folder can contain custom skins and textures
- / SAVE /- save for single player
After you copy these files and make the necessary backups, then you will need to return them to their original location.
- Open your Steam client and head to the Library tab. It will contain all of your purchased games.
- Right-click on the game you want and select "Back up ...".
- In the next window, select all the games you want to backup.
- Next, you need to choose where this entire backup will be saved. Choose the place from which it will be easiest for you to get to them.
- Steam will now ask you to choose between CD and DVD copy. If you have an external drive or USB storage, then we recommend that you use a DVD.
- After the end of the backup process, go to the previously specified directory where the backup of your games should have been saved, and transfer it to an external medium.
Step # 2 Moving Steam Files
Due to the fact that we have already backed up all the games you need, if something suddenly goes wrong, you can proceed to the next step - moving Steam to another computer.
- Click on the keyboard Windows + R.
- Enter taskmgr and press Enter.
- End in the Task Manager all processes that will be connected Steam Client Bootstrapper.
- Once all processes are complete, navigate to your Steam client directory. By default, it is located on section C.
- Find the following files and folders:
- SteamApps- folder
- Userdata- folder
- Steam.exe- executive file
- Delete everything from the Steam folder except as specified above.
- Copy the leftover folders and files to external storage and move them to the new computer on which you will be installing Steam.
- Start Steam using Administrator privileges and log into your account using your username and password.
What if an error appears?
You may face an error on Steam if you start moving some files in it, which is associated with some technical difficulties. But do not worry, because in this case we have a list of actions that will help you get out of this situation. First of all, you need to completely uninstall your Steam so that we can reinstall it later. There are two ways to remove it: through the Control Panel and through the Windows Registry Editor.
Uninstalling Steam via Control Panel
- Complete all the processes of the Steam client, as already shown in the previous paragraphs of the article.
- Go to your Steam directory.
- Move the folder SteamApps to your Desktop or any other point convenient for you, and then delete it from the Steam folder.
- Click on the keyboard Windows + R, write control panel and press Enter.
- Go to "Programs and Features".
- Find Steam in the list of installed programs and uninstall it.
Uninstalling Steam through Windows Registry Editor
When we deal with the Registry, we need to be very careful not to damage anything there. If this is done, then the entire performance of the entire system may be disrupted.
- First, delete all files from your Steam root folder.
- Click on the keyboard Windows + R, write in regedit and press Enter.
- Go to the directory:
- HKEY_LOCAL_MACHINE \ SOFTWARE \ Valve \- for 32-bit systems.
- HKEY_LOCAL_MACHINE \ SOFTWARE \ Wow6432Node \ Valve \- for 64-bit systems.
- Right click on Valve and select "Delete".
- Close Windows Registry Editor.
Step # 3 Install Steam
Since we have already uninstalled Steam again, it's time to start reinstalling it on Steam. You shouldn't have any problems with this. If you backed up the games as indicated in the previous paragraphs of the article, then you can easily restore the games without downloading them.
- After installing the client on your computer, click on the Steam button in the upper left corner of the window.
- From the context menu, select "Back up and restore games ...".
- You will be presented with two choices. Select "Recover from backup".
- After that, Steam will ask you to specify the directory where the backups of the games will be located. Once you do this, Steam will automatically find the game and start the process. Also, be aware that the client may download some small files or folders from the network during this process in order to complete the recovery process.
Found a typo? Select the text and press Ctrl + Enter
The capacity of solid state drives (SSDs) is constantly increasing, but the size of games is also increasing. Modern AAA projects usually take up to 20 GB, and many of them can exceed 60 GB, especially after taking into account the downloadable content.
It may be ironic, but it is the large games that load better on fast media, which surprisingly soon becomes full, especially when dealing with a small SSD, for example, 250 GB. This disc can hold 4 games, comparable in size to GTA V.
Fortunately, Steam has made it easy to move games around. you no longer need to open a Windows command prompt or load third-party utilities, although we will also look at these methods as they still work.
This procedure is optional, but it is a good precaution. The most convenient way is to simply copy the Steam or SteamApps folder (which contains the games) to the backup folder via Windows Explorer. The Steam client also provides a built-in backup and restore process that allows you to select your installed games and save them as backups. This utility splits game data into CSM / CSD files, which are the same size as CD and DVD. It is also possible to select one large save at once.
To do this, you need to: go to the Steam library> right-click on the game> create a backup ...> Select games to backup and follow the instructions.
To restore these files as installed Steam games, you need to go to the Steam library> back up and restore games ...> Restore a previous backup> specify the backup files> follow the prompts.
Moving one game between discs
- Go to Steam> Settings> Downloads> Steam Library Folders
- Create a new Steam library folder on the new drive (you can right click on one of these folders to select it as the default install path, although the next time you install, Steam will ask for the install path).
- Moving an already installed game to a new disc:

Right click on the game in the Steam library> properties> local files> move install folder ...> select path> move folder
Moving a game from an SSD
The most in a simple way will do all of the above by using built-in Steam functionality. However, this method also works:
- In Windows Explorer, move the game folder from your SSD back to the steamapps \ common folder or another library folder that Steam recognizes.
- On Steam, right click on the game and delete its contents, which won't actually delete anything since you've just moved all the game files.
- Install the game again, but specify the installation path where you moved the files. Steam will verify the data and will not download anything.
Moving the entire Steam folder
- Close Steam and navigate to your Steam folder or library via Windows (most likely C: \ Program Files \ Steam (x86)).
- Copy and paste the Steam folder to a new location (rename the old folder and keep it as a backup or delete it).
- You can run Steam.exe from a new folder, or you can run the Steam installer and specify a new location.
Something went wrong with the Steam installation
- Copy and paste the SteamApps folder to your backup folder
- Remove Steam
- Install Steam and copy the SteamApps folder back to the Steam directory
If the game is damaged, Steam can check the integrity of the files:
Right click on the damaged game in the Steam library> properties> local files> check the integrity of game files ...
If it has been a while since you did this, make sure the process is not slowing down Steam.
Old method (no longer required): using mklink
Around the time SSDs started to gain traction (over a decade ago!), Steam didn't have a built-in method to move games between drives. This feature was only added in 2017. Instead, gamers had to use the Windows command line, mklink, which linked one directory to another, so when the software accessed location A, it was redirected to location B. In other words, Steam recognized the game as if it was installed in original directory, but ran it from a different drive.

Now this method is deprecated, although it still works:
- Create a folder for the desired game installation path (for example D: \ Games \ Steam)
- Go to SteamApps (C: \ Program Files \ Steam \ steamapps \ common) and copy the game you want to move to the new disk (don't leave the game in the old directory)
- When copying is complete, go to the command line and enter mklink / d “LINK” “TARGET” - (for example: mklink / d “d: \ games \ steam \ steamapps \ common \ fullmojorampage” “e: \ games \ steam \ steamapps \ common \ fullmojorampage ")
Unlinking such a link is as easy as deleting it in C: \ Steam \ steamapps \ common.
Hint: you should be able to see the link by entering the dir command.
Other old utilities for moving / copying games
Download Steam Mover- Before Valve came to this, it was possible to move games using this utility. The program has a simple interface and can easily move games or create links (for example, the mklink approach described above). Version 0.1 of Steam Mover was released in April 2010, and although it has never been updated, it has been downloaded hundreds of thousands of times and few have complained about the utility's performance.

Download SteamTool Library Manage- In terms of functions, it is identical to Steam Mover, it has the same interface and methods. The program uses NTFS connections to create a link between the new and old locations (the utility only works with NTFS partitions).
Download Gamesave Manager - GSM can automatically detect saves for 4764 games and greatly simplifies the processes of copying, restoring and moving. The utility also provides other features, including the ability to move Steam games (it also uses NTFS links or connections).
Related publications
-
 Solving tasks on topographic maps and plans
GENERAL INFORMATION OF REAL ESTATE OBJECTS MAPS AND PLANS USED IN CREATING THE INVENTORY DOCUMENTATION in the Federal Law of the Russian Federation "On ...
-
 Design and research work "the influence of outdoor games on children's health" The influence of sports games on the human body
Influence of outdoor games on health and development of physical qualities in children of primary school age. Physical education teacher Sidorova ...