
Walkthrough Vikings Wolves of Midgard. Walkthrough Vikings: Wolves of the Midgard Walkthrough Viking wolves of midgard

In this article, we will take a closer look at the walkthrough of Vikings: Wolves of the Midgard: how to find iron skulls, all artifacts, complete additional tasks and many other nuances of the game.
Walkthrough Vikings: Wolves of the Midgard. Village
In this location, you will spend time between missions improving your hero, pumping skills, buying new weapons and selling various loot. First you have to improve the altar on the left side. At the expense of blood, you will increase the level of your hero every time.
Chapter 1
Each mission has a main and several additional tasks. In the first chapter, you will be asked to find three skulls and kill 30 goblins (Tomte). There are exactly the same number of goblins at the location as stated in the task. Just walk around the location and kill all opponents.
A few tips for the game at once, including controls, objects of the world, etc.:
- Attack - LMB.
- Roll - "Space".
- Movement - WSAD.
- Try to break everything you see - this way you will find wood and gold, later - iron.
The beginning of the passage of the game in the video:
Moving forward, stick to the right side of the screen to find the first skull chest.
After killing a large enemy, again go to the right side of the screen and look behind the fence for a barely visible chest with a second skull.
Learn about the totems of healing, a little later - about the altars. To heal, press the Tab key.
Follow the markers, kill the enemies and save Heldebrand. Having done this, a few steps to the top of the location, find the chest with the third skull. Helga will be in the upper left corner of the map - kill the tomte and return to the main door.
Chapter 2 walkthrough Vikings: Wolves of the Midgard. End of Yokul
At the bottom left of the screen, you can see a gradually filling circle - this is rage. It is best to save it for the final part of the episode, when you have to fight Yokul.
Video walkthrough of the second mission:
For additional objectives, you need to find 3 skulls, kill 2 Jotuns and destroy 10 idols.
Skulls are hidden inside gold chests, while regular chests contain other loot. In total, you will find 4 chests of golden color at the location. It is not so easy to get to one of them - it is located on a remote rock, the path to which is possible only if the bridge is raised.
According to the Jotuns, everything is simple - exploring the location, you will definitely find them both.
To get to the chest on a separate rock, you need to raise the bridge. The bridge is raised by activating ALL levers - there are a total of 5 of them. Inside the chest is the first part of the Skadi Bow artifact.
THE NOTE. In the game, you can find and collect 4-5 artifact weapons. Each of them is divided into 3 parts. They are hidden in the area. Some you will find without any problems, others you can find only if you are careful.
Each of the five levers is hidden inside the tall towers, behind wooden planks in a niche. Not so easy to notice, but if you know what they look like, then the task will be greatly simplified.
Check out the map below:
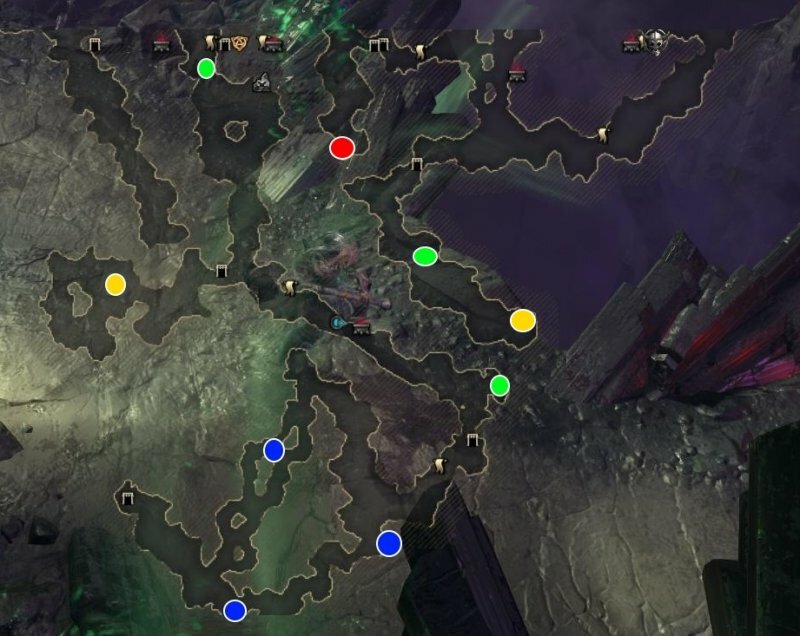
Yokul's End Map
Campfires are marked with yellow dots on the map, where you can warm yourself.
 The End of Yokul Map (Part 2)
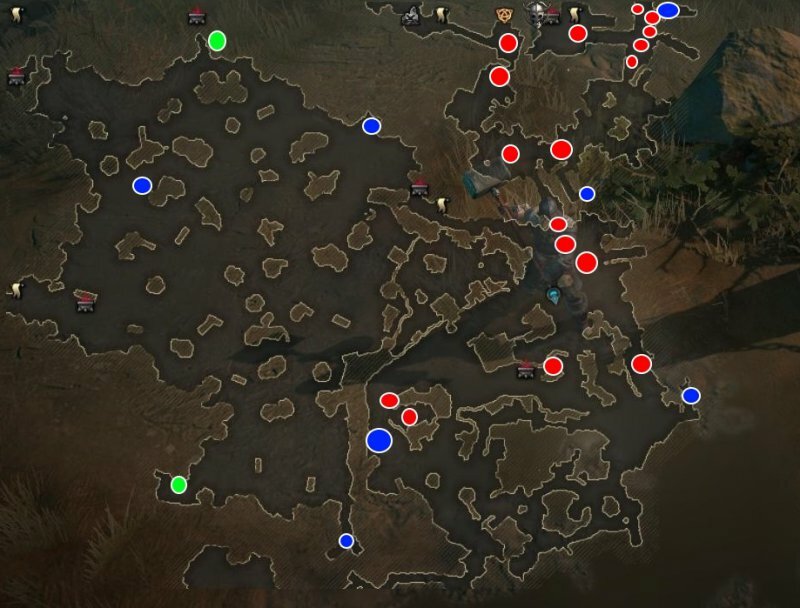
 - Blue - Jotuns.
- Green - chests with skulls.
- Blue markers are Yokul idols.
- Black - levers.
- Red - a golden chest with a piece of Skadi's Bow.
Inside the cave, you will have to fight Yokul. The boss creates ice spheres that explode in certain places in the location. Recognizing them is easy enough. If you hit the explosion, you will freeze for a few seconds.
Don't forget to stand on the yellow circles to keep warm. Hit Yokul's throne - this is the only way to kill the boss. After the throne is destroyed, beat Yokul.
Chapter 2
You will be asked to find 3 skulls, kill 15 hounds and destroy 10 Swanung banners. You can also find a chest with the legendary Harp accessory.
First of all, check out the location map:
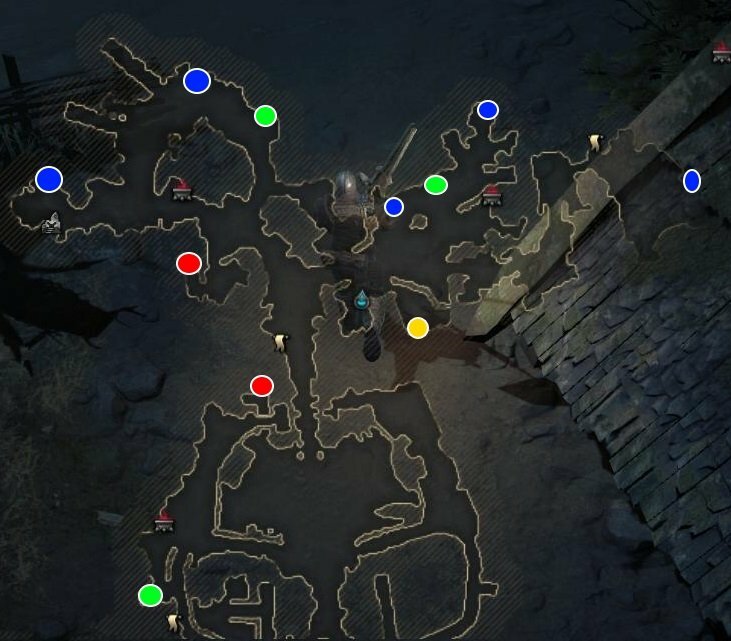
 Map "Old Enemy"
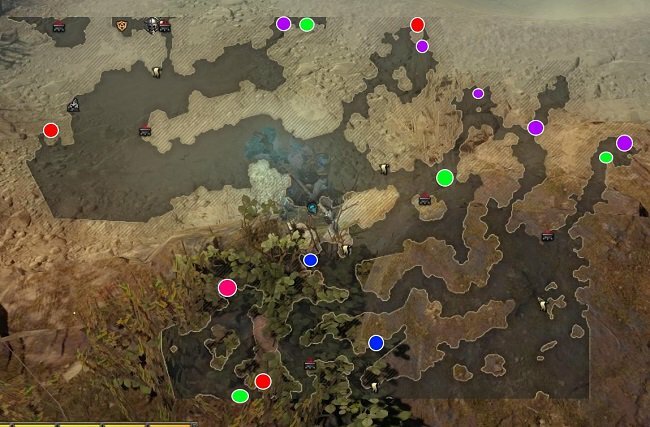
 - The green ones are the banners of Swanung.
- Red markers are skulls.
- Blue - psari.
- Yellow - a chest with "Gusli" (look in the grass).
According to the plot, run to the left and get acquainted with new enemies. Shielded opponents are dangerous opponents if you don't know how to deal with them. Here you need to either run away, or wait for them to release the shield in order to carry out an attack. If you freeze the enemy holding the shield, you still have to attack him exclusively from behind.
Examine the gate, which will be locked. Follow the marker to the left, into the swamps. Destroy the temple to get to the territory of the settlement. Follow the jarl's house and kill him after you destroy the spearmen. At the end of the battle, you will be able to make a choice - take 5000 gold at a time or get 1000 each time you complete a mission.
Chapter 3 walkthrough Vikings: Wolves of the Midgard. Horror of Fangskar
Interact with the drakkar (boat) to start the quest. For additional targets, you need to kill 320 fenwaits, destroy 30 huts (Tomte hats) and find 3 skulls.
Fenwaites are enemies that appear in the water. There will be more of them than you need to kill. Just
You will find 4 or 5 Tomte huts before you get inside the cave. The rest will be inside it. There are 31 huts in total, when you need to destroy 30. Be careful and you will succeed!
On chests with skulls: two of them will be outside the cave. But first kill Grindan. When the goblin jumps, roll to the side or you will be stunned. From time to time, you will have to fight with ordinary Tomte, while Grindan will hide in the shadows. After destroying it, you will receive a part of the artifact - the handle of the Lavatein.
After killing the enemy, go through the gate and go to the left side. There will be water here. Enter the water and kill the Fenwaites. At the end you will find a chest with a skull. The second chest is located closer to the right side of the map, on the other side, but not far from this place. Again, you have to enter the water, kill the fenwaites and search the chest.
You cannot get inside the cave - the path is closed. But in fact, everything is quite simple. You see various symbols on the stone, which blocked the way inside. Remember them. There is one disk on the left side of the entrance, and three more on the right. On these disks, from left to right, you need to set the correct combination of characters.
Go left inside the cave and kill the Troll to get the legendary Sviagris ring.
The chest with the third skull is hidden inside the cave. Just follow it to the top left.
When you complete all the tasks, then follow the marker to Grindil, Grindan's mother. Dodge her attacks and try to destroy the spawning totems as soon as possible (they will constantly heal Grindil). When it disappears, deal with simple enemies, trying not to get into green circles.
In the end, you must win.
Village
A runesmith named Frakki will appear in the village. Runes found through the blacksmith can be installed in weapons with empty slots. To do this, go to the upper left of the village. This is where Helda will appear. If you talk to her, you can pass the tests. The more waves you survive, the better the prize will be.
Chapter 3
Additional objectives include finding 3 skulls, killing 20 female warriors, and destroying 10 banners.
See it all on the map:
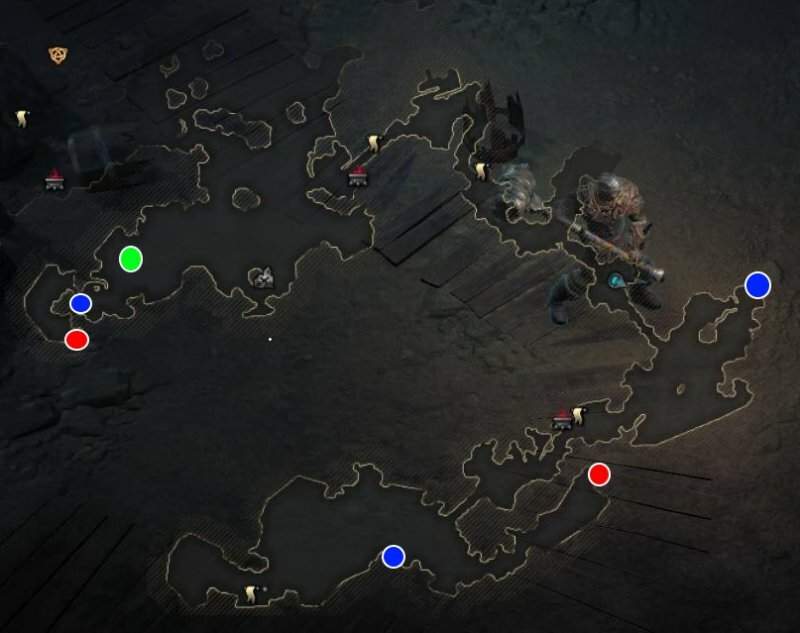
 Iron Fist Card
  Iron Fist Map (Part 2)
 - Green - skulls.
- Red markers are warriors.
- Yellow - a chest with a legendary talisman.
- Blue are banners.
The first skull chest is hidden at the top of the swampy area. There will be a path inside the alcove that is hard to see.
According to the plot, go to the gate, which will be locked. Kill opponents and move to the left, to the swamps. Deal with the enemies and make your way even further to the left to find a snowy area. There is only one bonfire here. Therefore, first clear the location, step by step, returning to the fire to warm up.
You will find the entrance to the cave. Inside it, talk to the trapper and carefully go around the spikes. Climb onto the wooden structure in the background, but don't rush to go anywhere. Here you can find the legendary talisman. Find the three glyphs depicted on the wall on the right. It looks like there used to be a bridge here. Remember the glyphs. Find in the background, at the top, a wall with an active point. Use it to get to another part of the cave.
Go to the closed door. Above it there are combinations of four symbols. Enter it on the stone disks on the left side. Follow the corridor with logs. Behind each of them will be a stone disk. Enter on three disks the combination that was mentioned earlier when you first entered the cave.
Entering the code is completely optional. But if you do, you will receive the Talisman of Hel. Go to the room that has opened, and get useful items from the chest, including the talisman. Deal with the enemies and go back. Now you need to defeat the boss - the Iron Guard.
Choose equipment that will increase your fire resistance. Even if we are talking about an ordinary ring that gives 10%. It will be better than the legendary one, which gives more, but different protection.
Talisman of Hel will allow you to damage the enemy with dark energy, since ice and fire are useless here. Among other things, Hel restores your health. Attack the enemy and dodge to the side. Beware of his fiery breath. Run back more often, because periodically the Guardian explodes. There will be iron fingers nearby - they must be destroyed.
Having won, you will again be able to decide the fate of the settlement - 250 iron immediately or 50 after each mission.
Chapter 3. Revenge
In the giants' lair, you need to complete the following side quests - find 3 skulls, kill 9 witches and destroy 15 idols.
At the location of all this, nothing more, nothing less:
 Revenge Card
  Map "Revenge" (part 2)
 - Blue - skulls.
- Green markers are witches.
- Reds are idols.
In this mission, you can find 2 pieces of artifacts. Once in the troll cave, follow closer to the left side of the screen. Soon you will find a passage that will lead to a dead end. There will be a strong witch with protection from darkness. Deal with her to take the artifact piece from the Mjolnir hammer.
Part of the artifact shield "Priven" you will find after the cave. After leaving it, move along the left path and find a turn to the left on the side. Roll up and closer to the top of the screen, find a passage hidden behind a log. Destroy the logs and take the enarms from the "Priven" shield from the chest.
The storyline is easy to get through! Kill the trolls and move towards the boss. When you leave the cave, you will have to solve a puzzle with levers. Just flip the levers to move the lava to the buckets that are next to it (down).
This will lift the stone and you will be able to fight Scully. During the fight, stay on the edge of the area and wait for Scully to run towards you. Dodge using dash and then hit the boss 2-3 times. Run away and repeat. Archers will be easier.
Chapter 4 walkthrough Vikings: Wolves of the Midgard. Pair runes
For additional targets - 3 skull, 10 elite soldiers and 10 wagons.
You will find elite soldiers without much effort - just clear every corner of the location. All of them are hiding in the open area - there will be nothing secret here.
But finding wagons and a chest with skulls will be more difficult. The hardest thing to find is the third chest, which, as it turned out, most likely will be the first for you. There is a chest inside the jarl's house, in which you will appear as soon as the quest begins. Just go to the wall on the right and find a chest with a skull.
The second chest is located inside the fortress - there will be a single bridge leading up the wall. There is a chest there. Find the last skull near the shore in the lower right part of the map.
Take a look at the map:
 Card "Dual Runes"
 - Red markers are chests.
- Blue - wagons.
On the territory of this location, you can also find the fourth chest, inside of which lies the talisman of Heimdall. With it, you can scare the enemy and deal damage with dark magic. When you get out of the village and get on the shore, then follow to the upper right side of the map. Find a pier with a ship. Climb up the ladder to the ship and take the talisman from the chest.
According to the plot, kill the enemies and move to the marker. Follow back to use the passage. Go to the catapults and destroy them. Then go to the boss and kill him. This is an easy opponent. The only difficulty may be that he wields a shield and summons a golden boar.
Chapter 4. The Bishop's Gambit
For additional objectives, you need to find 3 skulls, destroy 10 wagons and kill 15 priests. Let's take a look at the map:
 Bishop's Gambit Card
 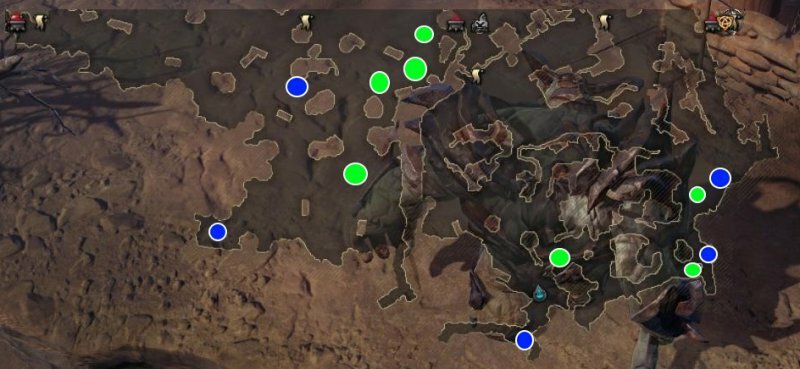 Bishop's Gambit Card (Part 2)
 - Red markers are skulls.
- Blue - wagons.
- Greens are priests.
There will be no artifacts or legendary items at the location.
Follow inside the cave, go down to the traps and find a hole. Click on it to talk to the trapper. You can decide whether to help him or not. Go to the swamp and follow the marker. After talking with the witch, you will turn into an Iron Guard. Destroy everything in your path and destroy the gate.
Having won, talk to the Witch and take the runestone. The next tasks are waiting for you behind the portal.
Chapter 5 walkthrough Vikings: Wolves of the Midgard. Tunnels and Trolls
You need to complete 3 goals - deal with 10 Jotuns, destroy 8 idols and find 3 skulls.
To get started, take a look at the map below:
 Map "Tunnels and trolls"
 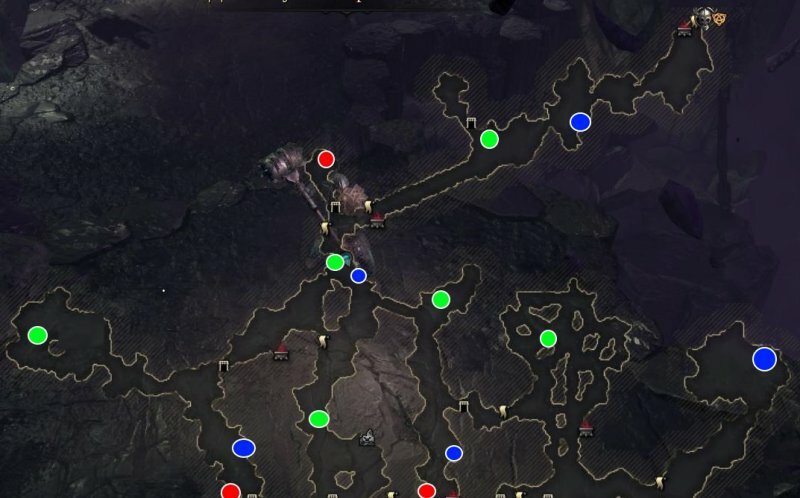 Map "Tunnels and trolls" (part 2)
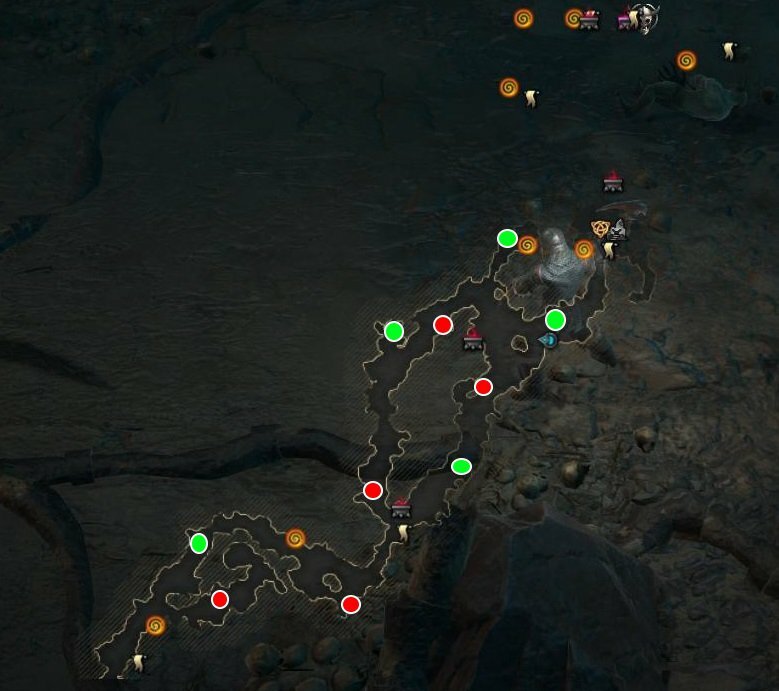
 - Green - Jotuns.
- Blue markers are idols.
- Red - skulls.
- Finally, during the mission, you will have the opportunity to find two legendary items - yellow markers.
To get the first item, deal with the troll (yellow marker in the left corner of the map). It will not be easy to win, but as a reward you will receive the legendary ring of the Nibelungs. As for the legendary talisman Hoder, look for a chest marked with a yellow marker.
According to the plot, go from one checkpoint to another. Turn the mechanism, moving clockwise to open the way further. Go to the marker, passing into the cave in order to remove the poisonous effect.
The gate will be closed. The mechanism from them is broken and you have to go in search of three parts. First go left and inside the cave, deal with Jotun. It will drop the first part. The rest of the details will also fall out of the Jotuns. By the way, these Jotuns are marked on the map with green markers.
After opening the gate, go to the boss. Grindil will fight with you again. Deal with her using the same tactics, not forgetting the totems. After the victory, a Jotun anvil will appear in your village. It allows you to improve the gunsmith and blacksmith. After the quest, it will be possible to make deals with the merchant.
Chapter 5
Side goals - finding 3 skulls, rescuing captives (five cells, not five people) and destroying 5 temples (one might say, totems or idols).
Check out the map below:
 Map "Flotnar"
  Map "Flotnar" (part 2)
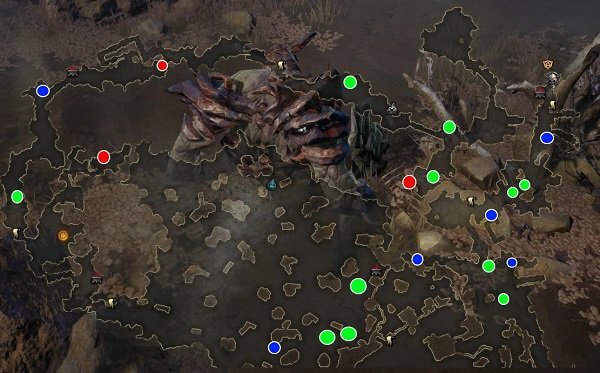
 - Green - temples.
- Red markers are chests.
- Blue are prisoners.
According to the plot, go along the coast and kill ordinary and giant crabs. By the way, the latter are a kind of opponents with shields. Go to the gate to make sure it's closed. On the left side there is a climb to the wall. The same is located on the right side of the gate. Both paths will lead to two guns - shoot these guns at the gate to destroy them.
In the village there is a chest with the legendary talisman of Odin. To find it, find a crack in the fence, destroy it and climb the hill. The chest is by the building on the left. Four of the five cells will be located behind the destroyed gate. But opening the fifth cell is more difficult - go to the right and pull the lever located on the corner of the building (in any case, the place is indicated in the screenshots above).
The third skull chest is located near the boss area. When you are told that it is necessary to raise the grate, then do not rush. Approach the wooden platform on the left side, where the abyss is, and then pull the lever. A second platform will appear with a chest on it.
Once you get to the locked grate, go to the left side and climb the wall. At its end on the right side there will be a lever. Pull on it to raise the grate.
Go to the courtyard and kill three enemy units. Pick a moment to destroy the ballistas. When you kill everyone, the mission will end with a conversation with Fardain.
Chapter 6 walkthrough Vikings: Wolves of the Midgard. Castra Ignis - Viking Robbery
Side objectives - 3 skulls, 5 giant crabs and 10 towers.
Check out the map below:
 Map "Robbery in the spirit of the Vikings"
 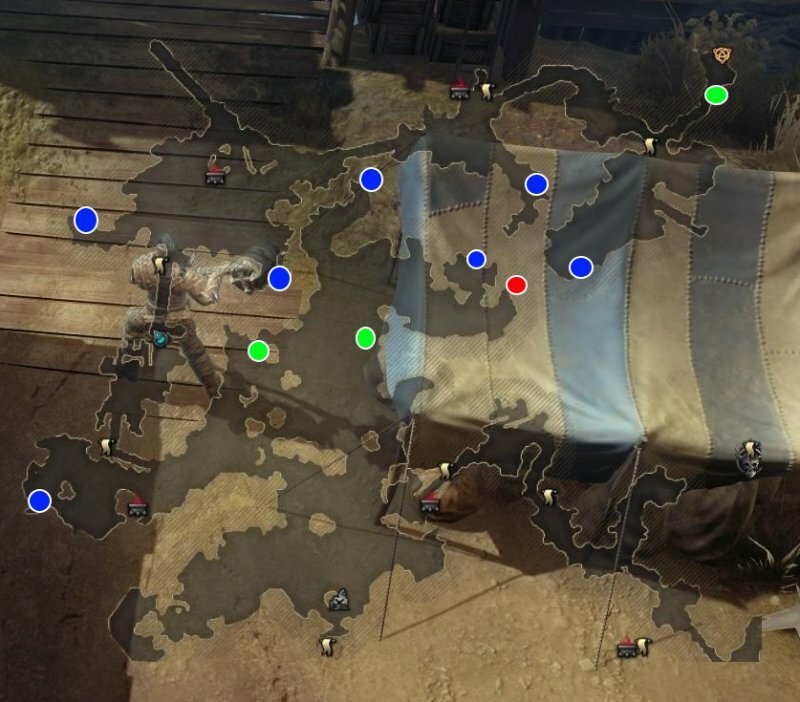 Map "Robbery in the spirit of the Vikings" (part 2)
 Red markers are skulls.
Green - crabs.
Blue - towers.
During the quest, two artifacts can be found. There is only one cave on the location! Inside it you will find a closed grate. You need a key to open it. The rusty key (namely, that's what it's called) lies in a chest located on the boat. After leaving the cave, go up, keeping to the right side (water). Here you should notice a boat tied to a stick. Destroy this stick (pole) and wait for the boat to dock at the pier. Go to it and take out the key from the chest. Return to the cave, open the grate with the key and take the Lavatein blade (artifact) from another chest.
The second artifact is the “Priven” shield bump, located at the Crusader, whom you will meet if you study the left side of the map.
In the story, go through 4 posts and kill the enemies. After raising the bridge, step back and turn right. The path will lead you to a cave. Use the portal to get to another cave. Go to the battlefield.
During the fight, when you kill all the enemies, the game may freeze - just nothing will happen. If so, then reload and die in the arena, losing to the troll. Load the last save and defeat the enemy this time. The mission should end automatically.
Chapter 6
Side quests - 3 skulls, 30 whiters, 6 menhirs.
Menhirs are structures made of stone, somewhat similar to idols. There are more Whitehirs at the location than you need to kill, so they are not considered in the screenshots below:
 Map "Sigurd's Ring"
  Map "Sigurd's Ring" (part 2)
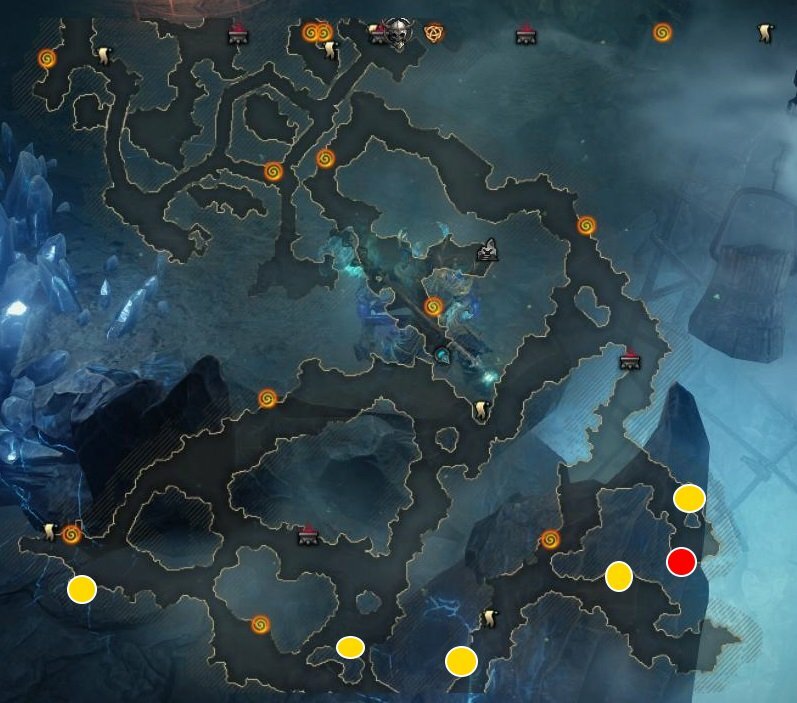
 - Red markers are skulls.
- Yellow - menhirs.
On the map there is a secret path leading to a difficult opponent. For defeating him, you will receive a part of the artifact - the shoulders of the Skadi Longbow. As part of the passage, the mission is divided into three stages.
Each of them will offer you to find a way to open a passage through the mound. Usually we are talking about a code combination that is entered on stone disks. You should be familiar with this type of puzzle.
In the first stage, two disks are located on the left side of the passage, and the other two are on the right. The combination is set from left to right, as usual.
At the second stage, everything is the same, there will just be more empty trenches.
At the third stage, you will not only have to remember the correct combination, but also pay attention to what position certain symbols occupy on the disks.
For example, if earlier the arrow was pointing up all the time (it was exactly opposite the arrow that the correct symbol had to be set on each disk), now it will be directed down. The position of the symbols also changes.
And here is the correct solution in turn from the left disk to the right one:
- "Arrow" at the bottom of the disc (i.e. if you leave the arrow up, it will point up, but in combination - down).
- The letter F is at the top.
- Letter X at the bottom.
- |X| on right.
After that, fight Sigurd. Try not to linger in the circle for a long time, otherwise you will receive damage from dark energy.
Chapter 7 walkthrough Vikings: Wolves of the Midgard. Simul - Fire Camp
Side quests - 3 skulls, 15 priests, 10 temples. Check out the map:
 Fire Camp Map
  Map "Camp of Fire" (part 2)
 - Red markers are skulls.
- Yellow - temples.
You will find priests in any case if you kill all the enemies you meet on the way.
The first chest is in a niche inside the cave, covered with boards. The other two skulls are hidden inside the boarded-up buildings on the territory of the fortress.
In the forge you will see a gate with two bolts. On the right there is the first lever. After activating it, go left and follow above to get to the left side of the gate. Here you will find the second lever. Go to another gate and go down and to the left, where there is a wooden wall. Fire the ballista to destroy the gate. While avoiding the white circles, hit the Bishop at the moment when he does not have a protective barrier.
Chapter 7
Side objectives - 3 skulls, 3 menhirs and 3 guardian doors.
You will meet Dvergs anyway, but on the map below their location is still indicated. The first chest is hidden - on the corner of the stone wall there is a slab with a shimmering hole. Destroy it and take the skull from the chest.
And here is a map of the area:
 Simul Lair Map
 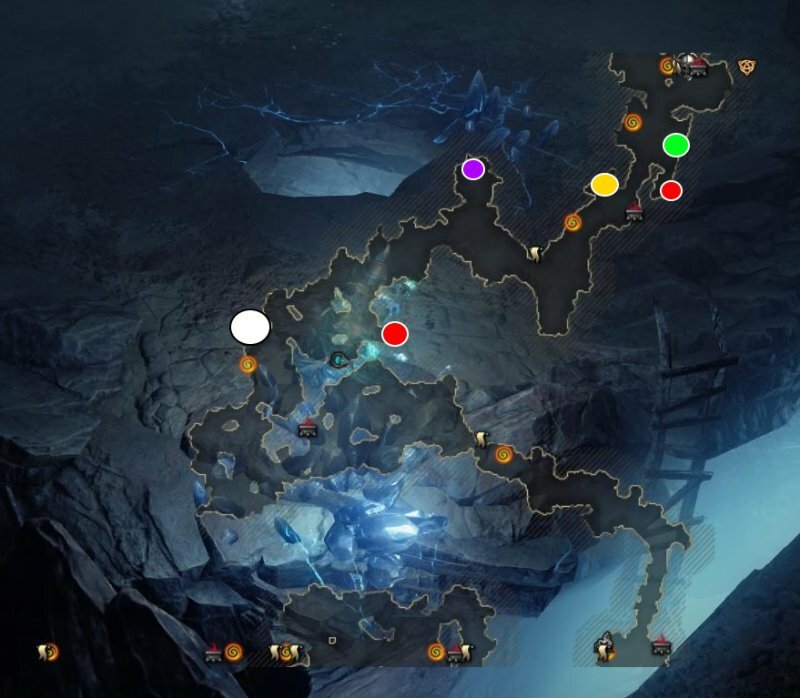 Simul Lair Map (Part 2)
 - White - a chest with the legendary talisman "Braga", which puts opponents to sleep.
- Green - doors.
- Red markers are skulls.
- Yellow - menhirs.
- Purple - a chest with an artifact (Gyungnir's blade).
To get to the artifact, you need to remove the stone pillars. You can click on each of them to raise and lower. You need the correct combination, which is visible at the beginning of the location. After killing the dverg, white sticks can be found on the wall, and some of them will be crossed out.
From left to right, you need to highlight the following columns - 2, 4, 5, 7.
Chapter 8 walkthrough Vikings: Wolves of the Midgard. Imperial Navy - Knife in the Dark
Side objectives - 3 skulls, 20 Tomte huts, 5 jarls.
There will be exactly 20 huts on the location, so we will mark it. The last one is hidden behind a large door.
To find all the huts, at the beginning, go up to the right. There will be two caves here. The right one is deaf, and through the left you can go right through. There will be a total of 11 huts in both caves! If you find less, then study them more carefully.
You will also pass through 3 more caves - without fail if you follow the markers. There will be 6 more huts. Already 17.
The two penultimate huts are not in caves, so we have indicated them on the map below.
You will destroy the last hut after the big door is opened. To find it, at the beginning of the location, go upstairs and go into the left, through cave. It will have a large locked door. Behind it is hidden a hat and a chest with an artifact - a handle from the Mjolnir hammer.
In order to open the large door, you will need to find 4 levers. There are the same number of caves on the map and each of them has a lever. This cave is no exception!
The first skull is hidden behind the boards inside the rock, the second - behind the stone in the cave, the third - in the water near the altar that increases the level of the character.
The legendary golden ax is hidden in a chest guarded by a crab. See map:
 Knife in the Dark card
 - Red markers are skulls.
- Blue are huts.
- Green - jarls.
- Pink - a chest with a golden axe.
- Purple - four levers and a door.
Chapter 8
Side goals - 3 skulls, 20 trolls, 10 menhirs.
 Map "The path to darkness"
 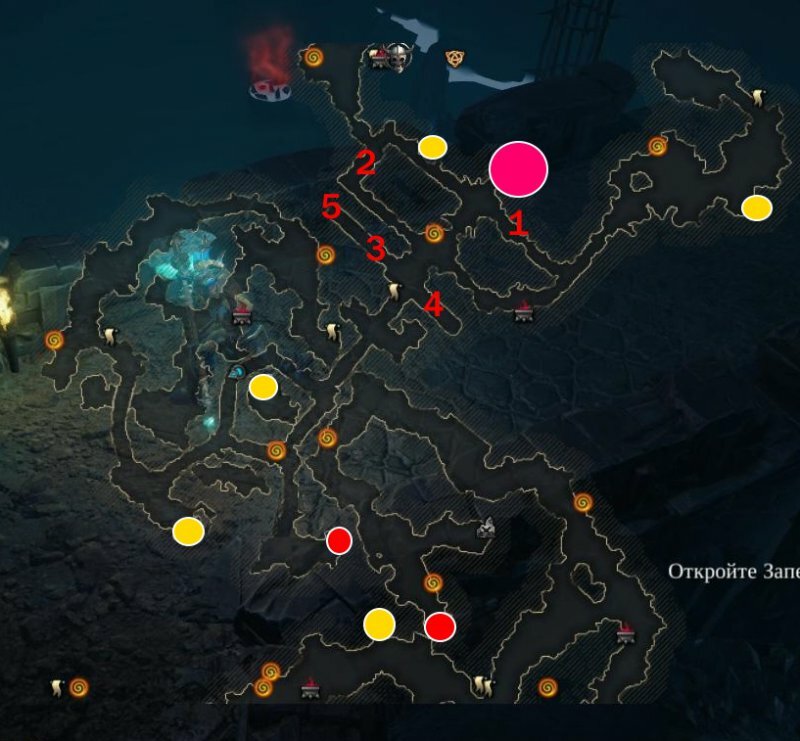 Map "The Path to Darkness" (part 2)
 - Red markers are skulls.
- Yellow - menhirs.
Inside the cage, which is at the end of the location, there is a chest with the Salt talisman. It is marked with a purple marker on the map above. To get it, you need to solve a puzzle with levers that are scattered around the map. The numbers on the map mark the necessary levers.
How to use the levers (if you haven’t managed to “wind up” anything yet): 1, 2, 3, 2, 4, 5.
Chapter 9 walkthrough Vikings: Wolves of the Midgard. Albion - Lost Clan
Side targets - 3 skulls, 10 banners, 15 fenwaits.
Look for Fenwaites on those places on the map where flowers are visible. There are more than you need.
The first chest is the hardest to find - it's well hidden. It is located inside the house on the left side of the mound, above the place where you spawn.
Map attached:
 Lost Clan Map
 - Blue are banners.
- Red markers are skulls.
- Yellow is a druid with Tyr's talisman.
Chapter 9
Side quests - 3 skulls, 30 huts, 15 draugs.
There are exactly as many huts and draugs as stated in the task.
In the middle of the location you will find a grave with levers and slabs. Pull the levers in the following order - X, F, |X| to open the grave. Kill the draug and take the Vidar Talisman.
After you cross the river on the boat, find another puzzle with more levers. Number like this:
 Lever puzzle
 If you didn’t do anything, then activate the levers in the following order: 3, 1, 8, 7, 1, 5, 3, 5, 4, 7, 2, 5, 6, 8, 1, 4. As a reward, you will receive a part of the shield " Praven" (artifact).
Chapter 9
Side quests - 3 skulls, 8 wagons, 3 ballistas.
See map:
 Map "Siege of Karlion"
 - Blue - wagons.
- Red markers are skulls.
- Greens are ballista.
- Yellow is a legendary weapon.
The legendary weapon is hidden at the very beginning of the location, behind the boards on the left.
In the fight with Arthur and Guinnevere, attack Arthur. So you will scare the woman and the fight will stop. Both characters will survive!
Chapter 10
Side quests - 3 skulls, 30 trolls, 7 menhirs.
The last chest is hidden in the mound behind the wall on the right side (visible through the crack).
You can find 2 artifacts. The first one drops from the Noble Frost Giant, and the second one is inside the barrow with levers. Find a pit with spikes and follow it to the right. Hit the vertical beam to form a bridge. Go around the area and go to the chest with the artifact.
Chapter 10 walkthrough Vikings: Wolves of the Midgard. Union on fire
Side quests - 3 skulls, 20 giants, 10 idols.
Location map:
 Map "Union on fire"
 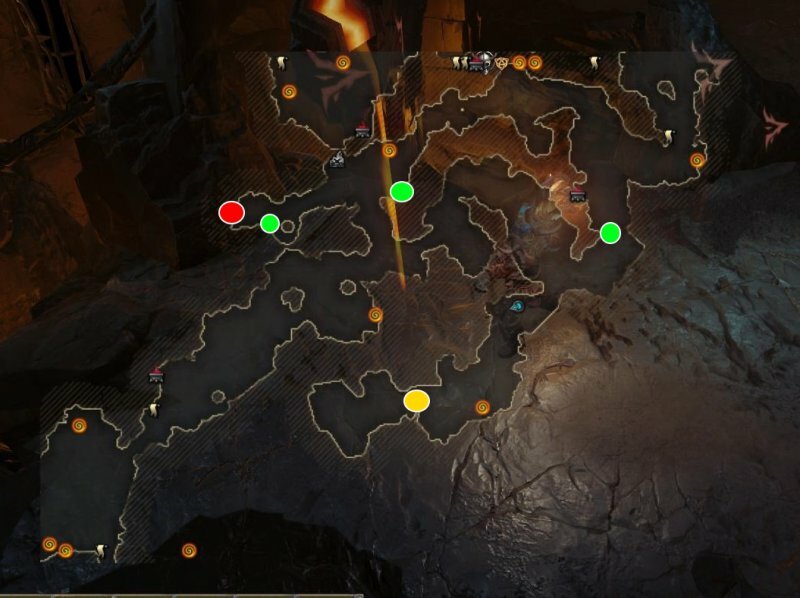 Map "Union on fire" (part 2)
  Map "Union on fire" (part 3)
 - Red markers are chests.
- Greens are idols.
There are 18 giants in the location, while the remaining two are bosses.
The wall with symbols opens with the correct combination. Moving towards it, inspect the walls and stones, memorizing the sequence of symbols.
If set correctly, the passage will open. You will reach a precious chest, inside of which lies the legendary Ring of Dispersion. Very valuable and useful item!
Where you need to open the bridge, number the levers from "1" to "3", starting from the bottom. Pull them in the following order - 2, 1, 2, 3.
Chapter 11 walkthrough Vikings: Wolves of the Midgard. Battle of Karlion
Side quests - 3 skulls, 5 cardinals, 3 ettins.
Three cardinals will be at the beginning of the quest. The fourth you will kill while protecting the wizard outside the gate. Go to the shore and destroy 2 ettins. On the right side there is a chest with a skull. The rest of the items you will find without problems.
Chapter 12
In this task, everything is very simple, including side objectives. There will be two huge opponents - ice and fire giants. For their destruction, you will receive two artifacts - from the Skadi bow and from the Lavatein ax.
The final. Eternal Well
The battle with Grimnir is divided into 2 stages. On the first one, you fight with an ordinary giant, doing everything that was taught before. In the second stage, it will be a big monster. You can't deal damage, but you can win. You should not attack the boss itself, but those tentacles that appear from the ground.
: Here is a detailed and complete walkthrough of the Prologue of the game. The first task (mission) is called "Ambush on Jotun" and in this text walkthrough you will learn location of all chests with three iron skulls, you will also find out what kind of reward awaits the hero / heroine, all totems and healing altars.
After you create a character and select a class (or simply - God), choose the most appropriate difficulty level (in this walkthrough the difficulty level is "Warrior") and you can safely click on the start of a new game. I would also like to add that this game has a "Valhalla" mode - and so in this mode, the first death will lead to the final death of the character, so you have to create a new one, because there will be no saves.
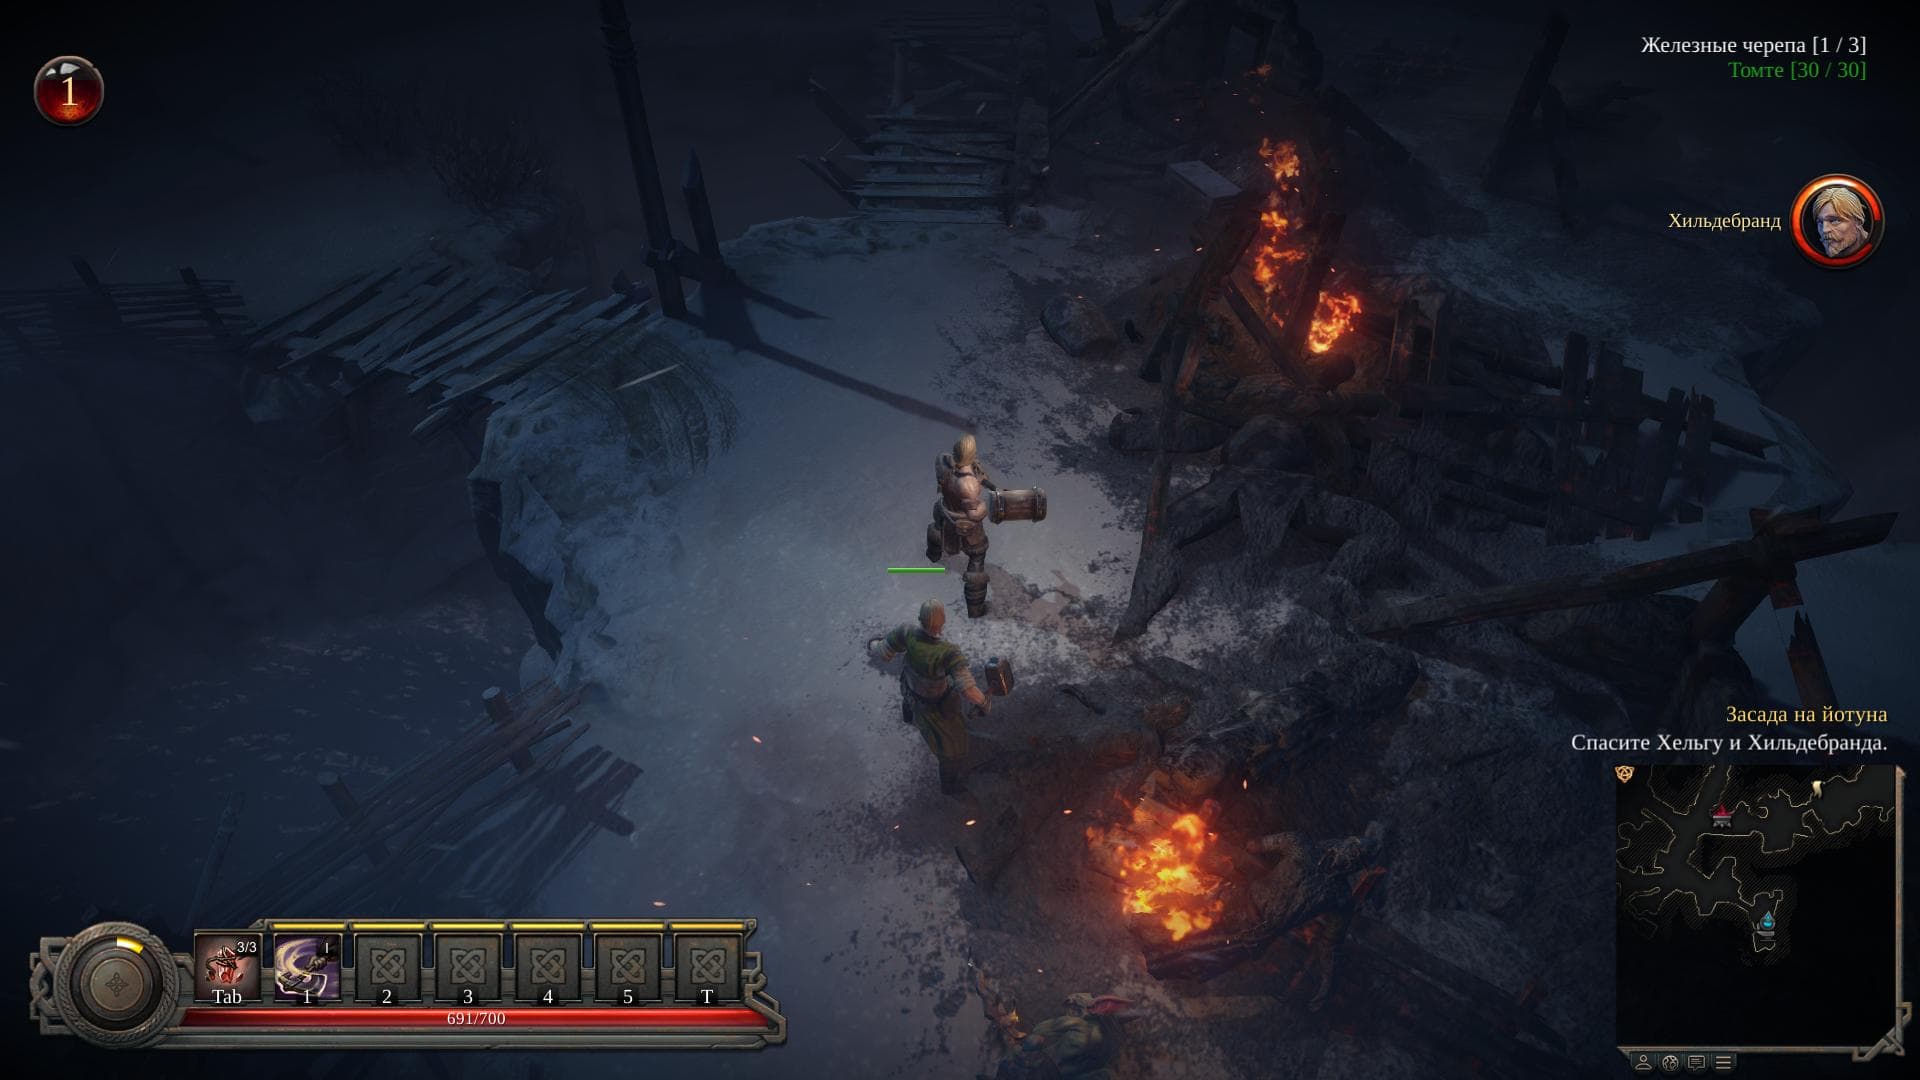
After watching the introductory cutscene, control will pass to you and the current task will appear, which will say that it is necessary to protect the village, but in addition, be sure to look in the upper right corner, where it will be said that during the passage of this task it is necessary to kill 30 tomte and find 3 iron skulls.
So, at this stage of the passage, everything is quite simple, because for now it is necessary to simply move along an absolutely linear location, killing all the enemies along the way (which will be just those Tomte). Check out a little tutorial along the way. In order to dodge blows, use rolls. Keep in mind that rolling consumes stamina. Also, as you move through the devastated village, along the way, break wagons and wooden barrels, from which not only gold will fall out, but also wood, which will soon come in handy for you.
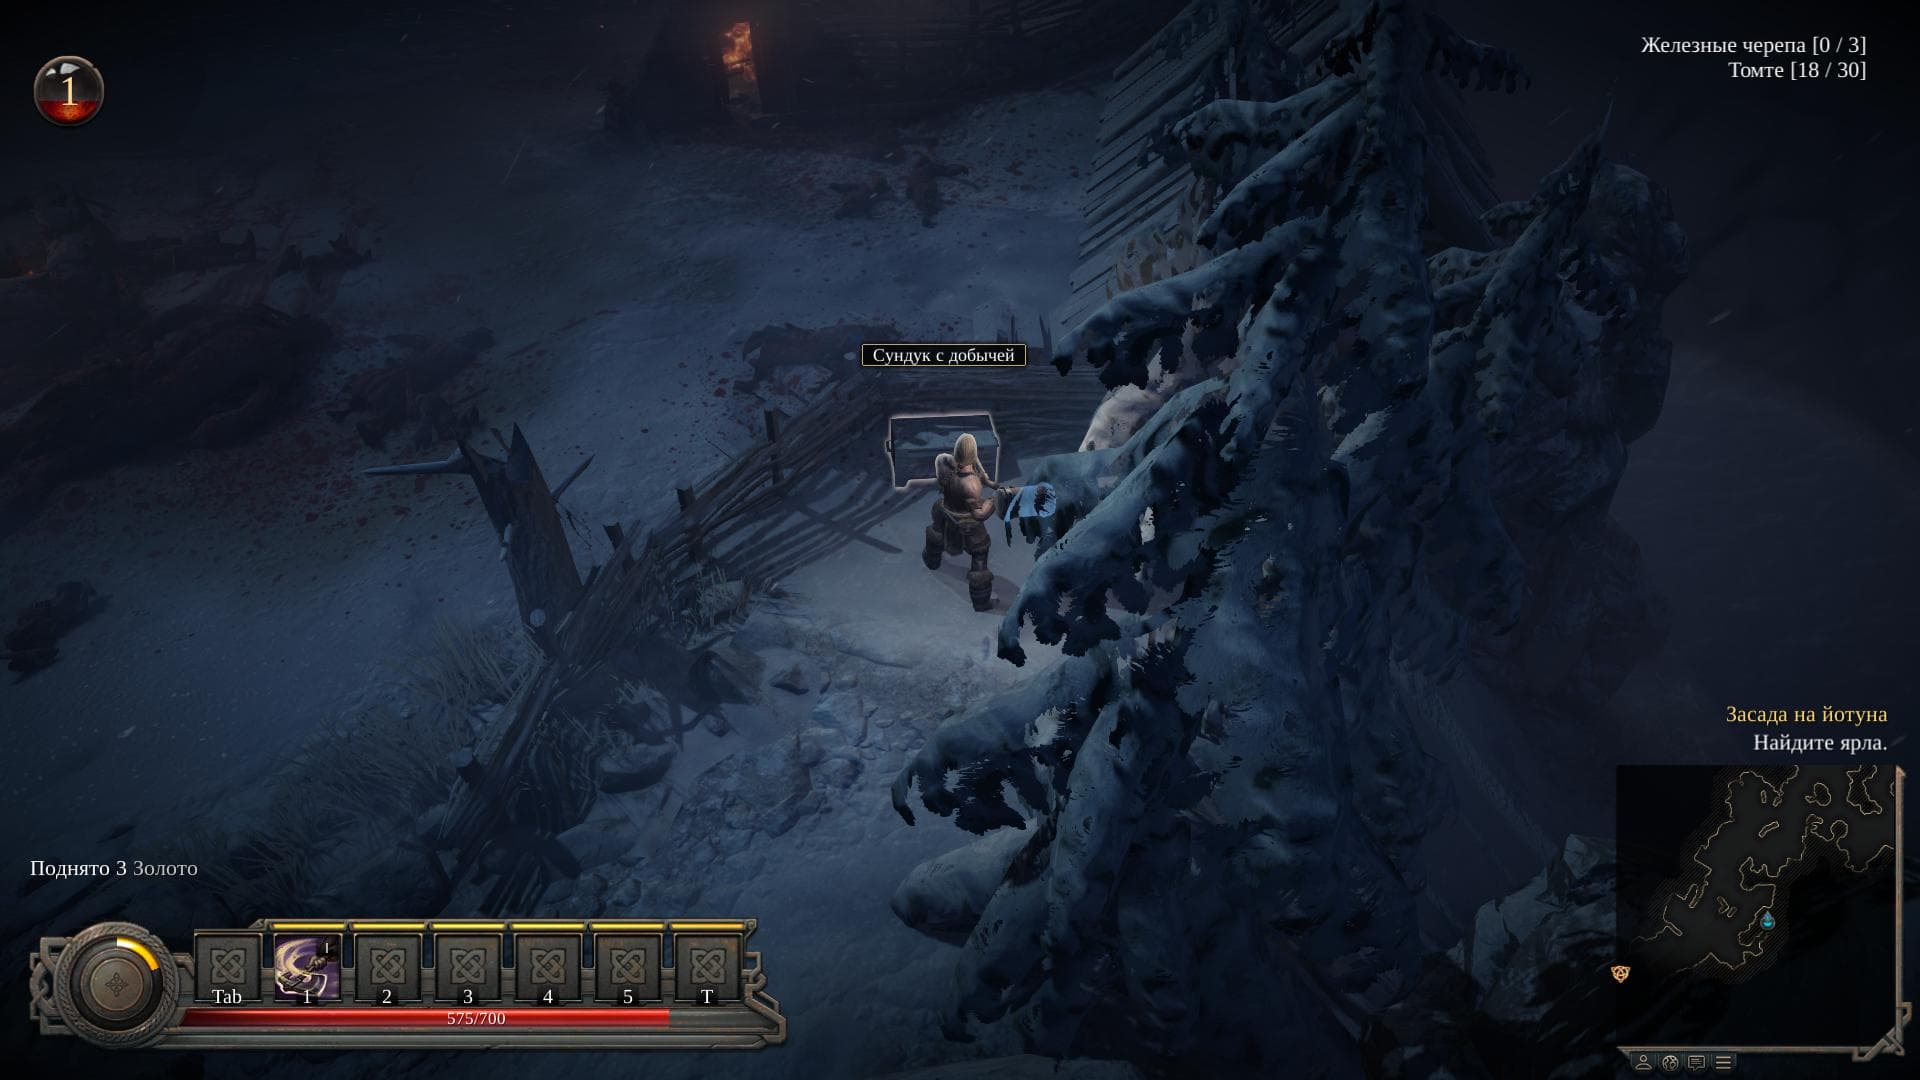
"This is where the first iron skull chest is found."
It is probably worth starting from the very beginning, because that is where the first iron skull is located. Do not rush to move immediately through the entire location. At the beginning of the game, follow closer to the right side of your screen, where you can find the first chest, inside of which you will find the "Iron Skull" (1/3). In the end, the screenshot above will help identify the location much better.
"There is a second iron skull chest in this location."
Soon a new task will appear, in which it will be said to find the jarl. In addition, in addition to everything, a meeting with the first giant (jotun) will take place. After the giant is killed, stick to the right side of the minimap. The fact is that behind the fence near the trees there is a second, but barely noticeable, chest. Having reached and opened it, the character will receive the second "Iron Skull" (2/3).
Now it's time to move on and meet the first friendly character (NPC) - Wayland. During the conversation, he will not only ask you to save the clan from an attack, but also pass on his healing totem. The healing system in turn in Vikings: Wolves of Midgard is rather unusual, but first things first. So, it will be possible to use only one totem, which in turn can either be found or bought from a merchant. Each totem will have a strictly defined number of charges and its own specific effectiveness. After the totem of healing has been used (and the "Tab" key is responsible for this by default), the number of charges will decrease by exactly one unit. It will be possible to restore the supply of charges near a place called the Altar of Healing.
"Location of Heldbrand and the last, third iron chest".
The first such altar of healing can be found on the left side of the village right after the checkpoint (near the jarl's house). Use the altar after chopping a couple of tomte into pieces, but after that do not rush to rush into the building to the jarl, because you will need to run around the village, kill a couple more tomte and save two inhabitants. Therefore, first of all, go down and then turn to the right side to the marker on the mini-map. In this place, the hero will stumble upon a man named Heldebrand. Tomte will attack him, so kill them, after which Heldebrand joins your squad. In addition, there is a third chest a little higher in the same place (the screenshot above will help determine the place), so approach it and the test will be completed. As a result, you will collect all three iron skulls.
Now you need to get to the top corner of the map on the left side, in order to now save a girl named Helga from the same Tomte. By the way, along the way you can meet a wounded jotun, but it will not be difficult to kill him, but if there are difficulties, then visit the altar of healing again. In any case, find the girl in the indicated place and together with them go up the stairs to the Jarl's house, the doors of which were trying to break the tomte before. Moreover, on the way to the building, a cutscene will appear, in which a completely healthy jotun will come to destroy the remains of the village, so you will have to tinker with it a little, but nothing particularly complicated. The main thing to remember is your abilities (especially rage and rolls) and the healing totem. After the fight, go inside, go to the very end and the cutscene will start.
: "Rune Algiz" (), Blood - 200, Wood - 30, Gold - 220, Iron - 7.
Quest: The End of Yokul
Vikings: Wolves of Midgard.Walkthrough.
: A complete and detailed walkthrough of the task "The End of Yokul" of the second chapter called "Dangerous Neighbors". Also in this walkthrough you will learn how to collect all the skulls, how to destroy idols of yokul, how to open all chests how to get to them and, in the end, how to kill yokul.
. Chapter 2: "Dangerous Neighbors"
Now begins the campaign called "The Beginning of Winter". After talking with Wayland, go to the left side of the map and look for the altar that you might have already met in the Prologue. In general, 200 units of blood will need to be sacrificed near the altar, thereby raising the level. And for the future, remember that the level of your hero / heroine increases only with the help of the altar. Go to the gate in the right side of the upper corner of the mini-map and select the location you need according to the assignment. Thus, the next task will begin. In addition to the main task, there will be additional ones: 1 - find three iron skulls, 2 - kill two Jotuns, 3 - destroy ten Yokul idols.
: During the passage of this task, I recommend collecting all the energy of rage (this is a round scale in the corner, on the left side of your screen) and save this mode for the battle with the Boss in the final part of the passage.
"This is exactly what the idols of Yokul look like, which will need to be destroyed."
So, now attention, because the screenshots below will show an image of absolutely all the important details of the passage: Jotuns, chests with iron skulls, ten Yokul idols, a chest with an artifact and a lever, but all this is below and in order.
Now, unlike the previous task, this time the chests with iron skulls will not be in gray chests, but in gold ones. There will be four such chests in total. The only problem is that initially access will be open to three chests, but the fourth chest will stand on a separate ledge. However, it is in the three available chests that the iron skulls will lie.

"It looks like a golden chest with an iron skull inside."
As for the giants, it will be quite easy to find them, however, as well as the idols of Jotun. But in order to gain access to the fourth golden chest, inside of which there will be a part of the Skadi Bow artifact, you will have to find levers with which you can raise the bridge to an inaccessible part of the location.
“The same fourth chest, inside of which a part of the artifact will lie. Moreover, the artifact may be different. Again, it all depends on the class.
The bridge can be raised using five levers. Each of the five levers will be hidden in the niches of dilapidated towers that are scattered throughout the location. And to notice them is not so easy as it might seem at first glance.
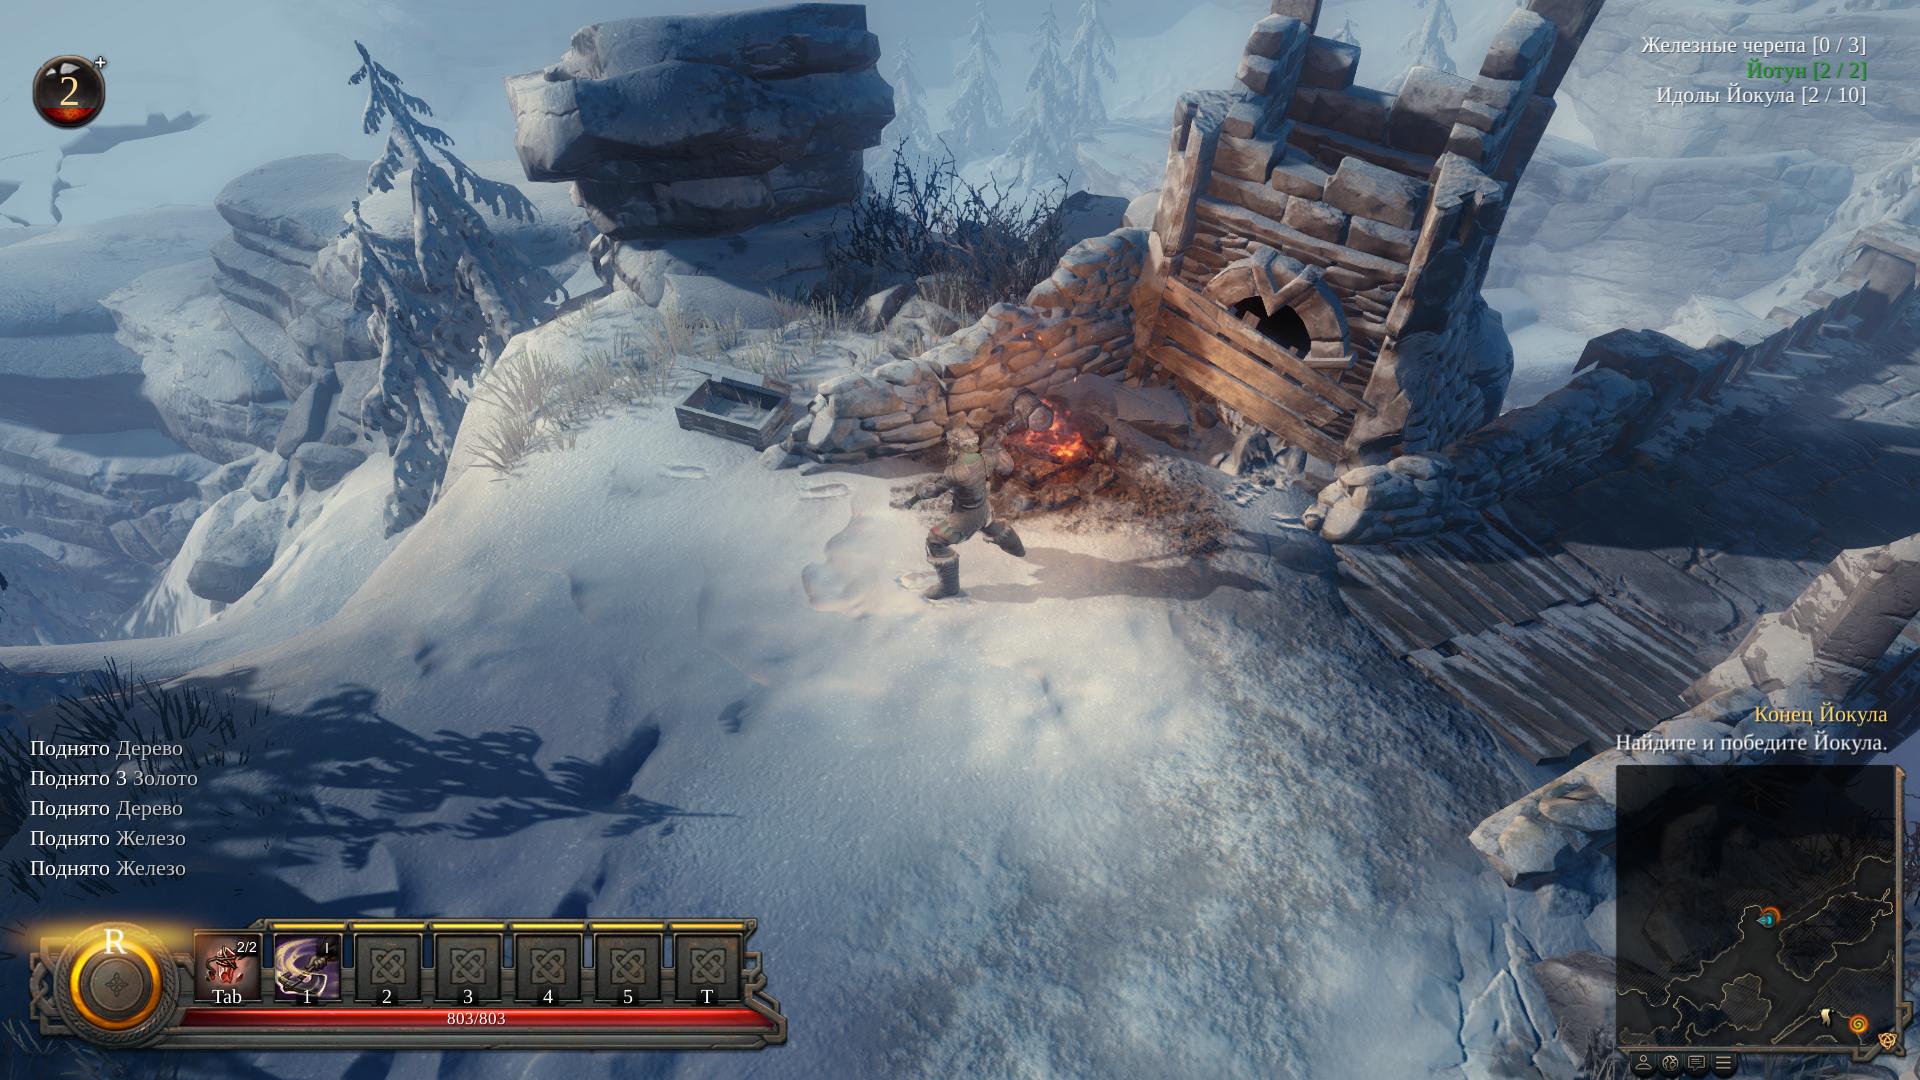
“An example of a dilapidated tower, where one of the five levers is located. In this case, the lever is under the wooden planks.”
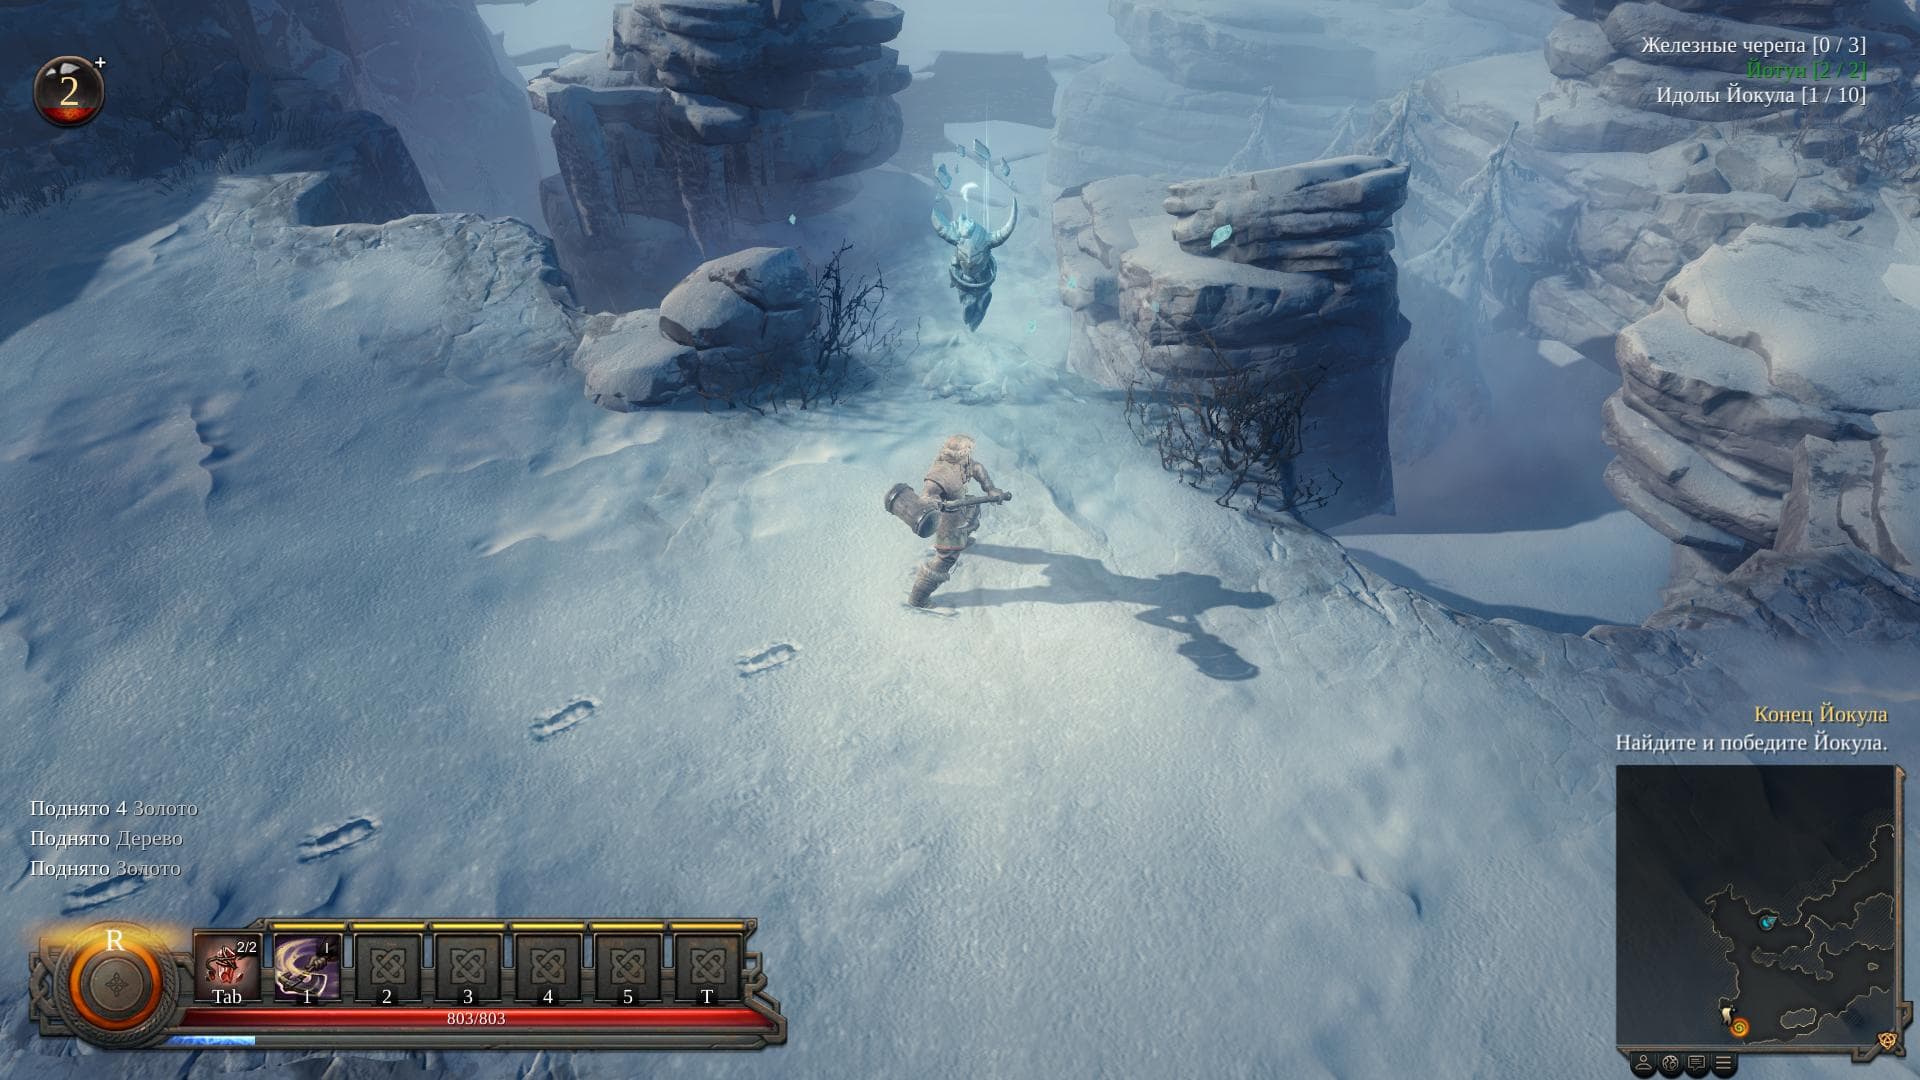
And few people will understand at the beginning of the passage of this location, but in this place your character can easily freeze. Pay attention to the health bar, because right below it, again in the lower left corner, the blue bar will gradually fill up. Therefore, if the scale is full, then the hero will begin to receive periodic damage. What to do? Everything is quite simple, because it is enough to find the nearest fire and stand near it - the fires are marked on the mini-map as yellow markers.

"A campfire around which you can warm up and thereby reduce the blue scale, which shows the level of how cold the character is."
In addition, in this location you can find a statue of a certain God. It is impossible to say exactly who it will be. It can be either a statue of Loki or Thor, or maybe other gods. It all depends on generation. But in any case, you need to know that any statue of a god will give a temporary bonus. So, for example, the statue of Loki (which is shaped like a large totem) will give a temporary bonus to +15% attack speed when touched. Thor's shrine will give +20% damage. So in any case, you should not skip such "stones", the bonuses are too good.

“The screenshot shows a statue of Loki. In general, such statues are called "temple" in the game and they are randomly generated. That is, you can come across both a statue of Loki and Thor, and any other God in the game.
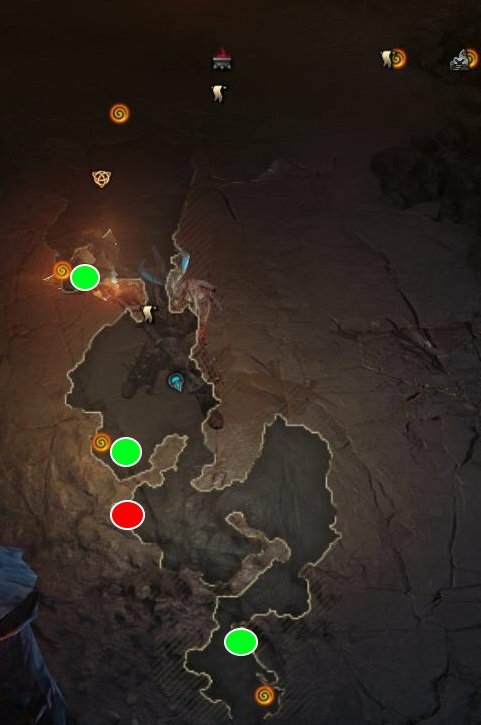
All Yokul idols are marked in the screenshot below with blue circles. All chests with skulls are marked with green circles. All levers for raising the bridge to the fourth golden chest in this location are marked with black circles. The location of Jotun is marked with a light blue circle. The chest with the artifact inside is marked with a red circle.
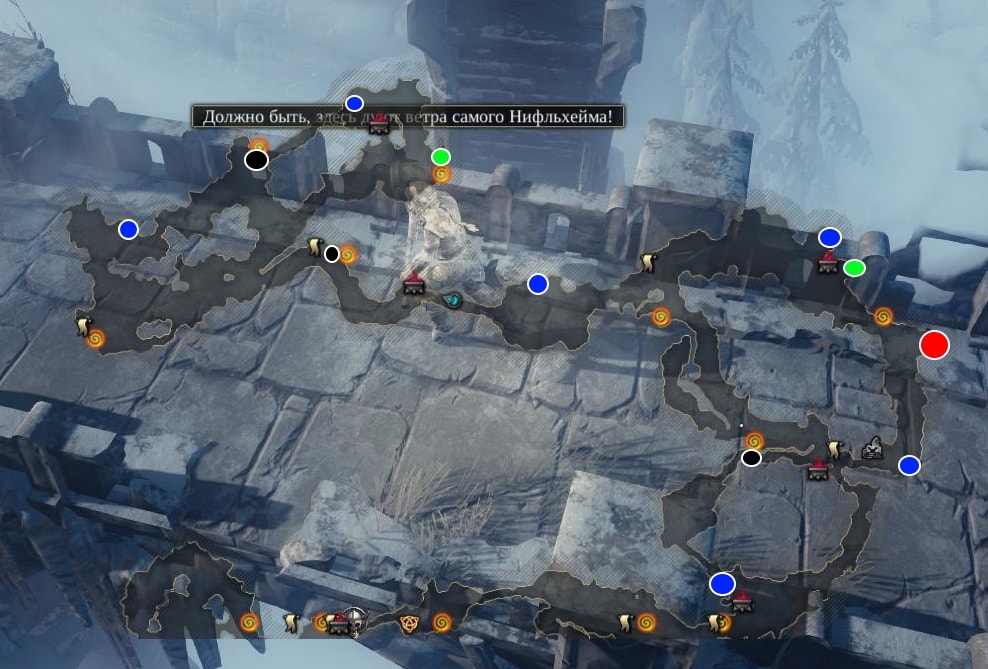
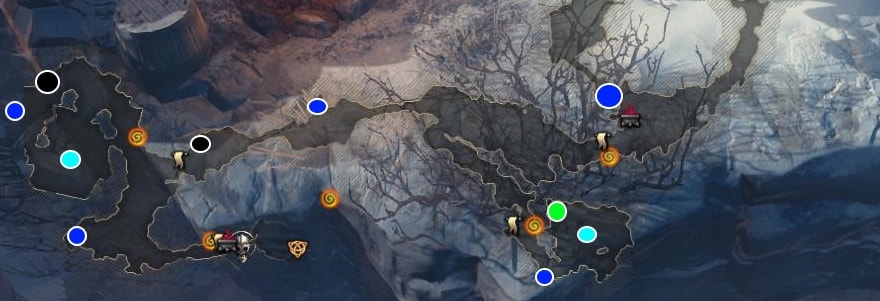
“The first half of the screenshot shows the top of the map with key details marked. On the second screenshot, the lower part of the map is marked.
Thus, the first thing I recommend is to start destroying the idols and giants of the Jotuns. Along the way, focusing on the screenshots above, open chests and collect skulls. Next, be sure to find all five levers near the towers in order to eventually pick up part of the artifact. In any case, you will need to go to the cave that is marked and prepare for battle, because the enemy will be worthy.

“That's how Jotun recruits are. In total, there will be two of them in this location. It won't be hard to find them."
. "Boss - Yokul"
How to defeat Yokul in the ice cave?
Although the battle with this enemy may seem difficult to some, it is actually quite simple. In the first half of the battle, Yokul will be engaged in the creation of ice spheres. After creating them, he will explode frost balls at certain key points in the location. The hero, in turn, will need to move away from these points, unless, of course, you want your character to be frozen for two seconds.
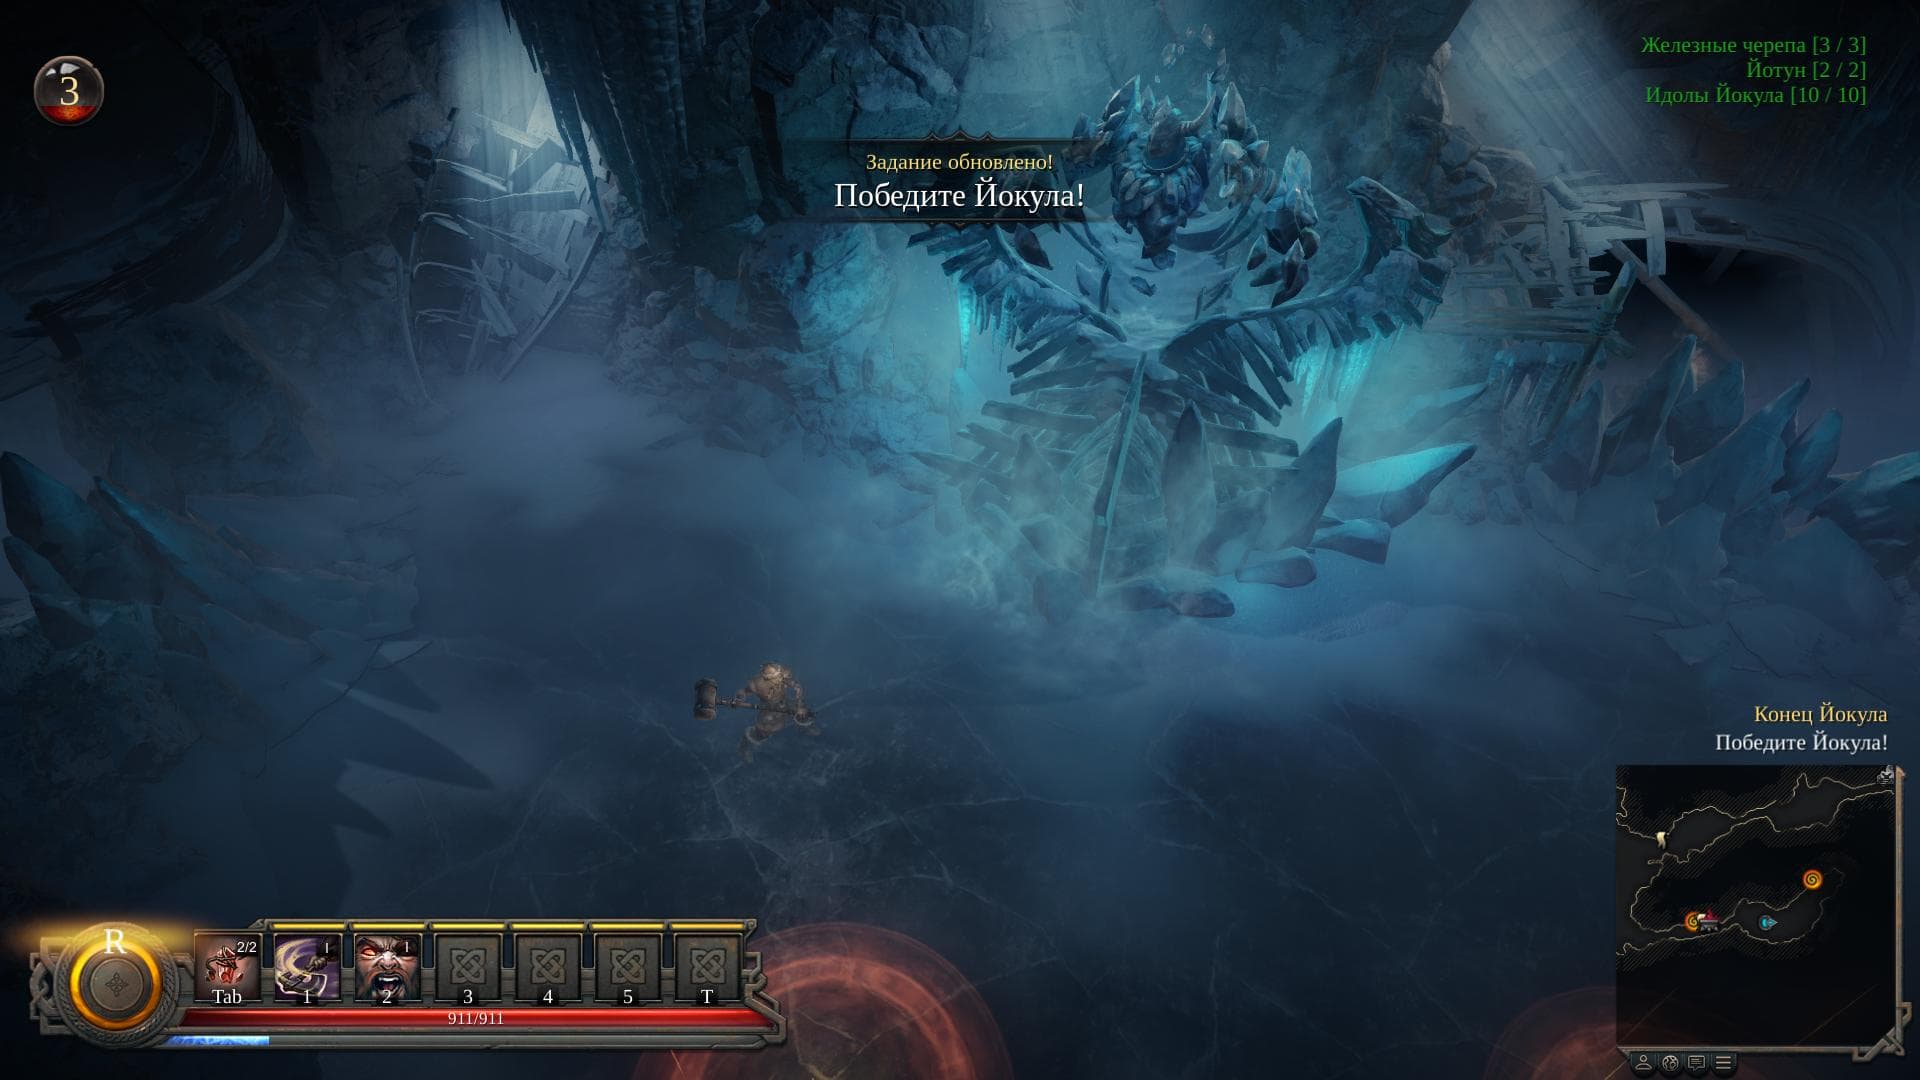
“Actually, Yokul himself sits on the throne - an ice giant golem. You can't describe it otherwise."
In addition, periodically you will need to bask in yellow mugs so as not to freeze completely. From time to time, wolves will appear, so do not forget to beat Yokul's throne after killing them (it will still stand on it). After the destruction of the throne, you will need to take on Yokul himself. He, in turn, can go down to the hero even before the throne is destroyed. The throne is best attacked in rage mode - it will be more effective and much faster. After the victory, a cutscene will begin.
: Talisman of Skadi, Rope Belt (), Hagalaz Rune (), 550 blood, 620 gold, 90 wood, 20 iron.
Quest: "An Old Enemy"
Walkthrough Vikings: Wolves of Midgard.
: This is a complete and detailed walkthrough of the story quest "The Old Enemy". Thanks to the text description, you will learn: how to find all the banners of swanung, how to find all the iron skulls in this location how to kill all hounds, where to find the legendary weapon part And how to kill the final Boss Jarl Swanung.
. Additional task: "Hunting for wolves"
In order to take on this task, you will need to use the Drakkar (this is a Scandinavian boat) or, again, the gate, as in the previous task. The bottom line is that this additional task can be completed in the same location where the story task “The End of Yokul” was previously completed.
All you need to do in this side quest is run quickly around the location and kill 50 wild wolves in this area. After you get the required number of kills, simply press the "Esc" key and select the item called "Return to the village."
On the other hand, you can repeat the previous feats and destroy ten idols of Yokul, kill two Jotuns and find again three iron skulls. All these key details will not change their location, so everything remains in place. But I want to note that in subsequent passages the levers will no longer be active, so access to the fourth golden chest will be opened immediately. Of course, there will be nothing inside. In any case, it is enough to complete the task once and move on along the storyline, because this quest will be repetitive.
. Story quest: "An old enemy"
So, in this task, the main character now has to storm the village of Svanung, killing their Jarl, who in turn will be the Boss at the end. And since the settlement is an impregnable fortress, it will take a lot of effort to find the entrance inside. As for additional challenges, they will include the usual search for three iron skulls, killing fifteen houndsmen and destroying ten banners of Swanung.

"This is what the banner of the Swanung clan will look like."
As usual, the mini-map will not mark the places where you can find this or that item. And since the location is much larger than the one presented in the End of Yokul quest, important items are easy enough to miss. In addition, in this location there is a unique chest that contains a legendary item - an accessory called "Gusli".

“In this screenshot, the Houndmaster is presented as an enemy, and such people will need to be killed 15 people.”
So, in the screenshot below, you can find out the location of all the important things and objects that exist in this location. Red circles are chests with skulls. The blue circles are the location of the hounds (only 13 hounds are marked for the reason that the other two enemies are obvious and impossible to miss). The green circles are the location of the Swanung banners. The circles of yellow color are a precious chest that was hidden in the grass. Inside the chest, you can find a valuable legendary accessory called "Gusli", so try not to miss it.
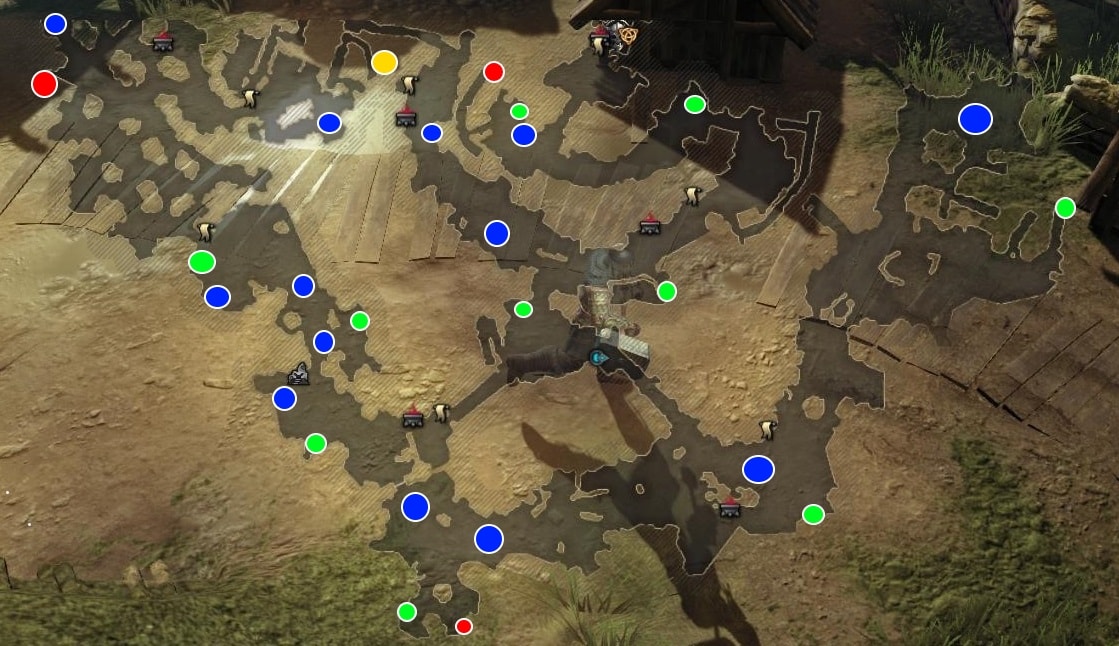
"A map showing all important objects/enemies/things in this location."
As for the passage of the location as a whole, the main thing in it is to move on the left side. Even if the road is linear in its basic structure. Along the way, you will have to periodically destroy wooden barricades and towers, on which or behind which enemy archers will stand. In addition, in this task there will be enemies who will actively use shields, so the battle tactics will change a bit. To defeat the “shieldmen”, you must either run away and wait for the enemy to open up, or stay close and roll behind your back to carry out a kind of counterattack. And even if you decide to freeze the enemy, then do not forget that the shield will still protect the enemy from the front.

“And here is the chest with the first iron skull. Notice how they look different now."
When you get to the iron gates, you won't be able to open them, so you have to go to the swamps on the left side. A little higher and to the right there will be wooden trash that can be destroyed, and having destroyed it, it will already be possible to get into the territory of an impregnable fortress. Thus, it will be possible with a fight, but already inside the fortress, to break through to the house of Jarl Svanung.
. "Boss - Jarl of the Swanungs"
How to defeat the Boss Jarl Swanung?
The boss, in turn, will not be able to show anything from the category of supernatural skills. To begin with, you have to cut down two spearmen-shielders, but even this will not take much effort. As usual, for the battle with the Boss, I recommend stocking up on energy for rage in order to activate it at the right time and quickly deal with the Jarl.
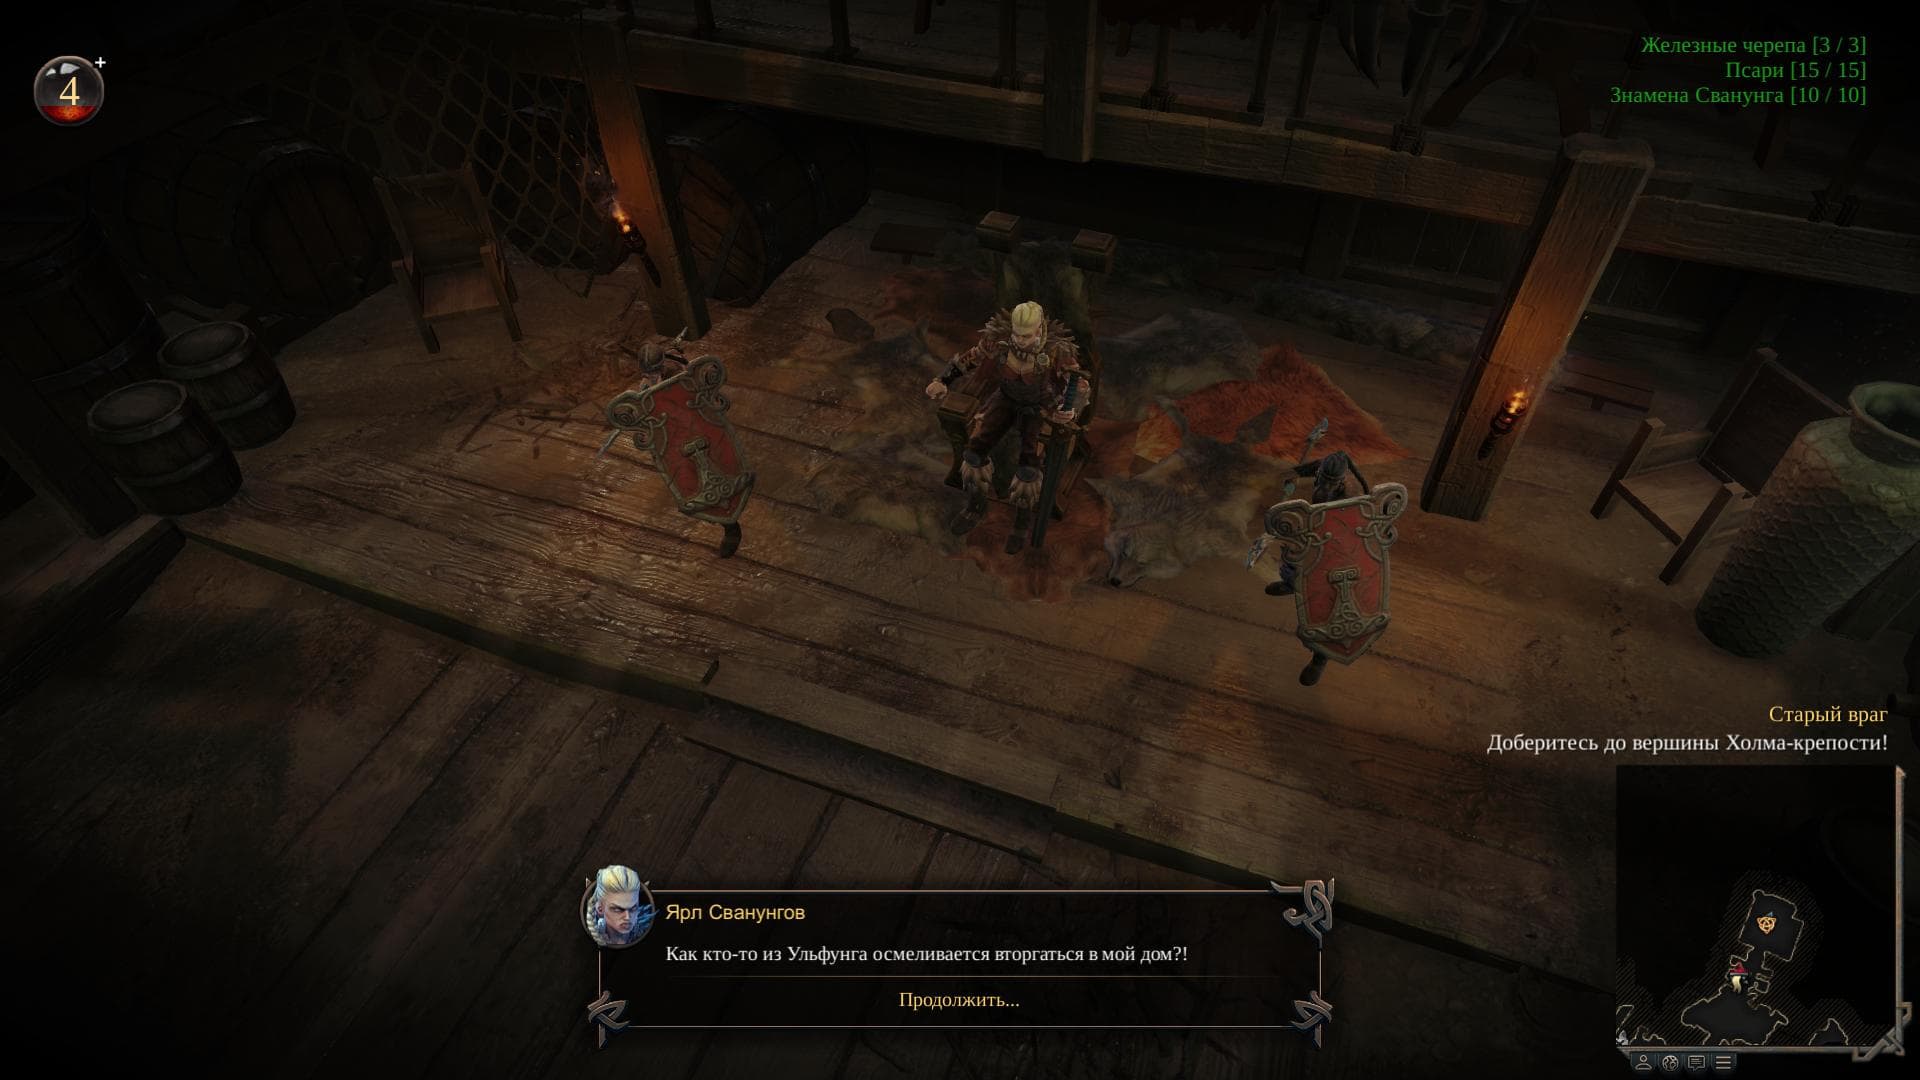
“And here, in fact, is the Boss Jarl of Swanung himself. And yes, it's a girl.
Moreover, if you play on the normal difficulty level, then it will be possible to kill the Jarl in just one such mode. Otherwise, the main thing is to dodge his attacks in a timely manner, use the freeze, and if she pats you hard, use the healing totem in a timely manner. Although, due to the cooldown of this skill, it will not be possible to use it more than once. In any case, after defeating the Jarl, you will have to make a key decision: 1 - Leave the Svanungs alive, make them vassals and thereby receive a tribute of 1,000 gold, 2 - Or kill everyone, completely plunder the settlement and get 5,000 gold once .
: “Legendary Belt of Life”, “Leather Ring” (), “Rune Algiz” (), 700 blood, 150 wood, 30 iron, 0 gold.
Quest: Fangskar Horror
Where and how to find all chests in Vikings: Wolves of Midgard. Location.
: This part of the article provides a complete detailed walkthrough of the story quest "The Horror of Fangskar". Thanks to the text description, you will learn: where and how to find all the tomte hats, where all the skulls are located, how to find the rune smith and, in the end, how to kill the Grindil Boss.
. Chapter 3: "Exploring Thule"
The quest starts as usual after interacting with Drakkar or the gate. The following tasks will be presented as additional tests: 1 - destroy thirty tomte caps, 2 - kill 20 fenwaits, 3 - find, as usual, three iron skulls.
So, fenwaits can be found in the water, and in fact it turned out that there are more of them than presented in the test, so it makes little sense to describe their killing, you can easily destroy the indicated number of monsters anyway. It also makes no sense to describe the detailed destruction of 30 tomte caps. Why? They are again more than required. Yes, and it's easier than ever to do this, because 5 huts are located immediately in front of the entrance to the cave, but all the rest are clearly inside. I think it's best to go straight to the location of the iron skull chests.
. "Mini Boss - Grindan"
How to kill the Grindan mini-boss?
The first two chests can be found outside. But they can only be found after the huge goblin troll Grindan is killed. Moreover, it will not be easy to carry out the plan, because in addition to all its bonuses, the icing spell does not work on it either, so the talisman found earlier in the battle against it will be absolutely useless.

"This is what a mini-boss named Grindan looks like."
In the fight with Grindan, you also need to know that when he jumps, your hero in turn needs to jump to the side, otherwise he will be stunned. In addition, from time to time this enemy will disappear from the location, and in the meantime you have to fight with the tomte. And yet, when you manage to defeat this mini-boss, you will receive one of the three parts of the new artifact as a reward - the Lavatein handle (this is part of the legendary two-handed ax).

“The hilt of the legendary two-handed ax called Lavatein.
After killing Grindan, go further through the gate and turn left. Looking at this moment on the map, you can understand that in this place there is a flooded small part of the island, along which it will be possible to pass. In general, follow this flooded part to the very end, along the way, killing a couple of fenwaites who have risen from the water. The bottom line is that at the very end there will be the first chest, inside of which the first iron skull will lie.

“This screenshot shows a more accurate and detailed location of the chest with the first iron skull, and of course the fenwaits too.”
The next (second) iron skull chest can be found on the right side of the mini-map, but not too far from the last chest. Although, again, you have to go into the water, kill a couple of rebellious fenwaits. In any case, at the end you will find the second chest, the location of which is shown in the screenshot below.

"Exact Location of the Second Iron Skull Chest".

“This is what tomte hats look like, so try not to miss them.”
So, upon arrival at the entrance to the cave, it will be blocked. But it is easy to open it: the main thing is to remember the sequence of symbols that are depicted on the stone, which block the entrance to the lair (cave) of the tomte. Notice the round stone with Scandinavian symbols on the left side + three more on the right side of the entrance. The whole point of the puzzle is that you need to set exactly the same sequence of symbols from left to right and the doors will open.

"Look carefully, because the screenshot provides a useful hint for solving the puzzle."
Once inside the cave, pay attention to the left side, where the healing altar is located (you can also notice it on the mini-map), but first of all, kill all the enemies, including the troll. As a result, after the battle, you will receive another legendary item called "Ring of Sviangris".
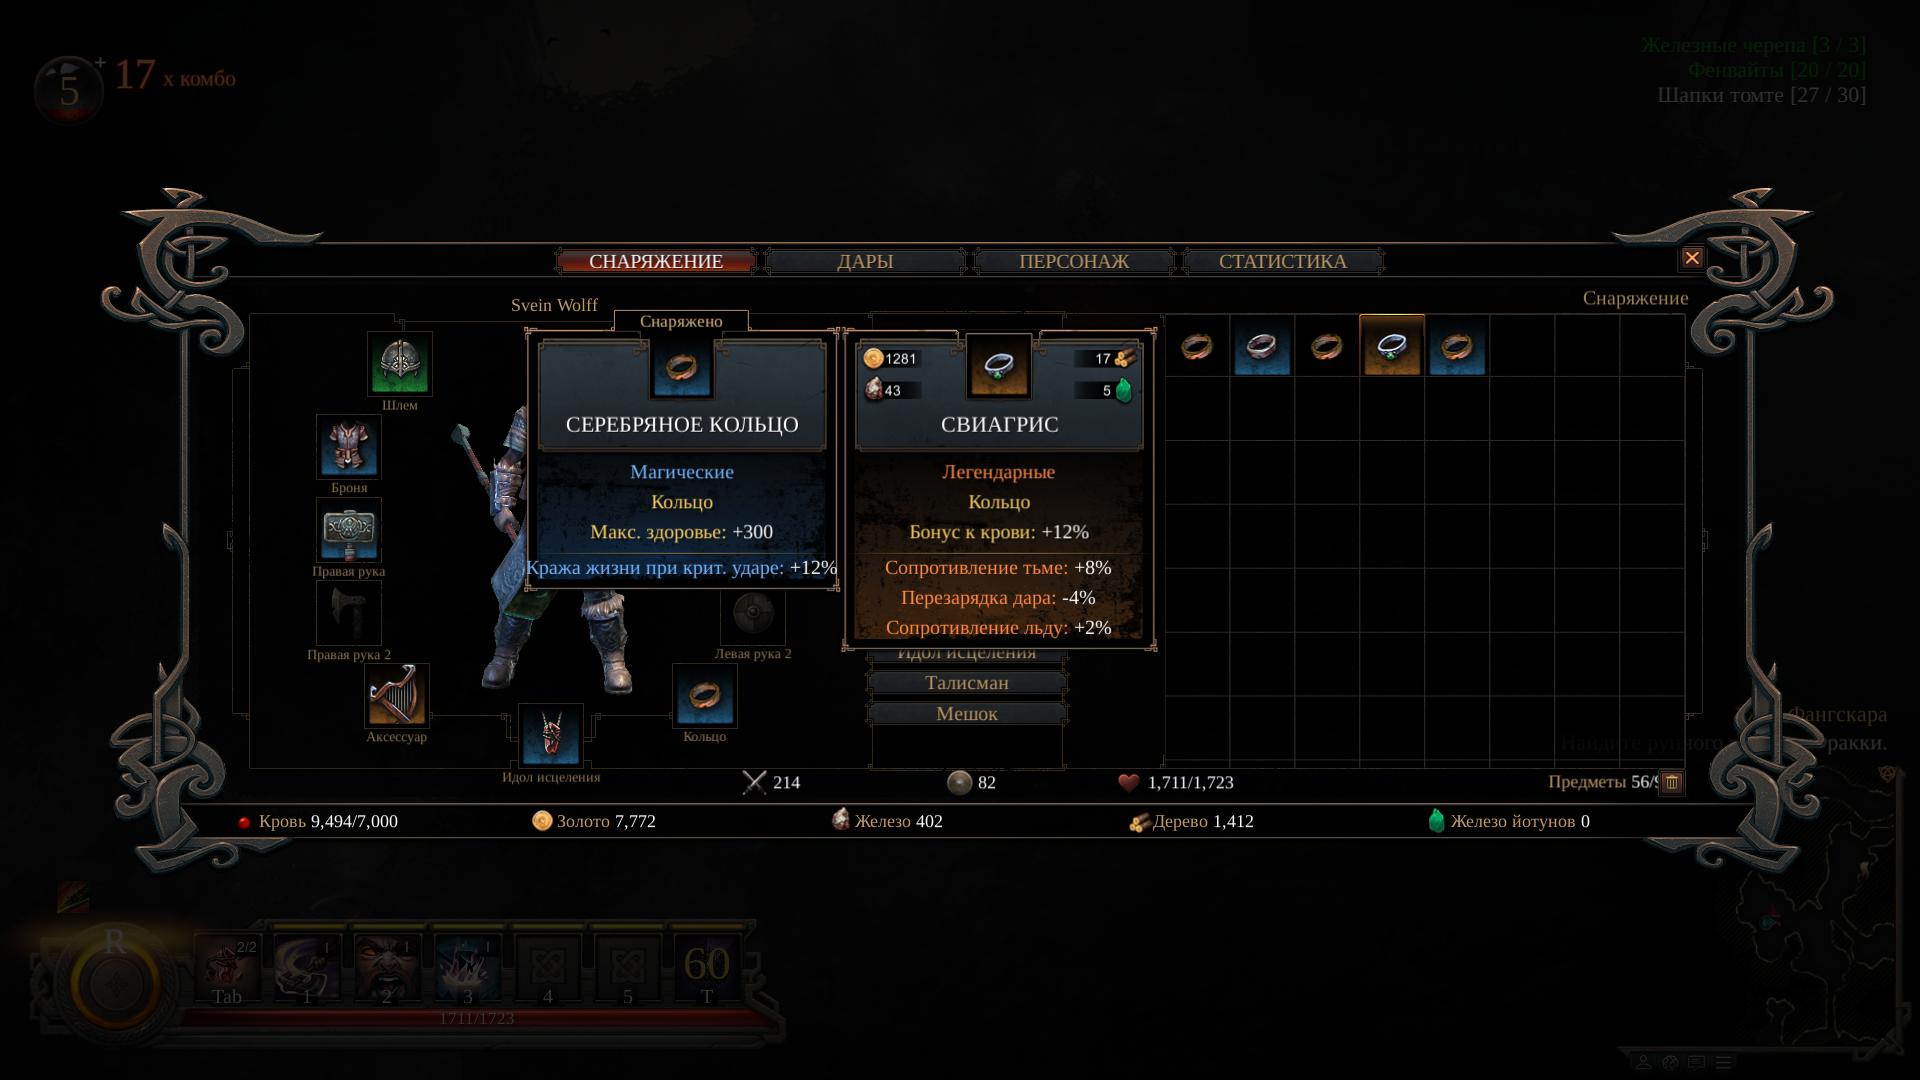
“The legendary Sviagris ring has such characteristics.
But the last chest with the third iron skull can be found far inside the cave. Try to carefully inspect the upper left corner - the chest will stand in this place. In any case, below is a screenshot, thanks to which it will not be difficult to find it at all.
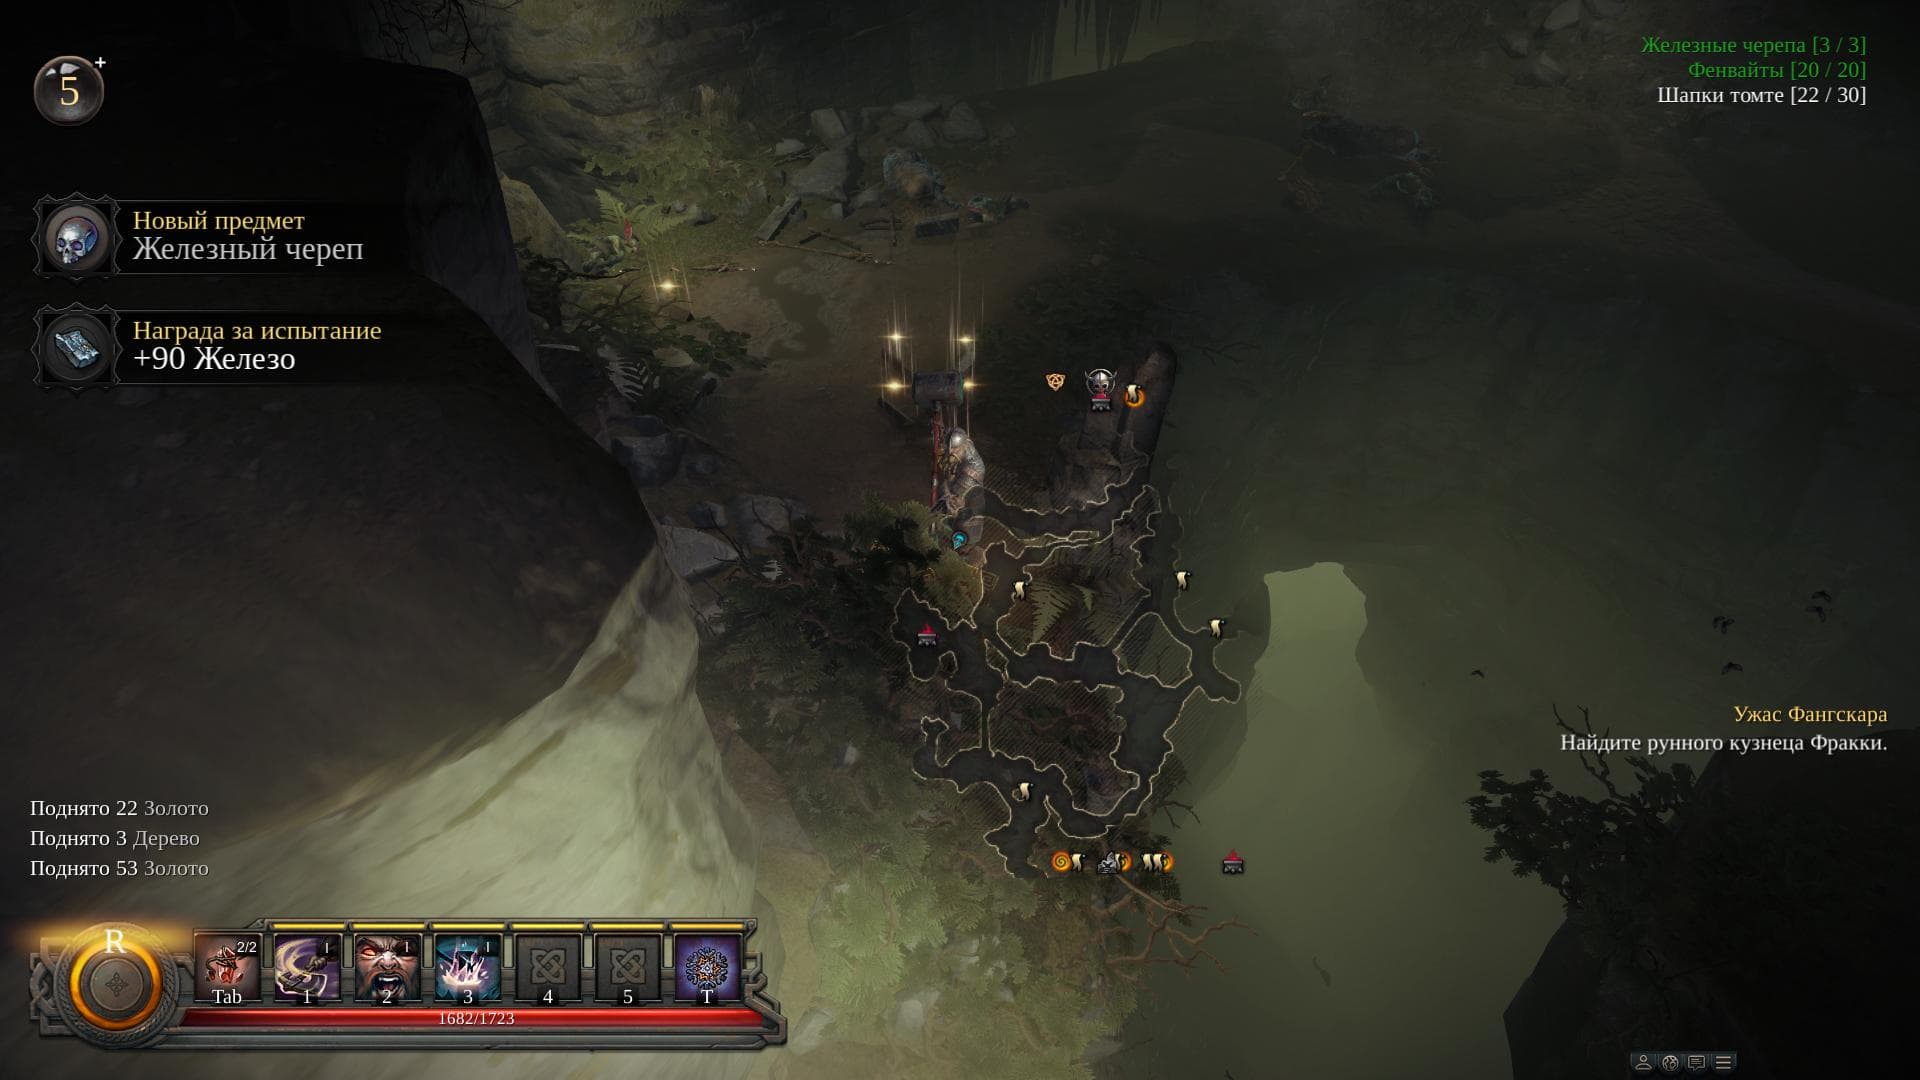
"Finally, the location of the last iron skull chest, don't miss it."
The rest is just moving forward. Destroy tomte, trolls. Be sure to destroy all the tomte hats along the way (if you have destroyed all five hats outside, then it will not be difficult to find the rest in the cave). And, in the end, you enter the battle with the final Boss.
. "Boss - Grindil"
How to kill the Grindil Boss?
Now you have to fight a huge sorceress, whose son you have already hacked to death outside. First of all, keep in mind that the energy totems that will emit light (which the witch will put) will need to be destroyed as quickly as possible. The problem is that they gradually restore the health of Grindila, and this nullifies all your efforts.

"This is what Boss Grindil looks like, a huge sorceress and Grindan's mother."
Her tricks are a bit similar to those that her son showed on the street. For example, she will also disappear from time to time, and instead of her, ordinary ordinary enemies will appear, which will need to be killed. New: Always try to avoid green circles on the ground. Once all enemies are killed, Grindil will become visible again. Thus, you will have to fight until you win the battle. As usual, try to leave the rage to fight her; do not forget about the totem of healing and that it will not work to freeze the sorceress; keep a close eye on her to know when to dodge her attack. The rest is simple.
: “Legendary accessory “Hel Talisman”, “Heavy Shield” (), “Hebe Rune” (), 550 blood, 1760 gold, 200 wood, 50 iron.
. "The Runesmith of Thrakki"
Although this is not all, because from now on you will have a runesmith named Thrakkios working in your village, who is also Helga's father. In addition, you probably already noticed that certain runes fell out to you. Runes, in turn, are intended for both weapons and equipment (provided that there are empty slots in things). So from now on, Thrace will be able to improve your equipment.

"Here comes the runesmith Frakki - a very valuable person who should not be missed."
Quest: "Iron Fist"
Quest: "Revenge"
Quest: "Dual Runes - Paladin Crusade"
Quest: Bishop's Gambit
As you progress through the Vikings: Wolves of Midgard story quests, you will occasionally find artifacts - we are talking about individual parts of the best equipment in the game.
After all three parts of an item have been found, double-clicking on its icon in the inventory will allow you to collect a new weapon or shield. There are four artifact weapons in total, which means 12 parts for you to find. And we will tell you in detail about how to do it and where to look for them.
Artistic "Big Bow Skadi"
Let's start our guide with the bow for the reason that its first part, chronologically, is the first artifact that you find in the game.
And this will happen literally after the prologue (the first chapter), in which your hero becomes the jarl of the village. We are talking about the first quest of the second chapter of "Dangerous Neighbors" called "The End of Yokul".
In the upper right part of the map there is a separate rock on which the chest is located. This chest contains the fore-end of Skadi's Longbow (1/3).
To open the chest, you have to get to it. To do this, you need to find five levers scattered throughout the location, and activate each of them.
Finding levers is easy if you know where they are. And all of them are hidden inside the destroyed towers, in niches covered with boards. Break the boards and activate each lever. Once ALL levers are activated, you will see a cut-scene with a bridge appearing.
You will not receive the next part of the bow soon. You need to get to the story quest "Sigurd's Ring" in the sixth chapter. During the passage of this task, you will need to find a secret passage to the mini-boss of the location. Its location is shown on the map.
On one of the mounds (it seems the second in a row), where you need to find stone discs and set symbols, go right. Inside one of the underground bunkers there will be slabs that you can destroy. The map itself will tell you where the secret passage should be. Behind him, after killing the boss, you will be able to find the artifact of the shoulders of Skadi's Longbow (2/3).
Take a look at the mini-map in this screenshot.
The bowstring of the art-made Skadi Longbow (3/3) can be found at the penultimate game location, during the passage of the quest "Road of Ice and Fire". To do this, in the first part of the location, look for an ice golem-defender. After his death, the desired item will drop.
Artistic two-handed ax "Lavatein"
In the first quest of the third chapter, which is called "The Horror of Fangskar", you can find the handle of the two-handed Lavatein ax (1/3). Luckily, this is easy enough to do. Moreover, it is impossible to miss this item - you will receive it for killing a troll named Grindan (will drop in the form of loot).
But the second part, the artifact blade of the two-handed Lavatein ax (2/3), is a little more difficult to find. The chest, which contains the item you need to search for the artifact, can simply be overlooked. But first things first.
We are talking about the quest "Robbery in the spirit of the Vikings" in the sixth chapter. As part of this quest, you can find two artifacts at once! The blade of the Lavatein is hidden inside a chest located behind a huge door in the cave. This cave is the only one in the location. It contains a room with a locked door.
To open this door, you need to find a rusty key. The rusty key, in turn, is hidden inside a chest located on a boat almost submerged under water.

A boat with a chest containing a rusty key.
The screenshot shows the location of the very boat - be guided by the mini-map in the lower right corner of the picture. The boat is tied to a pole on the shore. Break the pole and wait for the boat to swim up to the shore on the right. After opening the chest, take the key. Use the key to open the door inside the cave and take the Lavatein blade from the precious chest.
The last part of the weapon, the Lavatein two-handed ax head artifact (3/3), can be found in the game's penultimate story quest Road of Ice and Fire. Just study the location carefully and destroy the fire golem defender, from which the desired item will fall out (the second part of the location).
Artistic one-handed hammer "Mjolnir"
During the quest "Revenge" in the third chapter of the game, you can find two artifacts at once.
One of them will be the head of the one-handed hammer "Mjolnir" (1/3), which is quite simple to get. During the passage of the task, you will find yourself in a tomte cave. Head to its upper left to find a path that leads to a dead end with a precious chest. Inside it is the item you need.
The second part can be found in the Knife in the Dark quest in Chapter 8. To find the artifact handle of the one-handed hammer "Mjolnir" (2/3), you should climb up the map from the very beginning of the location. There are two caves here: the right one is deaf, the left one is through. Go to the through cave to find a locked door in it.
Behind the door is a chest with the artifact you need. Opening it is quite simple, but you have to explore the entire location. On the territory of this place there are four caves at once. The cave in which the door is located is one of them. Each of these caves has a lever. Activate all four levers to open the door. When you activate the latter, you will see a cut-scene. Just carefully explore the caves - the current one with the door, the one next to it on the right and the other two on the left side of the map.
The head of the one-handed hammer "Mjolnir" (3/3) is located inside the barrow, which you will visit as part of the "Plain of Souls" story quest. Inside the mound, you will have to properly "play" with levers and hidden passages in order to progress through the story. When you get inside, go right to find the first lever to the right of the pit passage. To the right of it, you will find a wooden platform standing in a vertical position. Hit them. The scaffolding will fall, and you will see that now you can get to the precious chest to the right. Do this by going around the ditch through the hidden passage and collect the last hammer artifact.
Artistic "Priven Shield"
Priven Artifact Heavy Shield Enarms (1/3) is the second artifact you can find in the Vengeance quest in Chapter 3 (besides the Mjolnir Hammerhead).
Finding this item is a little more difficult than the previous one. So, after finding the head of the one-handed hammer "Mjolnir" in the cave, leave it. You will have a road divided "into two lanes". Keep to the left lane and take the first left turn. This path leads to a dead end, but you shouldn't go that far to find the artifact.
Here you need to pay attention to the hidden passage that goes up the map. The hint is hidden in the map itself, which you can open with the M key. You can see the same passage on it. It is hidden by boards and logs that you just need to destroy. After that, get the artifact from the chest.
During the passage of the quest "Robbery in the spirit of the Vikings" in the sixth chapter, you can find the artifact of the shishak of the heavy shield "Priven" (2/3). In order to get a shield cone, you will need to go to the left side of the map and find one of the crusaders by the water. If you pass additional tests on each map (collecting iron skulls, etc.), then this crusader will be one of the objectives of the test for this quest. After killing him, you will receive the desired artifact.

Go to this point on the map.
The frame of the heavy shield "Priven" (3/3) is located at the location in the "Hide and Seek" story quest, which is in the ninth chapter. To get it, you have to solve a puzzle with tiles and symbols near the end of the map. You can see a detailed solution to this puzzle in a separate article dedicated to the puzzles of the game.
Bug. If the bug has not yet been fixed, then for many gamers, when solving the puzzle, the shield may not appear (a stone wall leaves, but there will be no shield on it). In this case, just complete the task, and then go on an additional quest, which will become available when interacting with the drakkar (boat) of the main character. Try to solve the puzzle again.
Art two-handed staff "Gyungnir"
I somehow missed the first part of the staff, but, it is clear that it must be found before the passage of the seventh chapter. Surely the clamp of the two-handed staff "Gyungnir" (1/3) falls out of some mob.
The second part of this staff can be found in the seventh chapter when completing the quest "Lair of the Simul".
So, being in a cave, you will find stone pillars at the top of the screen blocking the passage to the desired chest. You can interact with these pillars, which can be either highlighted or darkened. You just need to know the correct sequence.
Perhaps, with repeated passages, the solution is always the same, but just in case, I will indicate the place where the hint is located: go to the beginning of the location and follow through different rooms. One of them will contain a chalice of healing, a safe place (orange dot on the map) and an altar that allows you to level up your character by donating blood. When leaving this room, sticks are drawn on the walls - light and dark. This is the hint.
In my case, the solution looked like this (the following columns should be highlighted from left to right): second, fourth, fifth, seventh. Take the blade of the two-handed staff "Gyungnir" (2/3).
The third part of the artifact is the shaft of the two-handed staff "Gyungnir" (3/3). Just carefully study the location during the story quest "Plain of Souls". At some point, you can go to the right (when you are in the snowy mountains), where there is a huge Noble Frost Giant. After his death, the artifact you need drops out as a loot.
A detailed walkthrough of the quest "Simul's Lair" of the seventh chapter of Vikings: Wolves of Midgard: where to look for all the iron skulls, menhirs, how to kill Garm, a riddle with stone pillars, an artifact and a new talisman
- Chapter 1
- Chapter 2
- Chapter 2
- Chapter 3
- Chapter 3
- Chapter 3. Revenge
- Chapter 4
- Chapter 4. The Bishop's Gambit
- Chapter 5. Tunnels and Trolls
- Chapter 5
- Chapter 6. Castra Ignis - Viking Robbery
- Chapter 6
- Chapter 7
- Chapter 7
- Chapter 8
- Chapter 8
- Chapter 9
- Chapter 9
- Chapter 9
- Chapter 10
- Chapter 10
- Chapter 11
- Chapter 12
- The final. Eternal Well
To start this story quest, use the portal in your settlement.
You will be asked to pass three additional tests:
- Find 3 iron skulls.
- Destroy 3 menhirs.
- Kill 3 dwarven defenders.
First Door Defender
With the last point, everything is very clear and simple - moving from marker to marker, in any case, you will encounter these three opponents, but we will still indicate their location on the map.

First menhir
The first Iron Skull Chest is on the left side of the arena, where you will meet the first Guardian Doorg. The first menhir is also located there.

Chest with the first iron skull (slab already destroyed)
But the chest is hidden from view. Pay attention to the corner of the stone wall to see a slab and a small, shimmering blue hole. Destroy the stone slab to find the first chest. This is perhaps the most difficult of all chests with iron skulls on this level.

Chest with second iron skull

Chest with the third iron skull
The screenshots below indicate the location of all other items and objects: red circles - chests with iron skulls, yellow circles - menhirs, green circles - guardian doors.
In addition, you can see a white circle that indicates the location of the chest with the new legendary talisman "Braga". He is able to put enemies to sleep.

Chest with the legendary "talisman "Braga"

Talisman "Braga"
Finally, the purple circle marks the place where the chest with the next artifact is located - the blade of the two-handed staff "Gyungnir".

First part of the map

Second part of the map
To get to this chest, you will need to remove several stone pillars from the path. When interacting with each column, you turn on or off its highlight. Thus, you need to highlight the desired stone pillars to open the passage.

Stone pillars: passage to the chest with the artifact
How to do it? And the right combination should be sought almost in the first part of the location.

Hint for solving the pillar puzzle

Correct solution of the riddle with stone pillars
After destroying one of the dweerg protectors, you can see several drawings with wands on the walls - some of them are dark, while others are light. This is the correct order of the solution.
How to kill Garm?
At the end of the path, you will need to fight the huge fiery dog Garm. It will be possible to attack him in close combat only when he lowers his head. The rest of the time, try to dodge the blows of his paws. In principle, the enemy is not as difficult as it seems.

Fire Dog Garm
Quest Reward:
- Legendary bow "Ikaival".
- Door pickaxe.
- Runa Ingvaz.
- 4100 blood.
- 15,400 gold.
- 2200 wood.
- 460 iron.
Ambush on Jotun
In Vikings Wolves of Midgard, characters are divided into five different classes, each of which is associated with a specific Norse deity. You can choose gifts from Thor, Loki, Tyr, Skadi or Odin. At the same time, you can use any weapon in the game at any time, but it will be possible to use skills, for example, Thor, only if you have a two-handed hammer, sword or ax in your hands. If you chose the gifts of Tyr, then you will have to use only one-handed weapons, and so on.
Chapter 1
Make your way through the location, killing enemies. The most difficult thing here is to find three iron skulls. These collectibles are hidden inside three discreet chests. At the beginning of the game, keep to the right edge of the screen and go down gradually. After 20-30 meters there will be the first chest, among the trees.
Keep moving down and you will see a second chest behind the fence, again next to the trees.
Finally, you can find the third chest a little higher from the character who will need to be saved (Heldebrand).
Otherwise, you must learn how to use somersaults that perform the function of evasion. Use the Space, W, S, A, D keys.
From Wayland you will receive the first totem of healing. It has three charges and a certain amount of HP restored. More totems can be found later. When the charges run out, you will not be able to activate it. But you can restore all the charges of any totem at the healing altar, one of which will be in the village.
Rescue the two characters and then enter the jarl's house.
Chapter 2
Go to the altar on the left and donate blood to level up.
End of Yokul
At this location, you need to look at the blue bar under the health bar. If it fills up, you will get a frostbite effect and begin to lose health. Therefore, from time to time you need to linger at the fires marked with orange markers.
This time, regular chests will contain various resources, but not iron skulls. To find the skulls, you will have to find three golden chests. In principle, if you carefully explore the location, then look for them.
There is another golden chest in the upper right part of the location, located on a distant tower. To get to it, you need to raise the bridge. The bridge is raised by levers hidden throughout the area. Just destroy the wooden boards inside the stone towers and activate the lever - 4 or 5. When all the levers are activated, a cut-scene will AUTOMATICALLY start and you will be shown a rising bridge.
Go and take various resources from the chest, but the most important thing is the forearm of Luka Scandi. This is an artifact weapon that deals massive damage. Even if you are not an archer, you can sell it and earn a lot of money and a lot of resources. But this is only one of the three parts of the weapon!
When you destroy all the idols of Yokul, then go to the boss itself, marked with a skull icon. Go to the location and fight the enemy.
How to kill Yokul?
Destroy the enemy. Avoid the blue auras that spawn on the ground. Stand on orange circles to keep warm. While killing the wolves, get close to Yokul's throne and attack it. You will have to destroy the throne so that Yokul will never return to it. And then it's a matter of technology. The boss will have a little health left.
It will be good if you reserve a rage mode for him.
Bug with Yokul
Many have encountered this error when nothing happens after killing Yokul. Try to go through the location again, returning to the village through Esc. At the same time, without killing anyone, run straight to Yokul. Destroy and see what happens next.
Another option is to be patient and wait 5-10 minutes.
Another method is to die from the cold after the kill and go through the level again. There will be no bug this time.
old enemy
The quest "Hunting for wolves" can be completed several times. Items are located in the same place as in the mission "End of Yokul".
Go to the main quest "An Old Enemy".
In the screenshot above, you see the designations of all the items that need to be found:
- Iron skull chests are a red marker.
- The banners of Swanung are a green marker.
- Psari is a blue marker.
- Chest with the legendary accessory "Gusli" - yellow marker.
To kill enemies with shields, wait for them to attack first and then counterattack. Or use active skills.
When you find yourself in the jarl's house, you will need to kill him. Deal with two warriors, and then preferably attack the jarl of the Swanungs in rage mode.
Related publications
-
 The most profitable tank in World of Tanks
Taking part in the battles of the world of tanks, each tank brings a certain amount of credit (silver farm), which can be used...
-
 The Elder Scrolls V: Skyrim
Houses and estates in Skyrim On the territory of Skyrim, you can not only rush with weapons and cut out everything that moves on assignment or without. Here...