
How to solve the middle layer of the Rubik's cube 3x3. The impossible is possible, or how to solve the main models of the Rubik's cube

This page contains only a video instruction for solving a 3x3 Rubik's Cube. For other versions of the 3x3 assembly instructions, as well as algorithms and assembly schemes for other Rubiks puzzles, see the Instructions section. You can also use this instruction to assemble Rubik's VOID - a Rubik's cube without centers, however, at the beginning you will need to determine where which color you will collect and how these colors are located relative to each other.
To help those who watched the video course, we suggest downloading the instruction-cheat sheet for assembling the Rubik's cube on two A4 sheets with all the formulas mentioned in the video.
We invited Sergey Ryabko, two-time Rubik's Cube Champion of Russia, who also became European Champion in 2011, to record a video instruction on how to solve a Rubik's Cube. The proposed scheme is the easiest to understand, perfect for beginners, those who want to learn how to assemble a puzzle. Our instruction is distinguished minimal amount formulas, detailed explanations and illustrations. You can stop the video at any time by pausing the frame with the rotation formula. The video course "How to Solve a Rubik's Cube" from Rubik's consists of 7 parts and lasts a total of 30 minutes:
Step 1: Building a 3x3 Rubik's Cube
Step 2: Cross on the white side (first layer)
Step 3: Assembling the first layer
Step 4: Assembling the Second Layer
Step 5: Cross on the top side
Step 6: Assembling the Yellow Side (Last Layer)
Step 7: Rearranging the Corners
The materials were prepared with the support of MPEI students.
All the youth of the city were so in love
to the secretary of the local communal committee, that this prevented her from collecting membership dues.
After the publication of the story with the history of the creation of the Rubik's Cube, the blog began to receive requests for " how to solve a rubik's cube», « assembly scheme 3x3"and even by" secrets of the rubik's cube for beginners". The afflicted with burning eyes, constantly rotating five dice in each hand, conjured: “Give me! Give us a diagram with pictures! Give us back peace, sound sleep and healthy digestion!”.
I must admit that in the first days I was a little stunned by such an influx of cube fans. And at first he patiently explained to each Rubicompanist commentator that here about how the object of their passion appeared, and they write about assembly schemes in other places. Then I gave up.
As a lazy person, I decided to do something simple: give those who wish what they want and wash their hands. This is how this page came about. Enjoy.
Rubik's Cube Schemes. For beginners
Rubik's Cube 2x2: Very simple instruction and assembly diagram in 3 steps. (PDF, 217 Kb).
In general, the solving of the 2x2 Rubik's Cube is built on the logic of solving the last layer of the 3x3 Rubik's Cube, so for those who have mastered the 3x3, tips and tricks on how to solve the 2x2 Rubik's Cube most likely will not be needed.
Rubik's Cube 3x3: Translation of the original instructions and assembly diagram. (PDF, 898 Kb)
Rubik's Cube 3x3: Assembly scheme on 1 A4 sheet (author A. Pechenkin). (PDF, 1.25 Mb)
Rubik's Cube 3x3: Algorithm of 7 steps how to solve the Rubik's Cube. Version from in Belarus. (PDF, 2.8 Mb)
Rubik's Cube 4x4: Assembly scheme in three stages - central cubes, side cubes, all together by analogy with the assembly of a 3x3 cube. (PDF, 897 Kb). You will need the ability to solve a 3x3 cube.
Rubik's Cube 4x4, 5x5, 6x6, 7x7... 11x11: Author's algorithm Konishcheva GV, Magnitogorsk . A universal algorithm by which you can solve a Rubik's cube 4x4, 5x5 and more, up to 11x11. (PDF, 1.8 Mb)
Rubik's Cube 5x5: Assembly scheme in four stages - the first layer, then the corners, the outline and finally the central layers. (PDF, 1.4 Mb).
Famous articles about the Rubik's Cube that appeared in popular magazines during the Soviet era:
From tatya from magazine "" How to solve a Rubik's Cube:
1981 (PDF, 355 Kb)
1982 (PDF, 466 Kb)
1983 (PDF, 318 Kb)
1983 (PDF, 634 Kb)
1985 (PDF, 924 Kb)
1985 (PDF, 220 Kb)
From tatya from magazine "" about Rubik's Cube:
1980 No. 12 (PDF, 687 Kb)
1982 No. 3 (PDF, 1.7 Mb)
1982 No. 7 (PDF, 1 Mb)
1982 No. 8 (PDF, 1.4 Mb)
1983 No. 9 (PDF, 2 Mb)
From tatya from magazine "Young Technician" about the Rubik's Cube: : Booklet on English language(PDF, 943 Kb)
Rubik's Tic-Tac-Toe (Rubik's Tac Toe): Instructions for the game. (PDF, 184 Kb)
If you have other variants of Rubik's cube algorithms, descriptions of Rubik's puzzles or methods for their assembly, send them to us and we will publish them on this page or add a link to your site.
TOP 10 world records for solving the Rubik's cube for speed:
- that's half the battle. Now it needs to be assembled. And here this most detailed video instruction will help you.ANOTHER RUBIK'S CUBE INSTRUCTION FOR BEGINNERS?
The internet is busy right now huge amount instructions on the topic how to solve a 3x3 rubik's cube. The ways to solve the Rubik's cube for beginners, which are taught by numerous instructors, are practically no different.Except for one, the most important thing - the simplicity and accessibility of the explanation. It depends on this how quickly you or your child will solve your first Rubik's cube.
WILL COLLECT EVEN A FIRST-GRADER. THE BEST INSTRUCTION FOR LEARNING CHILDREN.
Simplest 3x3 rubik's cube learning method developed by the hero of the show "Ukraine Got Talent" Maxim Chechnev. Maxim, while working in children's camps, taught many children how to solve a 3x3 cube. And based on his experience, he developed the simplest teaching methodology, understandable and accessible to children even of primary school age.
The learning process is divided into 9 lessons with tasks. Do not be intimidated by the number of lessons - all of them can be completed within a few hours. But in the final, you will not only collect your first Rubik's Cube, but you are also guaranteed to remember the assembly steps and for the second time you will definitely collect the Rubik's Cube without prompts, on your own.
How to solve a Rubik's Cube video from Maxim Chechnev.
Stage 1. Basics of the cube structure.
Stage 2. We assemble a cross on one of the sides + a theory about the elements of the Rubik's cube 3x3.
After you have assembled the cross, before watching 3 videos, it is MANDATORY to disassemble and reassemble it several times. Fix the steps and Rubik's cube formulas immediately, so as not to forget in an hour!
Stage 3. We put the elements of the cross in place.
Stage 4. We collect one side completely.
Stage 5A. We collect the second layer (second floor) of the Rubik's cube + fixing the material.
IMPORTANT! After completing step 5A, disassemble your cube - and be sure to secure the previous 4 steps of the Rubik's Cube on the orange side (collect the cross, and then completely the entire orange side).
Stage 5B. We collect the second layer (second floor) of the Rubik's cube + additional possible situations.
Before you begin to study the algorithm for assembling the Rubik's Cube game, you need to find out the history of its occurrence. The cube was invented by the Hungarian professor and sculptor Erno Rubik in order to explain the basics of mathematics to his students.
However, the mathematics of the Rubik's Cube soon struck the minds of others, including Tibor Lakzi, who was busy promoting the game. By the end of the 20th century, assembling the Rubik's Cube had become a new hobby for many, and the circulation of the game exceeded one hundred million copies. The world record was set by Mats Volk. He solves the best Rubik's cube in 5.55 seconds.

How to disassemble a Rubik's Cube if it is already assembled and why is it needed? The structure should be disassembled in order to make sure that all the parts are arranged correctly. To do this, you need to mechanically arrange the parts in their places and only then proceed to the initial stage.
What are Rubik's Cubes? It should be said that the varieties of the Rubik's Cube range from 2x2 to 7x7 inclusive.
The types of Rubik's cube are also diverse. For example, there is a very original Rubik's cube - in the form of a 3-d pyramid, munks, a mirror Rubik's cube. However, the 3x3 Rubik's Cube puzzle is most often used.
Before you learn how to assemble a disassembled game, it's worth learning a little theory for beginners. For starters, this is a Rubik's Cube device. The whole cube consists of 6 edges and 12 faces, as well as mounts that hold all parts of the structure.
There are three positions of minor elements:

- Central. There are only 6 such positions, the element is located in the center of the face. One side item belongs to 1 part.

- Lateral. Such elements form a cross of 4 pieces on one face. One side position belongs to 2 elements.
- Corner. located at the corners of the structure. There are 3 cubes per corner.
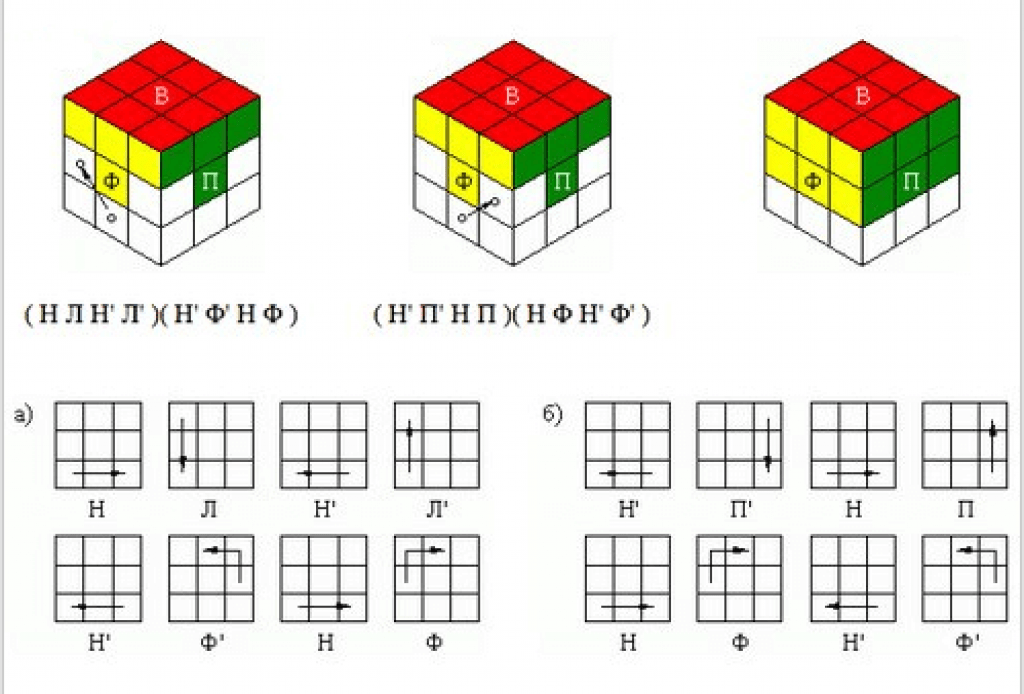
It is also necessary to learn the language in which any formula for solving a Rubik's cube is written. Rubik's cube diagram notation.

After the basic notation has been studied, you can proceed to the assembly of the structure itself.
How to solve a Rubik's cube 3x3 - quickly and easily. The best technique for beginners.
Steps to assemble a Rubik's Cube

There is a simple instruction that proves best of all that even a child can fold an ordinary figure, as well as a mirrored Rubik's cube. How to solve a Rubik's cube 3x3 scheme for children - the Friedrich method.
First stage. Assembling a Rubik's Cube always starts with a cross. Assembling an ordinary cross on one of the faces is quite simple, you just have to decide on the color: yellow is most often used. At this stage, you can ignore the position of the colors on the other sides.

Second phase. The most important thing is to learn how to assemble the right cross. This means that the top elements of the mating sides must have the same color as the central ones of the same faces. If this did not happen, that is, a maximum of two sides did not match, one of the following algorithms should be used.
In this case, an important criterion is that the cross is always at the top.
Third stage. It is necessary to fully assemble one of the sides, that is, put the corners in place. If you turn the cross over and make it the bottom side, you will notice that the upper corners of adjacent sides contain the one you chose as the basis. Accordingly, there are three options for the position of the yellow element: top, left or right, and for each of them there are their own combinations to combine them with the bottom side.

In the end, it should turn out that one side is completely ready, and the top layer of each adjacent side and the center have the same color.

Fourth stage. Before you start collecting a cube for speed, you should remember some more formulas.
First you need to turn the finished side up again. Then scroll the bottom edge so that one of the colors of the side element matches the color of any side and forms the letter “T”. Thus, you will need to move the side cube from the bottom layer to the middle one so that its two colors match the colors of the adjacent sides. In this case, there may be two positions.

Fifth stage. Now we need to deal with the 3rd layer. First you need to turn the cube so that the “raw” side is on top. If you chose yellow as the main color, then white should be the diametrically located color. You need to apply the following algorithm for a certain position of the cube(s) with white color.
Sixth stage. Assembling a regular cross, in which the colors of the upper face must match with adjacent ones, implies two cases, but if none of the cases is suitable, any algorithm can be taken.

Seventh stage. Arranging the corners in your position at this stage will be quite difficult. There can be confusion between the layers here, but with proper assembly, everything will easily fall into place.
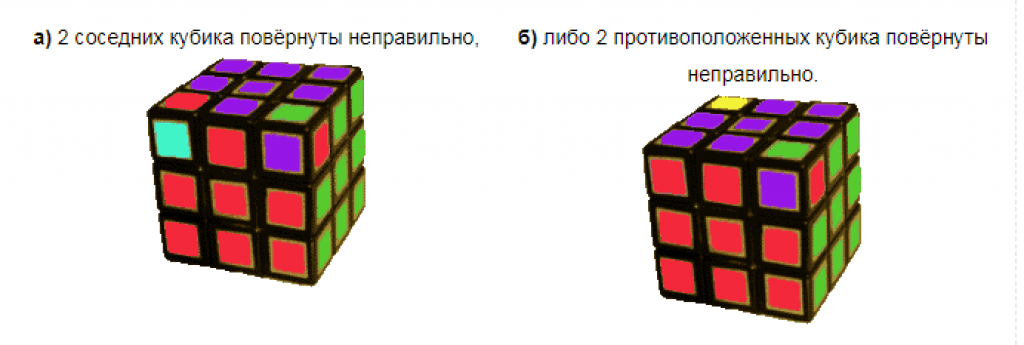
Eighth stage. To turn the corners correctly, we need to consider two cases, again related to moving in a circle.
If you need to change the corners crosswise or opposite corners, you can use any of the algorithms.
The same method can be used to assemble a mirrored Rubik's cube. A small Rubik's cube will be much easier to solve, but the Rubik's cube will only count as a record for the 3x3 variant.
Secret Technology

If your goal is to complete a Rubik's Cube in a minute or less, and become the best at it, you need to know some assembly secrets.
- It is best to start the assembly by choosing white or yellow as the base.
- The correct Rubik's cube technique means that you need to spend as little time as possible turning the cube over. Even if you do it quickly, there will be a difference in precious seconds or milliseconds, which can change the world record. Therefore, many begin the assembly of the initial cross on the bottom face.
- A good result is always shown by the one who knows how to look one step ahead - at stages where strong mental stress is not required, one must already think over the next move.
- Speed Rubik's Cube 3x3 is different high quality and the ability to rotate, however, for this you can use a special lubricant, even for not very expensive designs.
- A professional Rubik's Cube implies the ability to use all fingers when solving, and this often helps to set a new world record.
How to assemble with closed eyes according to the algorithm

How to solve a rubik's cube eyes closed? Just remember a few rules.
- Pictures of the Rubik's Cube should always be in memory as before your eyes. To do this, you need to start the assembly each time with the same color and remember that the centers of the sides are always stationary relative to each other.
- The invented method of assembling with closed eyes is the best way to quickly start hitting others. The algorithm assumes that you first need to correctly orient the corner elements using the formula “R W R’ W R W2 R’ L’ W’ L W’ L’W2 L”, since each corner contains either white or yellow.
- Then you need to do the orientation of the side elements. We need to determine if the element is in the correct orientation. If it is correct, then the color of the element matches the color of sides B and H and does not match the other sides. If the element belongs to the middle layer, then the orientation is correct if the color of the element of the same sides has the F or Z sides.
Thus, by repeating these algorithms, it is possible to arrive at the initial position of all elements. In the same way, you can learn how to collect another unusual look - a mirrored Rubik's cube.
How to solve the Rubik's Cube the easiest instruction
Collecting a Rubik's Cube can be difficult for both an adult and a child, and if after several attempts you fail, do not despair, simple and understandable 3x3 patterns will help you figure out the puzzle. There are many different ways to do this, because the best minds at one time spent their energy on this and gave amazing results in the form of schemes and algorithms.
The easiest way to assemble for those who have just started
This scheme is considered the simplest and is great for children. It starts with the assembly of the cross, in other words, each edge should have the same color of the central plate and corner elements. At the beginning of the assembly, the Rubik's cube must be disassembled. Assembly scheme 3 * 3 in 8 stages.
First you need to take the cube in your hands and turn one of the sides towards you, respectively, taking its frontal one - F, all remaining according to the scheme. Assembly must start from the bottom (H).
Below is a diagram of this approach:
- Having chosen the color that you want to start first, proceed to the assembly of the lower cross. This is a simple stage, the complexity of which ends solely with the choice of color. What is at this stage on the other sides of the cube should not attract attention.

Rubik's Cube Step
- It is necessary to assemble the cross correctly - the cross must end on adjacent faces. This means that the faces located at the top of the mating sides must have the same color as the bottom cross. If this did not happen during assembly, then there are two available algorithms that can correct the situation:
- The mismatch on two adjacent sides is corrected by the scheme:
P V P»V P V2 P V
- If the opposite parts of the cube have an error, then you can try the following formula:
F2 T2 N2 F2 T2
When working with these algorithms, the cross should be at the top.
- We collect completely one of the sides of the Rubik's cube. To do this, you need to put the corners in place. Turning the puzzle over with the already assembled cross down, it will become noticeable that the upper corners of the sides adjacent to H have acquired the same color as the cross. That is, if the cross is yellow, then the considered corner elements will also be yellow. With such a scheme, only three options for the position of the base color can be possible: on the left, on the right, or on top, and for each such position there is its own assembly scheme:

The result of applying such algorithms is one fully assembled color, and the adjacent side of the upper strip has one color.
We continue the assembly
- If you want to solve the Rubik's Cube for speed, then there are a few more important and relevant formulas for you to remember. We unfold the side that is already completely ready up. We begin to twist the bottom edge until the color of one of the side elements matches with any of the sides and form the letter T. Then, it is necessary to move the side element from the bottom edge to the middle until it matches the color of the adjacent sides. As a result, we get two versions of the provisions, in which:
- Left turn required: N L N "L" N "F" N F.
- Move to the right: N "P" P N P N F N "F".
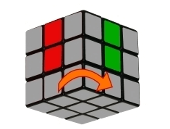
- Now it's time for the third layer. We turn the toy itself over so that the side that has not yet been folded is at the top. Most likely, white became the opposite color if you chose the most popular yellow color to start the assembly. If there are white plates in front of your eyes with any position described below, then I act according to the following formulas:
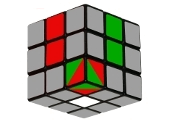
White dice: central and 2 opposite F P V P "V" F".
White dice: center and two on the side F V P V "P" F".
White dies in the center, choose the scheme you like and repeat 2 times.
- Another regular cross with the upper face matching in color with adjacent ones, in which 2 outcomes are most often possible:
But, if this does not affect the situation in any way, then you can use any options.

- A rather difficult stage at which it is necessary to put the corner elements in their rightful places. And it's not that easy. Most often there is a lot of confusion in the layers, but if everything is done correctly, then in the end, each color block will stand where you need it.
- Stage number eight is connected with the same angles and roundabouts:
Clockwise P2 V2 » P F P» V2″ P F P .
And in the opposite direction: P "F P" V2 "P F" P "V2" P2 .
Any of these algorithms will also come in handy when moving in corners: crosswise or opposed.
The mirror cube is assembled using the same algorithms, but those who want to break the record should know that only the 3 * 3 model applies to this indicator.
The assembly of the 3 * 3 model for clarity can be seen in the video below:
How to solve a Rubik's cube 3x3 - quickly and easily. The best technique for beginners.
Seven steps to build
- First, make sure that the cube is disassembled. This will mark the beginning of stage number 1. The stage ends with the assembly of the cross on the top side of the cube, and the upper middle faces of the sides should match the center in color. One of the plates of the upper cross should be located on the edge of the bottom. To do this, we take either the first or the second option.

![]()
The operation is repeated for all remaining cubes of the cross B.
- Stage two starts with the assembled cross of the upper part, ends with the fully assembled. How does this happen? The diagram is popular to explain the entire sequence of actions. We take the corner element of face B and translate it into H. Depending on the color distribution, you need to choose your own solution.


With three cubes of the corner of the upper face, you need to repeat exactly the same thing.
- It is easy to guess that the beginning of the next stage is always the result of the previous one. As we remember, the previous goal was to assemble the face completely. If the goal is achieved, then you can begin to implement a new task: the assembly of the two upper layers.
To simplify, we turn again to the help of diagrams. It is necessary to move the selected side cube down. Next, choose:

We continue the assembly
As usual, we repeat everything and stir the last dies.
- The cube assembled with two belts must be placed in layers down. This part will end with the cubes from the cross B in their place, but turned upside down. You just need to rearrange the cubes In the middle part until the moment when everyone falls into place.


These actions will give the effect of breakage, but you should not be afraid. Repetition is the mother of learning. We fix the algorithm and voila - we have a cube in front of us where everything is in place. But you need to spatially change the wrong cube in your hands a little, turning it over to the side on the right.
- In this step, the beginning, as always, is taken from the end of an already completed step. We go according to the scheme.

- At the end of the step, the cube will be fully assembled, but it will start with the fact that all the corners will be where they should be, but possibly upside down.
There may be two positions.
To do the flip, do the following:

The algorithm is applied until the PV becomes correct. Again, things can get messy, but that's okay if you trust consistency over and over again. Before repeating, we put another “wrong cube” in the corner on the right. Repeat until the cube is completed.
The Jessica Friedrich Method
Jessica Friedrich's method, as one of the fastest methods for solving a Rubik's cube.
In 1981, Jessica Friedrich developed her assembly plan, which has all the same basic points and no fundamental differences, but it greatly speeds up the process. You just have to learn "only" 119 rules. If you want to break a record, you have to strain your brains.
If you are just starting out and spend two minutes or more on assembly, then this method is not for you yet, practice with eight step instructions.
- This method begins with the same assembly of a cross with edges on the sides. In English, the name of this step sounds like Cross and in translation means a cross.
- The second stage implies the assembly of two layers of the cube at once and is called F2L (an abbreviation for the phrase First 2 Layers, which literally translates as the first two layers). The algorithms describing this path are given below:

- The OLL stage means assembling the top layer of the Rubik's Cube. It will be described by 57 formulas.

- The final, fourth stage is called PLL and means the placement of all elements in their places. The last stage can describe these algorithms:

15 steps to assemble a 3*3 cube
In 1982, for the first time, competitions appeared in which those who wanted to solve the puzzle as quickly as possible took part. In connection with the discovery of such games, more and more new formulas and algorithms for solving the problem began to appear. But, in fifteen moves, no one has yet been able to cope with the task. Even an assembly using 8 stages implies many more moves. The algorithm of God given below has twenty such moves.
The discovery of such a quick assembly belongs to a team from Google, in 2010 they released their solution to the Hungarian sculptor's puzzle.
Now, if you hear somewhere else about the 15-step solution system, you can safely argue with him, there is no chance that his resource will exceed the resources of such a powerful company. Those who wish to learn how to solve the cube by the fastest and probably the youngest method among the ambulances can pick up toys and use the scheme shown in the picture below.

Secret assembly technology
For those who want to cope with the task, in a time equal to or less than a minute, it is worth learning a few simple rules.
- White and yellow color will be a great solution to start the assembly.
- Many precious seconds are wasted on turning the Rubik's Cube in hand, which, of course, negatively affects the temporary results. That is why they start assembling, collecting a cross on the bottom face of the puzzle. So you save time on the confused turning of the toy.
- The 3*3 cube is well suited for the hand and its surface is already quite slippery and rotates well, but for greater success, you can purchase a special, not very expensive lubricant for such items.
- Always be one step ahead: at the moment when the mental stress has already subsided and you are completing one of the algorithms that will definitely lead to success, it's time to think about the next step.
- Use all resources: all your ten fingers. This is what will lead to new records in the assembly of the cube.
With closed eyes? Easily!
Do you want to surprise everyone with the ability to solve a Rubik's Cube without watching the process? Learned algorithms will help to cope with this. In addition, follow a few simple rules:
- Keep in mind the picture of the puzzle, it should always be mentally in front of your eyes and remember the golden rule, which says that it is best to start assembling from the bottom edge. And do not forget about the immobility of the centers relative to the sides.
- Assembling the cube with blindfolded or closed eyes will definitely amaze those around you. The invented algorithm says: orient the corners correctly! As a rule, all corners contain two colors: it is either yellow or white.
- Correctly position the side elements of the problem and whether its orientation is correct.
HOW TO COMPLETE THE RUBIK'S CUBE
How to solve a rubik's cube. Instructions on how to solve a rubik's cube. Algorithms for how to solve a rubik's cube.
Related publications
-
 Walking Dead: The Final Season walkthrough When will the walking dead second episode come out
In this walkthrough, only one of the options for passing the game is considered! + Described finding all collectibles. Episode 1:...
-
 Passage of the plot Truckers 3 secrets of the game
Third life behind the wheel, Three centuries without sleep. "You are not alone", group DDT Rassvet. A few hundred miles behind, pinking mountains ahead, and behind them...