
DIY board game project. We diversify our leisure time: do-it-yourself board games

As you know, sitting children in front of a computer is not very good for their health. It is much better to captivate a child with a board game - bright and colorful, with an exciting scenario and unusual characters. Today's selection is about board games for kids that you can make yourself.
Even if you already have several games at home, we recommend trying to make one or more of your own, based on the scenario you like. Of course, the production of a really colorful and exciting game is a very laborious process. However, a homemade game will fully meet the preferences of you and your baby - from the characters to the design of the playing field.
Some Tips
The first and most important point, on the implementation of which the quality of the game depends, is its idea. It's good if you, starting to create your board game, already have a rough idea of what it will be like. You can make a desktop "walker", "quest", "strategy" or simpler, but no less exciting - chess, tic-tac-toe, lotto, dominoes and other games.
Decide on the scale of the game. There is a nuance here: if you are inventing a game for a baby, then make the game details large and place the game on the floor. Younger schoolchildren and teenagers will be more interested in board games on paper, which can be played sitting at a common table.
Create sketches of the playing field, chips, cards, dice, the necessary figures, banknotes and other trifles. At this stage, you should also take care of the design of the game and how you will decorate the playing field by preparing all the drawings, stickers and stickers necessary for this.
During the sketch testing phase, involve as many participants as possible to make the game interesting for everyone. During the game, notice the shortcomings and try to fix them. Perhaps one of the participants will offer more interesting options for moves or design. Just let future players participate in their creation, and they will come up with the ground rules themselves!
After making all the suggestions and adjustments, decorate the game, cut out all the necessary chips, figures, bills, tips, etc., collect the heroes of the game and decorate the playing field.
Ideas
Now a few words about what kind of game you can make. The theme of the game will depend on the interests of your child and the hobbies of your family. Most often, they come up with desktop "walkers" or "quests" with the heroes of their favorite fairy tales and cartoons, when there are many obstacles on the hero's path that must be overcome in order to complete the mission.
You can make a game on the principle of an "artist", when you need to finish drawing certain parts of the body for your character, which the player takes out by lot. It turns out very fantastic and fun.
Idea 1: Tic-tac-toe
Tic-tac-toe is one of the famous games that both kids and adults can play. The basic principle is that two opponents fill the squares with crosses and zeros, carefully calculating the logic of their opponent.
If your child does not know how to or does not like to draw, this game will appeal to him. One of the simple options for this props for the game is to prepare chips with crosses and tac-toes in advance. Chips can be made from any materials, and the field can be made on fabric. For girls, a heart-shaped field and chips of different colors are also suitable in the form of small hearts.
Recently, crafts made of felt have become popular. This material is very convenient in needlework, as its edges do not crumble. You only need to cut out the chips and make a field. You can carefully make stitches along the edge to decorate the field and chips.
If you want to play tic-tac-toe during your meal, make a game with magnets. Take 4 ice cream sticks, paint them with paint, and then glue them together to make a playing field. Glue magnets on the back side. Separately, make chips with zeros and crosses marked. They also need to stick magnets to them. This version of the game can be attached to the refrigerator and played while eating.
Idea 2: Treasure Hunt
Treasure hunt is just one of the variants of the rpg game scenario. In fact, you can come up with any plot - cat and mouse, a round-the-world trip, a game based on your favorite fairy tale, etc. The main props are a playing field with cells and a die, when thrown, the hero's figure moves a certain number of cells. Cells can contain tasks or "tricks" - for example, when hitting a certain cell, the player moves back a few steps or skips a turn.
To make the game, you will need 8 sheets of A4 paper, tape, a ruler, a small round object with a diameter of 3-5 cm, for example, a cover, colored pencils and a set of felt-tip pens. Sheets of paper are laid out neatly 4 in a row. In order for the card to be folded, we leave gaps between the sheets. We put a load in the form of a book on each sheet so that they do not move and glue all the sheets along each row with tape. It turns out a large paper rectangle.
Turn the card over and start filling it out. Using a pencil, we outline the future route of moves, placing directions from top to bottom. Stops are drawn in the form of circles using a cap. The distances between the circles should be small - 3-4 cm. Then we connect all the circles with a ruler. We circle all the lines with bright colored pencils and felt-tip pens.
All empty spaces on the map can be filled with drawings on the selected topic. It is good if the whole family takes part in drawing. Parents can come up with drawings themselves, and let the child decorate. You can also use beautiful stickers.
After preparing the field, we come up with the rules of the game and write them in circles. For example, in some places you can add bonus steps, and in some places you can add penalty steps that will force the participant to go back a few steps.
After the card is ready, it can be completely pasted over with tape. So it will last for a long time. In this form, the card can be taken with you both on a visit and on the street. As chips, you can use chocolate egg toys, as well as any small objects such as smooth pebbles, chestnuts, etc. The cube is made of cardboard, or you can buy ready-made.

Idea 3: Puzzle "Geographic map"
Puzzles - pictures that need to be made up of pieces - are known to every kid. Those that are sold in stores are often not of very good quality, printed on cardboard and cut in a standard way. And once upon a time puzzles were much more interesting! They were invented by the Englishman John Spilsbury in 1761. Trading in geographical maps, he invented a new teaching aid. Spilsbury began to stick geographical maps on a base of cedar and mahogany and cut the resulting picture into many pieces of various shapes. Each of the pieces contained a small part of the geographic information, and by collecting the necessary sections piece by piece, the students studied geography. In the future, puzzles began to be used to study other subjects.
We propose to create a puzzle to study the geography of our country. Buy an outline map of Ukraine and color each region of the country in your own color with your child. Along the way, you can write some interesting facts on each region or draw a famous symbol of the region - for example, the Lviv City Hall, the Carpathian Mountains or the Crimean beaches. After that, you can stick the card on a sheet of thick paper or cardboard, cut it into square or curly pieces and assemble it like a puzzle.
Instead of a map of Ukraine, you can also create a puzzle dedicated to Europe or the whole world. If you or your child are fond of drawing, you can try to draw a map yourself or even come up with fictional states with their own history, peoples and customs.

Idea 4: "Monopoly"
Monopoly is one of the most popular board games in the world. It was invented in 1934 in the USA, and since then it has gained a huge number of fans around the world, because it is interesting to play for both children and adults. There are a lot of variations of Monopoly in the world, but a game made by yourself will undoubtedly become a hit in your home game library, because it will be made in accordance with your personal preferences, with a unique playing field, chips, heroes and banknotes.
For the playing field, thick drawing paper is best suited, which will subsequently need to be glued with adhesive tape so that the game is durable. We draw a closed playing field on whatman paper, which can be decorated to your liking. The size of the field, the shape and number of game cells are determined by you. The level of difficulty is completely up to you, just like the plot and the specifics of the game.
After the playing field is ready, and all the necessary marks have been applied, draw your own chips, bills and cards with conditions. Coming up with the name of the currency, developing a sketch of banknotes, and making them will bring joy to you and your child for several evenings!
Don't forget to choose the right figurines: let each player make their own figurine or choose the right one from the little things in each house.
Separately, it is worth working out the rules of the game, adapting them according to your preferences and the level of training of the players. The rules can either make the game easier or harder depending on how experienced the players are at playing it. Make a separate card with a set of all the rules to avoid disputes during the game.

Idea 5: Alias
"Alias" or "Say Different" is an exciting educational game for children. During the game, the child will be able to learn how to convey thoughts to people, develop vocabulary, learn to listen and understand others. Great board game for language development. The usual game set, which is sold in online stores, includes a playing field, an hourglass, a cube, chips and cards on which the words are not only written, as in an adult game, but also drawn. In the do-it-yourself version of the game, you can do without an hourglass, you can count the time using a stopwatch on your phone.
Alias is a team game: the more people, the more interesting it will be to play it. Prepare the playing field, lay out stacks of cards, divide into teams and you can start.
The idea of the game is to explain as many words as possible to the teammates while the sand is running through the hourglass and be the first to reach the finish line.
Players take turns moving their tokens across the board by the number of dots shown on the die. At the same time, during each turn, players need to pull out a card from the pile and try to explain to others what is shown there. You need to explain in other words, you can’t say a word from a card. Other players must understand what word they are trying to explain. In this case, the player can represent the word with sounds (“meow”, “wow-wow”), try to find synonyms or even antonyms.
If the word is guessed, then the player will be able to move the chip again on his next turn and explain new words, if not, then on his next turn the player will explain the words without moving the chip.
The playing field for Alias is quite simple, and it will not be difficult to draw it yourself. You can do without it altogether - just count points or draw checkmarks: whoever has more checkmarks or a longer column with correct answers wins.
The most important thing in this game is the cards. They are best made from thick cardboard. Pictures can be cut from old magazines or drawn by yourself. The number of cards in the game can be unlimited and subsequently "expand" the deck, adding new interesting pictures as you find them. For one card, one picture is needed, denoting a certain word or concept. It is better to write this word on a card so that the player can find out that it cannot be used in an explanation.

Idea 6: "Fleas"
Flea is an old Slavic game. Previously, they were made of wood or made from buttons of a certain shape. But, unfortunately, not always at home there are so many necessary buttons, so we propose to make a toy a little differently and from the materials that everyone probably has at home. The cost of this game is minimal, the production time is 10 minutes, but the fun and pleasure is for the whole day. The game develops fine motor skills of hands and game communication skills.
To play, we need beans (preferably two colors), a cardboard box for sweets, two coins of 5 or 50 kopecks, felt-tip pens and colored paper, a small piece of felt or other dense material.
From dense material we cut out two circles. You can use a coffee cup as a template. We paint or glue the inside of the candy box with colored paper (it is necessary that the playing field has sides, otherwise the beans will fly away from it). We make the markings of the playing field like a football field (you can do without markings - dream up with your child). Ready!
How to play: if you press a coin on the edge of the bean, the bean will jump like a living flea. Beans jump well from a soft surface; for this, felt disks are provided. This property of jumping is the basis of the folk game. And then there are already options: get a flea in a bowl, cover the opponent’s flea with your flea (this is if the fleas are wooden and large), whose flea will jump further, etc. In our version of the game, the main task is to get your flea into the opponent's goal.
Players are located in front of the field and try to get into the opponent's goal. If the player hits his color on the field, you can pick up the bean from the field and use it in the next turn, if the bean remains on the opponent’s field, but does not hit the goal - no point is awarded and the bean remains in place, if the player scores a goal in his own gate - a point is awarded to the opponent. They play until the bean fleas run out. The amount of beans can be varied.

Idea 7: "Worm Races"
Worm Racing is a board game for kids 4-8 years old. You can buy the original game in the online store, but we suggest you make it yourself, since you don't need special game accessories to make it. To make the game, you will need cardboard, felt-tip pens and several sets of seven chips of the same color - you can use buttons, checkers, or even M&M's dragees.
We cut out tokens (cards) from cardboard and put down numbers from 4 to 7 on them, plus a token with the “X” sign. We make as many such sets as there will be participants. We paint each set in a color corresponding to the color of the set of chips. We also cut out a strip with the inscription "Finish" from cardboard. Everything, the game is ready!
How to play: each participant is given a set of chips and a set of tokens of the same color. The chips are placed at the start in a row, in the form of worms. Before the first move, bidding takes place between the participants. Everyone blindly selects one token from their set and places it number down on the start line. After all the tokens are laid out, they are opened and it is determined who goes first and how many moves he moves his worm. Each participant in the game moves the worm by the number of moves that is written on the token. The right of the first move goes to the one who has the smallest number on the token. If two tokens with the same numbers are opened, the owners of the tokens skip the turn. The owner of the token with the “X” sign moves for any number of moves (from 2 to 7), besides, he can move the finish line further (but not closer). After the turn, the won back tokens are set aside and can only return to the owners after a turn.
Atyrgul Kalilova
I have been working with young children for over 10 years. The main task of the early development of a child at 2-3 years old is the development of sensory skills, fine motor skills and coordination of movements. In the work of the DOE, a large and important place is occupied by DIY games. They are used both in joint and independent activities of children. Playing at preschool age is the leading activity of children. The game is a source of extensive information, a method of teaching and educating children. With its help, conditions are created for the development of creative abilities, the comprehensive development of the child.
The new formations of modern life put before us teachers the search for new methods and techniques of working with children. In order to arouse children's interest in the game, I have prepared a methodological guide in the form of didactic games for young children. In the touch corner there is a card index of games do it yourself. As far as possible, we invent and regularly replenish our favorite corner with new didactic games.
A good helper in the development of fine motor skills in our group are various educational toys that we made ourselves


Related publications:
An alternative to expensive didactic games is handmade games. Each time sorting through the old cubes, the hand does not rise.
1. Game "Domestic and wild animals". 2 pictures are pasted on cardboard: a forest and a village, holes are made and screw necks are inserted.
One of the leading aspects of the development of a preschooler is the development of fine motor skills, and coordination of finger movements. It has been proven that development
Proper speech breathing is necessary for the development of speech, since the respiratory system is nothing more than an energy base for speech.
DIY games. "Catch the bee" this game develops attention, dexterity, coordination of movements. For the manufacture you will need: plastic.
1. "Guess the picture" The game is a box with interchangeable pictures inside, covered with some kind of cereal. Children rake with their fingers.
After wandering around the Internet, I decided to make some board games for my kids. I printed the pictures, colored and glued them.
Victoria Sakhno
Board games for kids are a great way to play together. At the same time, in addition to having fun, they contribute to the development of the child. Depending on the game, intellectual, speech, creative abilities can develop. Today we invite you to make DIY board games to develop the intellectual abilities of your baby and. These games will be interesting for preschoolers and younger students, and the production will take no more than 15 minutes.
tangram
Tangram is an ancient Chinese puzzle invented in the 6th century BC. It is a square divided into 7 figures: triangles - 2 large, 2 small and 1 medium, a square and a parallelogram. The essence of the game is to assemble another given figure according to the silhouette from these 7 figures. In this case, all figures must be used and the imposition of one figure on another is not allowed.
Tangram develops logic, attention, figurative and abstract thinking, as well as fine motor skills of hands.

How to make a tangram?
As a basis, you can take cardboard, thick felt or porous rubber. If you plan to make the game one-color, then cut out the square and divide it into parts according to the scheme. If you choose a multi-colored puzzle, then first we draw a tangram pattern on paper, cut it into pieces, and then cut out tangram figures of different colors according to the pattern. I chose the second method in order to make it easier for the child to assemble the figures according to the color scheme. As a material, I use porous rubber with a velvet coating, the size of the assembled game is 17 by 17 cm. Figures from such a tangram are quite large.
In addition to the puzzle, diagrams are needed. They are diverse in subject matter and can be easily found on the Internet. You can print them out or draw them yourself in a notebook (like ours).

There are 3 types of circuit complexity:
- The scheme is divided into tangram figures and colored according to the color of the main figures. This is the simplest option when a child correlates a colored figure with a drawn one and lays out a given figure by copying.
- The scheme is divided into main figures, but at the same time it is one-color. There is no color hint anymore.
- The scheme is a silhouette without a breakdown into the main figures. Such tasks become available at school age.
Tic-tac-toe
The well-known game in our performance "Berries - Mushrooms". Develops logic and thinking. To make it, we need: multi-colored porous rubber, 1 meter of thick yarn (bright braid or rope), scissors and glue. 
Manufacturing process:
- Cut out the playing field - a square measuring 22 by 22 cm.
- We prepare 2 pieces of yarn 22 cm each and glue it on the playing field in accordance with the generally accepted pattern.
- We cut out berries (5 pcs.) From red rubber and glue a green stalk on top.
- Cut out mushrooms from brown rubber, also 5 pieces. White legs are decorated with white rubber. In the absence of the latter, I used a piece of white felt.
When the game is dry, you can play.
Tired of the mess in the nursery? Tired of endlessly collecting toys for the child?
labyrinth
For my daughter, I made 2 mazes: a large one and a small one with different tasks. In the small one, you need to help Masha get to the fruit tree. But on the way they are waiting for her: a spider, a bee and a snail. You need to choose the safest path. In the big labyrinth, you need to help Luntik collect all the toys and come with them to Kuza for a joint game. 
To make a labyrinth we need:
- box lid (I used lids from our board games, now they are 2 in 1 games),
- cocktail tubes,
- glue,
- scotch,
- big bead,
- stickers or cutouts depending on the missions and story of your game.
Now on the lid we mark the labyrinth itself, that is, the places where you will stick the tubes. You can make a labyrinth yourself, use our version or copy the appropriate one from the Internet. Now we try on and cut the cocktail tubes so that they exactly match the given pattern. We glue them with PVA glue, then carefully glue the stickers (figures). When the glue dries, additionally fix the ends of the tubes with tape.
Greetings, my dear friends! And I want to ask a question right off the bat. Share how you tear off your kids from computers? As for me, this is a whole skill. After all, you don’t want to say “no, you can’t”, and you don’t need to, but to encourage, it’s worse for yourself. So what did you come up with and invent? And I will talk about my method. But only this is not my invention, but handed down to us by our ancestors, these are board games for children with their own hands. To the aristocracy, a simple and hitherto valid method! After all, he is the game! What all our crumbs love to do so much!
Play something to make fun for yourself, and even with your own hands! Really, it's a great idea! I have been using it for several years now and have not been disappointed! After all, there are no restrictions, there is no uniformity. Everything is always like the first time! Great!
What do I pay attention to so that the game is interesting and useful for kids? And what materials do I use?
What are we playing?
Our favorite board games are tic-tac-toe, table basketball and football. We also do adventure games, but they don’t cause so many emotions in my son. Let me remind you, he is 4.5 years old. And yes, but, nevertheless, these games are played with pleasure.
Of the purchased favorites: janga, sea battle, loto and checkers. So far, I'm not very good at playing checkers, since the teacher (that's me) also plays as a beginner.
So, our favorite games that we made ourselves in the video:
What you should pay attention to:
- the age of the crumbs;
- interests;
- opportunities.
Why is it important? Because for some, these will be exciting and developing projects, while for others, they will be primitive, like learned material, which no one will like and which should not be allowed.
Guys, do you know what is interesting for your little one personally? It would be good to take into account the needs of children. Someone is crazy about trains, others need bunnies and monkeys. And the third ones need to be taught to count in the game or check according to the traffic rules, how much they know the rules, so that we remain calm when they go somewhere on their own.
We are proud of our kids! Their ability is the occasion for our little boast. And do-it-yourself strategy board games are a way to unlock the potential of the baby and develop it.
Handy materials
May I know your opinion? Friends, what kind of craft material do you prefer?
Probably, I will express the general point of view that this is the one with which at home it is easier for you yourself, or more interesting to do something.
And I will make one more point. Sometimes I don't take new or valuable material. In the course is even junk. Something that happens to be kept, or in the expectation that I can make something useful out of it. For example, corks from plastic bottles or from wine, an old chessboard whose pieces are confused, buttons, pebbles, etc.
Well, when we collected everything: an understanding of what we have to design with the kids, for what and for what purposes. We found out what materials we can use. Do not forget the good mood. Now it remains to get down to business.
Ideas for creativity
If the game is for crumbs 2-3 years old, then the material that we will use should be simple. For older adults, you can think of something serious to entrust them with some of the work that they can handle. Some projects will be didactic, we have to make not only a construction, or a “battlefield”, but also come up with rules, draw up a plot.
Go?!
Table basketball
Great game for kids ages 4 and up. Interesting for adults too. Very cool toy, easy to make. But very useful. We have been playing it for a month every day for an hour with the whole family. For boring winter evenings - a great idea!
%
labyrinths
All kinds of labyrinths can be drawn by yourself, you can print it. You can play with your finger, you can play with a little man or Lego animal, or you can even drive a small car. Of course, the roads then need to be drawn wider. Depending on the difficulty, the game can be suitable for both a 2-year-old and a 13-year-old child.


Find your color
What board games can be made with children with their own hands for the little ones? At 2 years old, the crumbs perfectly distinguish colors. This will be the task of the child.
We take paper of any density and draw 2 lines in the middle, horizontal and vertical. We draw each of the four parts with our own color: blue, red, green, yellow. Here is the work for kids. The little ones can help us. Give them felt-tip pens or colored pencils (preferably soft ones) and let them work.
And even with baby cards, he can help us. In order for the cards to be dense, you can either take cardboard or glue the sheet by folding it 2 or 3 times. Decorate. The size of a card can either be the same as its color box or smaller.
Target. The peanut must put a card on the field of the same color.
Another game with buttons for kids on the video:
Puzzle
Making a puzzle that will be interesting for the whole family to collect is very, very simple. We take a picture, glue it to the cardboard. The drawing can be anything, from a simple emoticon to a map of your country, and cut it into pieces. If everything is clear with the emoticon, the parts will be of arbitrary size and shape, then the map can be cut into regions.
Target. Find a place for each piece. If this is a map, it will be informative for preschoolers to put all the parts together and at the same time get to know their country.
A world map can be bought at stationery, pasted on cardboard or whatman paper, cut. The older the children, the more parts. You can first print a card on a regular sheet and play with a small one. Click on the picture to print it will enlarge.
Our planet for why children 4-5 years old
You can just take a map and print bright pictures of animals and cut them out and lay them out across the continents. So the kid will already have an idea about his planet before school. My son (4.3 years old) just started asking what is a country and who is a king. I'm thinking of making a game like this for him.
The map can also be printed on A4. I also found animals for printing, when printing, uncheck the box: stretch to fit the frame.

Africa

Australia

Taiga

Russia

South America

North America
Puzzles for babies 1-3 years old
If for kids 2-3 years old, then you can make puzzles from 2-3 parts. Some mothers make beautiful felt grooves.
Master class on such wonderful video puzzles:
Walker-walker
Great option for a 5 year old. And it's fun to draw, and it's great to play later. But here you need rules and a plot.
Love to draw? Then part of the work, smaller, you "have to" do it yourself. The rest - entrust the child. What you need for the craft:
- Field;
- Chip;
- cube;
- Cards.
Chips. By the way, participants can also make chips for board games with their own hands, as well as everything else. We make them out of paper. We twist a small bag, in the shape of a cone, glue the edges and cut off the excess along the bottom. It turns out a stable figure. It can be decorated.
Older children will be interested in experimenting and cutting figures out of wood. Although, this material can be used more simply. Cut a thick branch into pieces, remove the bark from it and paint over.
It's even easier to make chips out of felt. Sew 2 small circles of the same size together. Between them, make a gasket of any material. Circles-chips are needed the same size, but different in color.
Field. Decide on its size. It will depend on how many participants you are counting on and on the age of the crumbs for whom this fun is being created (small patterns and pictures for babies are not clearly visible, and are not interesting).
How to draw a field? Everything is simple! Since this is a walker, we will need a “road” along which our character will walk. And parking lots, let's call them cells. Some of them will be "with prizes". For example, “forward”, “backward”, or “wait a little, wait”. But this already applies to the rules. The main thing is not to overdo it. Such "prizes" should not occupy more than 1/3 of all cells.
Another small addition. Such cells can be of different sizes and shapes: round, oval, triangular, square, and even clouds, if it suits the theme of the game. You can make them yourself, draw or cut printed signs and stick them.
And don't forget, everything should be fun and colorful!
rules. They directly depend on the age of the crumbs. They will look like part of a fairy tale: they lived ... and they needed to go ... they decided to get to the right place in a race. But there were obstacles in their way ... Perhaps the baby will be interested in writing this story with you.
cube. And let's try to make a cube for board games with our own hands. We cut out a small cross from paper, consisting horizontally of 3 identical squares, and vertically of 4. We number them. Horizontal - 2, 3, 4. Vertical - 1, 3, 5, 6. Point "3" - the intersection. Do not forget that around, on three sides of the cubes "2", "4", and at the end of the cube "1" there should be additional strips for gluing.
Cards. These are reminders of what to do when you hit one or another stop cell. Cards can be for a specific cell, or, in random order, taken from a pile. You decide. Write it down in the rules.
Video - do-it-yourself board games
That's exactly what I'm waiting for you to tell about your work, how you design fun with kids, and which games are more interesting for them to play! And therefore, write, subscribe to the news, and they will definitely be. Ask questions and leave suggestions yourself, and bring your friends! Always looking forward to you! Till! And happy day!
Card cutting. Dust is interesting: it covers everything very quickly in paper production.
I have been asked many times how a box of cut cardboard can cost 1,500 rubles. What's in it?
- From the chain of formation, that is, starting from the costs of development and production - this is the lower limiter.
- From the economy - how much a person is willing to pay, and what price can be set until competitors gobble up (this is the upper limiter, it also shows what production cost we should fit into).
- And from the cost of analogues-substitutes. In our case, handicraft. That is, making a board game with your own hands.
Let's start with the box
The size of the box is usually determined by the size of the playing field (and most often doubled or quadrupled).- We make our own. Of course, you can take a box for shoes or the Russian Post, but it will be scary and not about the game. The cost of mailboxes is here. As you can see, those for 90 and 120 rubles are suitable for us, but you can keep within 70 rubles (in practice, they get even cheaper - if without a logo).
- Making for the exhibition. In our case of preparing a game that has not yet been released for the exhibition, we need a full-fledged pasting of the box. We do this manually at our production facility using the existing cutting, ordering the printing of liners in a digital printing house, that is, based on one of the standard production boxes. The cost, including manual work, is already about 1000 rubles.
- We make it in a printing house as a pre-print layout. This is a beta box, which you need to check how the inscriptions look, whether there are any problems with the image on the corners, and so on, twist it in your hands, put it in our special cabinet in the office with games (like in a store) and evaluate the visibility in the display from afar. For this beta, a sheet of cardboard is printed in the printing house, on which there is a bottom and a sheet with a lid. Then all this is cut out with ordinary scissors and glued with adhesive tape. It is immediately clear whether something needs to be corrected in the layout or whether we give it to circulation. The cost of such work is about 700 rubles. The box is perfect for presenting the project to the publisher, but not for permanent use - it will unstick and tear very quickly, and its quality is far from “glossy”.
- We do in circulation. Normal industrial boxes have a cost price with circulations of 5-10 thousand pieces, about 40-70 rubles per piece. And this is only the cost for production, excluding logistics and other things. The box for your phone is so strong, beautiful - in the cost, most likely, 150-250 rubles. A box for a hair dryer (ugly) - cheaper than a hundred. For example, our standard box of the Jackal: Treasure Island format with dimensions of 257x257x74 mm, kappa (binding cardboard) thickness of 1.25 mm, ordinary coated paper for gluing, printing and varnish for an edition of 3000 pieces costs 68 rubles (hereinafter, prices ordered by an external author of the game as part of the production of its circulation). But we, of course, print much larger print runs, and it turns out much cheaper.

The only point: the photo is not the connection itself, but the application of glue before the connection.
To understand why a box can cost so much, you have to start from afar - namely, with the general issue of box production. Beautiful large boxes in Russia at affordable prices are able to make 4 factories, and one of them is ours in Podolsk. The rest (not from these factories) are shipped from China or other countries. The problem is in the technical process, for example, lid-bottom boxes (self-assembly is cheaper, but much, much worse for large games):
- First you need to take a sheet of cardboard and draw a cutting on it.
- Then cut out the future constructor for the box (more precisely, two - for the lid and bottom separately). This is done with a bang on a crucible press and is nothing complicated.
- Stack boxes. This is already more difficult, because if the boxes are of different sizes (and, in general, you need at least 4 different sizes), then automating this is quite difficult. Therefore, it is done by hand.
- Folded cardboard boxes need to be pasted over with paper (pasted) - pictures and all sorts of inscriptions will be printed on this paper. It is impossible to print on the cardboard itself, because the paint is absorbed into it in a completely different way (the offset machine does not work on kappa). If you want beautiful - keep the paper. This is also done in most cases by hand on special machines.

Are all boxes handmade? Far from it, but a fully automatic line is an extremely rare phenomenon for Russia. We, for example, have our own, but adventures with this freaking creation of a Chinese engineering genius are drawn to a whole post where small children are not allowed. On the third day of commissioning, for example, it turned out that the power relay was exactly under the vat for boiling glue. And this same glue boils, splashes and closes the contacts tightly with splashes. Then the machine rises, and all the glue hardens inside in thin tubes. We made the first upgrade with a children's sandbox bucket - we protected the relay. Since then, there have been many more upgrades of the same level, only slightly more technologically advanced. Now, fie-fie, it works fine.
Printing any sheet is also a non-trivial story. To print a picture on the box liner, you must first prepare the offset film and make an adjustment. It costs at least 15 thousand rubles: first, color separation is done. What it is for: the printing machine is a block the size of KAMAZ, in which four colors are applied in turn to the sheet. The first block is the first color, the second block is the second, the third is the third, the fourth is the fourth. In mixing, the desired shade of CMYK is obtained - from cyan, purple, yellow and black. We also have a fifth compartment - this is for additional processing of our material, such as varnish or printing with a fixed pantone color. So, you need to prepare and calculate everything so that they are applied correctly - this is color separation and adjustment.
Then offset film is made. From the film, the image is transferred to an aluminum mold. These forms need to be loaded into the machine - also not five seconds (but, for a second, newspapers or leaflets of some candidate could be printed there at that time - that is, downtime is paid). Then the fitting starts. To launch a print run, you need to spend about 200-300 sheets for print runs of up to 5,000 pieces. With large runs, there may be several adjustments, conditionally, the adjustment is corrected every hour, because it gradually goes astray. Fitting - this is the accuracy of hitting the color, the accuracy of matching the face and turnover, and so on. At the time of makeready, the printer runs around the machine and slightly tightens the sheet stops, or shifts them, adds a little ink to the section, and so on. We print games for exhibitions in a print run of 50 pieces both in digital and offset - yes, they are cheaper to do in digital, but there will be no quality for display. The number does not allow you to accurately get your face into a turn, it constantly jumps up to 2 millimeters, regardless of the adjustment, digital machines (except for prohibitively expensive ones) cannot accurately position the sheet. In general, solid randomness, disappointment and rather low-quality color (not least because of this randomness). Large-format printing (also a number, but different) - the quality is worse there, but they can print. The price of turning on the machine is 300 rubles (this is even for one sheet). The standard sheet is B3, that is, it doesn’t fit as much as we would like. There are also features of paper - for example, a coated layer must be applied to cardboard. This is done for each sheet of the box, for cards, fields and other components. And this is another simple case when there is no pantone or varnishing.
Knocking out the box is also a surprise. In general, this is a stamp on the lid liner, a stamp on the bottom of the liner and 2 stamps on the cardboard for these boxes. There are curly exceptions. A stamp for a crucible is plywood, in which the desired pattern is burned with a laser, and then knives of a certain configuration are inserted into this pattern, then the knives are glued on both sides with rubber bands of a certain hardness (for different types of cutting, different hardness). If you do not put rubber bands, then after a couple of blows all the knives will be bent - you need to soften the blow, giving such a load on the knife that will allow you to cut through the products, but not deform the knife. Also fitting and stamp production.
Do you think that's it with the box? But no. Now we need a lodgement. It's the kind of thing that keeps the components of the game in place - with slots for cards and so on. You can make it simple and a little scary out of cardboard (it will move away from the walls, small chips will wake up under it, but it is suitable for games from the field and cards). And you can - inflate in the form of plastic.

It is done like this:
- Handicraft. We take cardboard and just bend it as it will. It turns out, as a rule, not very much, but, in general, it doesn’t really interfere, given that our box is no longer from the game at all.
- In circulation. You need a form and a special machine. The scheme for the production of a plastic lodgement does not differ much from the scheme for the production of a plastic bottle (only bottles are riveted in millions, and lodgements - in thousands). The cost of plastic - 80-90 rubles. In our handicraft case, cardboard ones are folded for three prototypes. The arithmetic is also simple. Process: development of a drawing, creation of a 3D model, then preparation for the manufacture of a punching die, frames and a punch for mechanical drawing (if necessary), color selection and cutting of the material being processed - the process of vacuum thermoforming of the lodgements. The cost of equipment is on average from 50 to 100 thousand rubles. In total, in a minimum circulation of 1000 pieces, the price for a lodgement is about 80-90 rubles. Another question is that if you make 5,000 lodgements (like we do), then the price may drop to 30-40 rubles.
- To the exhibition. For a prototype, you can make equipment not from aluminum, but from MDF, it costs 15 thousand rubles. 10 pieces maximum, and the lodgements will turn out to be slightly different in shape. Still need an adjustment. The polymer takes about 30 rubles for each lodgement.
- At the printing house. In the case of a “household order” in a printing house, a cardboard lodgement in the spirit of “brr”, made with manual labor by cutting out according to a sketch, is 200-300 rubles per unit. If it is done correctly - 5000 rubles for a stamp, 2 rubles for a blow (1 blow = 1 lodgment).
Cards
Cards are most often in a box from 50 to 100 pieces.- Handicraft. You can take card protectors (200 rubles), an ordinary deck in their size (70-100 rubles) and put pieces of paper on top of ordinary cards in protectors - this way the cards can be mixed, and this is how prototypes are usually brought to us. Or buy prototyping cardboard cards and write by hand on them - this is how we test games in alpha.
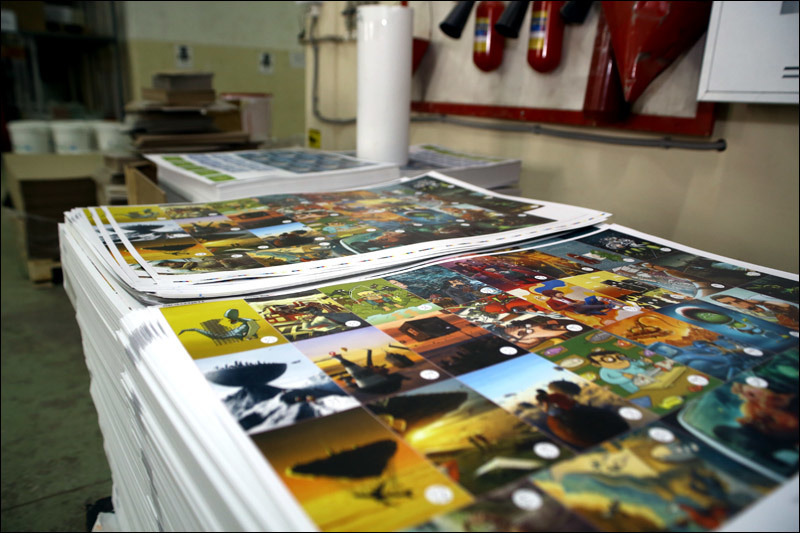
- More or less beautiful maps should be made for the exhibition. To do this, we print them on an accurate color printer, take them to a specialized production like ours or a printing house with a tunnel press as in the picture at the top of the post (or, in extreme cases, with a manual corner rounder). We could have done it before our own production, but it’s cheaper to get to the printing house, we are in Podolsk. Then, first, we cut the sheets with printed cards into rectangles, and then we level and round the corners on the press. Such a deck of 100 cards costs from 3 to 3.5 thousand rubles. It looks good, although there are displacements of the face relative to the turnover due to the inaccuracy of printing with a number.
- For prototype to play or demonstrate to a publisher, so you don't have to bother. You just need to print the cards in a printing house and ask them, or cut the sheets into rectangles with scissors yourself. The cost of 100 cards will be about 2 thousand rubles.
- In circulation- a deck of 100 cards in the size of 63 x 89, printed on cardboard 260 grams, 4 + 4, wd-varnish, and various turnovers will cost approximately 70 kopecks per card with a circulation of 3000 pieces. On two sheets, a maximum of 100 cards will lie. 101 cards - you no longer fit into the sheet - plus an adjustment and all the consequences. Plus a separate corrugation for packaging and laying work. If you have watched the movie "War dogs" about 100 million Kalashnikov rounds, you should understand how important this is.
"Stupid Casual" ordered cards for the Imaginarium from us - more precisely, he began to order after a series of "shaggy" around the edges at another production
Plastic cards will be even more expensive. On the run, the need to accurately match the color of the shirts emerges (this immediately means a very accurate pantone fit). Plus, there are often unformatted cards, for example, very small ones - these are new forms. Again, in our case, the printing house cuts with its hands, in production it is still necessary to adjust the machine - this is quite a long time.
That's all - if the stamp is standard. We have several dozen of them, and some are repeated - to avoid downtime when the stamps leave for sharpening. A stamp for non-standard, taking into account delivery, will be released at about 20,000 and is done in 2 weeks. There is only one factory in the country that is engaged in the production of tunnel dies. They also make tunnel presses, and they also need to sharpen these stamps.
Field
The field is made according to the same principle as the box - from several layers of material. Fortunately, you need to bend it a little, and there is no volume pasting there. Therefore, everything is relatively simple.- Handicraft. We take a large sheet of cardboard and draw everything on it, or paste a printout on it. 50 rubles per sheet and 20 rubles per printout.
- To the exhibition it is better to do this: we print the image on the liner in digital or wide format. We go to the printing house, where they know how to paste (glue) binding cardboard with liners. We cover from the face with our liner, and from the back with beautiful white or black paper. Let our folding field have a size of 500 * 250 mm, width + cardboard - then the price is 550 rubles.
- For publisher presentation it is easier, as with the box, to print the field on ordinary cardboard - this will be enough to get the right impression of the game. The issue price is 350 rubles.
- With circulation 3000 pieces of our field 500x250 mm will cost about 56 rubles per unit.

Laminating boxes, the same is often done with margins
rules
- Artisanally- a pack of printouts, say, 10 rubles per sheet (this is the price of print services at the metro, it's cheaper on your own printer - but do not forget about the price of the printer).
- At the printing house or for an exhibition: 200*200, 12 stripes 4+4, paperclip = 650 r. Very expensive due to a single print run.
- In circulation- 25 rubles per piece for 1000 pieces.
Chips
The figurines are difficult to make. Here is an example process:

The final step is casting into a polymer mold, in which the metal turns into a figure.
- Handicraft: take chips from another game.
- For the exhibition: you can make figurines on an industrial high-precision 3D printer or cast single metal products not just expensive, but horse-radish expensive. Model, form - or model and normal printer. You can also take typical wooden ones for a prototype, of course.
- In a circulation of 10 thousand pieces per model. In metal, the most difficult thing is a master copy (made of silver, this is necessary for making a casting mold). Usually the cost of a 3D model and making a master copy is very high. Then a casting run, which does not make sense for runs of up to 10,000 pieces. There is a casting "in silicone", there a figurine in the cost price at the factory is from 20 to 100 rubles, depending on the complexity and size.
- Less than 10 thousand pieces. It is rational to use a tree here. There is nothing more difficult in a tree than coloring. There's a magical story here. A painting machine (so that the paint lays down without drops, does not flow, does not change color, and then the figures do not paint the table when pressed) costs 20 thousand euros. We traveled around several German factories, looking after used ones. Didn't find it cheap. Then they complained to "Kuzmich" - a local engineer, who lies for half a day under the products of the AZLK plant. He thought about it and said what he would do if we brought him home appliances for analysis. As a result, from parts of a refrigerator and a washing machine, heaps of plywood and pipes, he bungled a Frankenstein monster. Then, a year and a half later, the Austrians came to see how everything works. They were very surprised by the quality of the coloring, which in some places is even higher than the German one. Foreigners almost had an attack there, the second in a day. The first happened when they saw an industrial zone with men before payday.
friable
Cardboard markers, tiles and compound fields are made like this:
Everything else is purchased. Cubes, hourglasses, markers - this is China. In our case, our warehouse stock. Hourglasses, for example, in Russia are made only for medicine (terrible and large). The rest is about the same. They learned how to make wooden cubes here, before it was necessary to have 3 countries in the process. Small-scale bakellite production (this is an artificial polymer stone, escalator steps and poker chips are made from it, only harder) went bankrupt two years ago. We are now going to make cubes at home. Something like this.
That is why a self-made game of the same quality as a production copy costs 5-10 thousand per unit (this is when we take it to an exhibition). If all the stamps are new, then the price would be higher by another 15-20 thousand.
The same in the printing house "by hand" somewhere around 2000-2500 (excluding stamps).
Or the same for 1200-1500 retail on the shelf.
Economic pricing
Taking into account the cost of production, this factor has almost no effect. More precisely, it affects the choice of materials: most often you have to replace plastic cards with paper ones and come up with something else with figurines. How much people are willing to pay for board games is determined not by production, but by the price of other gifts. The maximum price of normal demand for Moscow is 2000-2500 rubles for a large box with a bunch of everything, for other cities - 1000-1500 rubles. Therefore, everything interesting should fit up to 2000 rubles iron.Industrial pricing
There is one more thing besides production. Development. You need to draw illustrations (this is at least 50-70 thousand), make up everything, do proofreading, do pre-press work (including color correction and optimally arrange everything on the sheet), do a bunch of logistics, have intermediate and final warehouses for components and finished things, a workshop for drying boxes, a workshop for assembling components inside the box, conducting quality control and much more. Plus a license if the game is foreign or royalties to a domestic author (5-10% of the wholesale price). This partRelated publications
-
 Walking Dead: The Final Season walkthrough When will the walking dead second episode come out
In this walkthrough, only one of the options for passing the game is considered! + Described finding all collectibles. Episode 1:...
-
 Passage of the plot Truckers 3 secrets of the game
Third life behind the wheel, Three centuries without sleep. "You are not alone", group DDT Rassvet. A few hundred miles behind, pink mountains ahead, and behind them...